

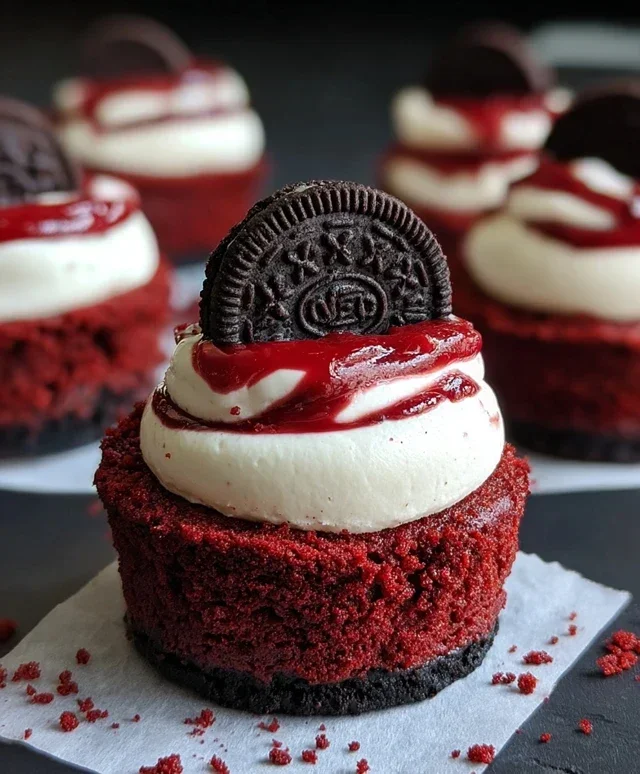
Mini Red Velvet Oreo Cheesecakes are more than just a dessert; they’re a decadent dream come true, a perfect bite-sized indulgence that hits all the right notes. Have you ever craved a treat that’s simultaneously rich, creamy, and satisfyingly chocolatey? That’s precisely the magic of these delightful creations. People absolutely adore them because they combine two of the most beloved flavors in existence: the unmistakable tang and vibrant hue of red velvet, expertly layered with the classic, crum extractbly goodness of Oreos. What truly sets these Mini Red Velvet Oreo Cheesecakes apart is their sophisticated yet approachable charm. They’re elegant enough for a special occasion but incredibly easy to whip up for a casual craving. Each miniature marvel offers a concentrated burst of flavor, making them the ultimate crowd-pleaser and a guaranteed way to impress your taste buds (and anyone lucky enough to share them with you!).

Mini Red Velvet Oreo Cheesecakes
Get ready to delight your taste buds with these incredibly decadent Mini Red Velvet Oreo Cheesecakes! These little wonders are a perfect blend of classic cheesecake richness, the satisfying crunch of Oreos, and the irresistible allure of red velvet. They’re surprisingly easy to make and are guaranteed to be a showstopper at any gathering, or simply a wonderful treat for yourself. The combination of a chocolate cookie crust, a creamy, tangy cheesecake filling infused with vibrant red velvet flavor, and the subtle sweetness makes each bite an experience. We’re using some fantastic ingredients to achieve that signature flavor and texture, ensuring a professional-looking and tasting dessert right from your own kitchen.
Ingredients:
Oreo Crust Preparation
First things first, let’s get that delicious Oreo crust ready. This forms the perfect base for our mini cheesecakes. You’ll want to take your 12 Oreo cookies and either place them in a food processor and pulse until they form fine crum extractbs, or put them in a sturdy zip-top bag and crush them with a rolling pin until you have a fine consistency. The goal is to get them as fine as possible for a cohesive crust.
In a medium bowl, combine the Oreo crum extractbs with 3 tablespoons of all-purpose flour, 1/2 cup of cocoa powder, 1/2 cup of granulated sugar, and a pinch of salt. Whisk these dry ingredients together thoroughly to ensure everything is evenly distributed. This will help create a richer chocolate flavor in the crust and give it a little more structure.
Next, pour in the 1/4 cup of melted unsalted butter. Stir this mixture until it resembles damp sand and holds together when you squeeze it. This is your crust mixture. If it seems a little too dry and crum extractbly, you can add another teaspoon or two of melted butter, but be careful not to make it greasy. The texture should be perfect for pressing into your muffin tin.
Forming the Crusts
Now, it’s time to get this crust into our muffin tin. You’ll want to lightly grease a standard 12-cup muffin tin or line it with paper liners. If you’re using paper liners, you might want to use a heavier duty liner to prevent any soggin extractess from the cheesecake filling.
Divide the crust mixture evenly among the 12 muffin cups. Use the bottom of a small glass or your fingers to firmly press the crum extractbs into the bottom of each cup, creating a compact and even layer. Don’t be shy with this step; a well-compacted crust is key to preventing it from crum extractbling apart when you serve the cheesecakes. Once pressed, place the muffin tin in the freezer for about 15-20 minutes while you prepare the cheesecake filling. This chilling step helps the crust set and become firm, making it easier to handle.
Red Velvet Cheesecake Filling
While the crusts are chilling, let’s whip up the star of the show: the red velvet cheesecake filling. In a large bowl, beat the 8 ounces of room-temperature cream cheese until it’s completely smooth and creamy. Make sure your cream cheese is truly at room temperature; this is crucial for achieving a lump-free filling. If it’s still cold, it will be difficult to incorporate smoothly.
Add the 1 room-temperature egg to the cream cheese and beat on low speed until just combined. Over-beating at this stage can introduce too much air, which can cause cracks in your cheesecakes. Next, stir in the 1/4 cup of sour cream, 1/4 cup of granulated sugar, 1 tablespoon of cocoa powder, and 1/2 teaspoon of vanilla extract. Beat on low speed until everything is well incorporated and the mixture is smooth. Again, avoid over-mixing.
Now for the vibrant red velvet color! Add your red gel food coloring, starting with a few drops and mixing until you achieve your desired shade of red. Gel food coloring is highly concentrated, so a little goes a long way. You’re aiming for a deep, rich red that’s characteristic of red velvet. Mix until the color is uniform throughout the batter. This is the point where the magic really happens, transforming a classic cheesecake into a festive red velvet dream.
Baking and Cooling
Preheat your oven to 325 degrees Fahrenheit (160 degrees Celsius). Remove the chilled muffin tin from the freezer. Carefully spoon the red velvet cheesecake filling evenly over the Oreo crusts in each muffin cup, filling them about two-thirds to three-quarters full. Try to get the filling as even as possible across all the cups for consistent baking.
Bake for 18-22 minutes, or until the edges of the cheesecakes are set but the centers still have a slight jiggle when you gently tap the pan. Over-baking will result in a dry cheesecake, so keep a close eye on them. Once baked, turn off the oven and let the cheesecakes cool in the oven with the door slightly ajar for about 30 minutes. This gradual cooling process helps prevent cracking. After this, remove the cheesecakes from the oven and let them cool completely on a wire rack at room temperature.
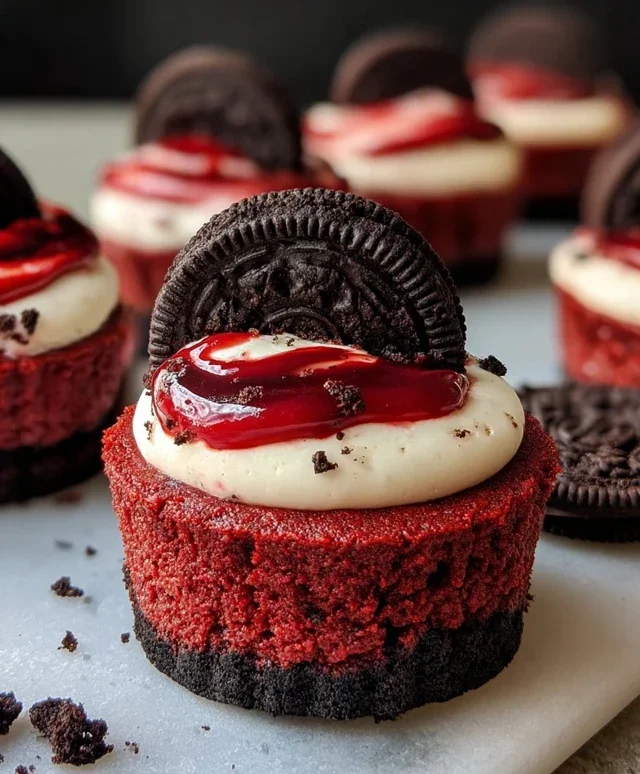
Once completely cooled, cover the muffin tin loosely with plastic wrap and refrigerate for at least 4 hours, or preferably overnight. Chilling is essential for the cheesecakes to fully set and develop their flavor and texture. When you’re ready to serve, carefully remove the mini cheesecakes from the muffin tin. You can use an offset spatula or a thin knife to gently loosen the edges if needed. These Mini Red Velvet Oreo Cheesecakes are absolutely divine on their own, but they’re also wonderful garnished with a dollop of whipped cream or a drizzle of chocolate ganache. Enjoy every single bite!
Conclusion:
There you have it – a delightful recipe for Mini Red Velvet Oreo Cheesecakes that’s sure to impress! These little treats are fantastic because they combine the classic decadence of red velvet with the irresistible crunch of Oreos, all in a perfectly portioned cheesecake. The rich, creamy filling nestled on a cookie crust is simply divine. They are perfect for parties, holidays, or just when you need a special dessert to brighten your day. I love serving them chilled, perhaps with a dollop of whipped cream or a scattering of chocolate shavings for an extra touch of elegance. Don’t be afraid to get creative with variations! You could try adding a swirl of cream cheese frosting on top or even incorporating a few mini chocolate chips into the batter for a double chocolate punch.
I genuinely encourage you to give this Mini Red Velvet Oreo Cheesecake recipe a try. The steps are straightforward, and the result is a showstopper that tastes even better than it looks. It’s a wonderful way to experiment with flavors and create something truly memorable. You won’t regret the effort – these mini cheesecakes are a guaranteed crowd-pleaser!
Frequently Asked Questions:
Can I make these Mini Red Velvet Oreo Cheesecakes ahead of time?
Absolutely! These mini cheesecakes are excellent candidates for making ahead. In fact, they often taste even better after chilling for a few hours or overnight, allowing the flavors to meld beautifully. Store them in an airtight container in the refrigerator for up to 3 days.
What if I don’t have mini cheesecake pans?
No worries if you don’t have specialized mini cheesecake pans! You can adapt this recipe by using a standard muffin tin lined with paper or foil cupcake liners. Just be sure to press the Oreo crust firmly into the bottom of each liner. You may also need to adjust the baking time slightly; keep an eye on them and bake until the edges are set and the centers are just slightly jiggly.
Can I make a dairy-free version?
While this specific recipe is designed for traditional dairy ingredients, you could certainly explore dairy-free alternatives. For the cream cheese, look for a good quality dairy-free cream cheese substitute. For the sour cream, a plain, unsweetened dairy-free yogurt would work well. Ensure your Oreos are dairy-free as well, as some varieties contain them. Keep in mind that texture and taste may vary slightly with substitutions.
Mini Red Velvet Oreo Cheesecakes
Decadent mini cheesecakes with a red velvet Oreo crust and a creamy red velvet cheesecake filling.
Ingredients
-
12 Oreo cookies
-
1/4 cup unsalted butter, melted
-
8 oz cream cheese, room temperature
-
1 egg, room temperature
-
1/4 cup sour cream, room temperature
-
1/4 cup granulated sugar
-
1 tablespoon cocoa powder
-
1/2 teaspoon vanilla extract
-
Red gel food coloring
Instructions
-
Step 1
Crush Oreo cookies into fine crumbs. Mix with melted butter and press into the bottoms of 12 mini muffin cups lined with paper liners. -
Step 2
In a medium bowl, beat cream cheese until smooth. Gradually beat in granulated sugar until well combined. -
Step 3
Beat in the egg, then the sour cream and vanilla extract until just combined. Do not overmix. -
Step 4
In a small bowl, whisk together cocoa powder and red gel food coloring. Add to the cream cheese mixture and stir until evenly colored. -
Step 5
Spoon the cheesecake filling evenly over the Oreo crusts. -
Step 6
Bake at 325°F (160°C) for 18-20 minutes, or until the edges are set and the centers are slightly jiggly. -
Step 7
Let cool completely in the muffin tin before refrigerating for at least 2 hours, or until firm.
Important Information
Nutrition Facts (Per Serving)
It is important to consider this information as approximate and not to use it as definitive health advice.
Allergy Information
Please check ingredients for potential allergens and consult a health professional if in doubt.

Leave a Comment