

Easter Bunny Coconut Tails are a delightful treat that instantly transport me back to childhood Easters. There’s something undeniably magical about these fluffy, sweet, and subtly tropical confections. They’re not just visually adorable with their whimsical bunny tail shape, but their melt-in-your-mouth texture and bright coconut flavor are incredibly addictive. I love how they offer a refreshing alternative to heavier Easter candies, making them a perfect addition to any festive spread. These Easter Bunny Coconut Tails are special because they’re surprisingly simple to make, allowing you to whip up a batch of pure joy without a fuss. Whether you’re looking for a charming addition to your Easter dessert table or a fun activity to do with loved ones, these little bites of paradise are sure to be a hit. Get ready to hop into spring with this incredibly satisfying recipe!

Easter Bunny Coconut Tails
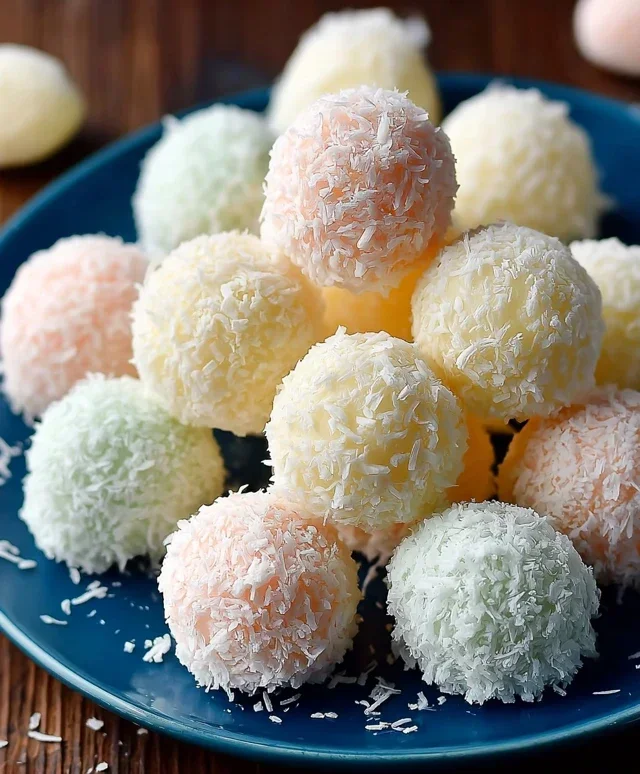
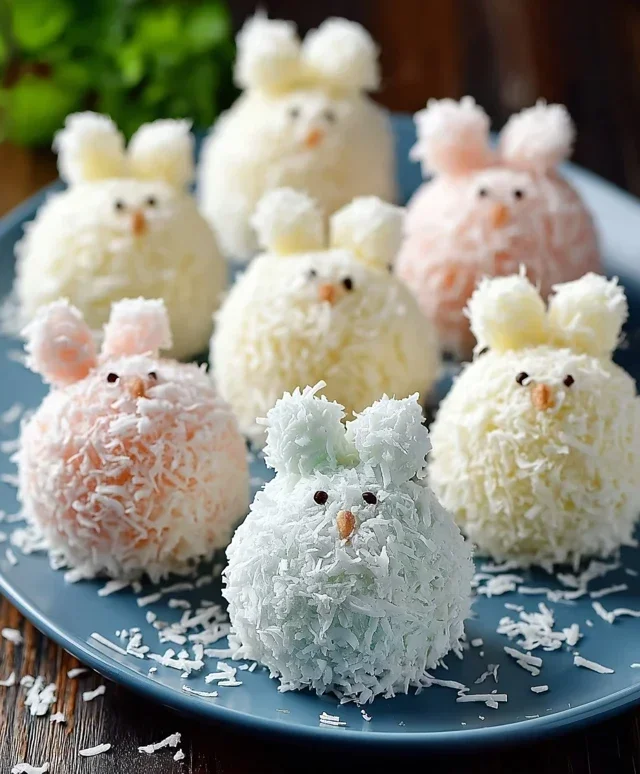
Easter is a time for joy, springtime blooms, and of course, delicious treats! This year, I wanted to create something truly special and whimsical, something that would bring a smile to faces both young and old. These Easter Bunny Coconut Tails are the answer! They’re incredibly simple to make, requiring no fancy baking skills, and the results are utterly delightful. Imagin extracte fluffy, sweet coconut creations, shaped like adorable bunny tails, dipped in creamy white chocolate and adorned with a touch of festive pink. They’re perfect for Easter baskets, dessert tables, or just a sweet afternoon snack. I’ve been looking forward to sharing this recipe with you all, as it’s become a new family favorite.
Ingredients:
Crafting Your Coconut Tails: The Melting Magic
The foundation of our Easter Bunny Coconut Tails lies in creating a wonderfully pliable and sweet coconut mixture. This is where the magic begin extracts, transforming simple ingredients into a delightful base for our bunny tails.
1. The first step is to gently melt our butter and marshmallows together. In a medium-sized, microwave-safe bowl, combine the ¼ cup of butter and 1½ cups of mini marshmallows. I like to microwave these in 30-second intervals, stirring well after each interval. This prevents the marshmallows from scorching or boiling over. You want them to be fully melted and smooth, creating a sticky, gooey binder for our coconut. Be patient here; it might take a couple of rounds in the microwave, but the goal is a uniform, glossy mixture. Once melted, carefully remove the bowl from the microwave.
2. Now it’s time to infuse our mixture with flavor and that signature vanilla essence. Stir the 1 teaspoon of vanilla extract into the melted marshmallow and butter mixture. The vanilla adds a subtle but important layer of warmth and sweetness that complements the coconut beautifully. Mix it thoroughly until it’s completely incorporated.
3. Next, we’ll introduce our star ingredient: the coconut! Add the 2 cups of shredded coconut to the bowl with the marshmallow mixture. This is where you’ll want to get your hands (or a sturdy spoon or spatula) involved. Stir and mix everything together until the shredded coconut is thoroughly coated in the sticky marshmallow mixture. It will be a bit clumpy and chewy at this stage, and that’s perfectly normal. You’re aiming for a consistent texture where every strand of coconut is embraced by the sweet binder. Make sure there are no dry pockets of coconut. I often find using my hands, lightly greased with a bit of cooking spray or a tiny dab of butter, helps to really get everything incorporated evenly.
Shaping Your Bunny Tails
With our coconut mixture ready, it’s time to give it its adorable bunny tail form! This is a fun and tactile part of the process.
4. Once the coconut mixture has cooled slightly, so it’s manageable to touch but still pliable, it’s time to shape your bunny tails. Take small portions of the mixture, about a tablespoon at a time, and roll them between your palms to form little, round balls, mimicking the shape of bunny tails. They don’t need to be perfectly uniform; a little variation adds to their charm. As you shape them, place them on a baking sheet lined with parchment paper. The parchment paper is crucial here, as it prevents the sticky tails from adhering to the baking sheet. If the mixture becomes too sticky, you can lightly grease your hands with a little cooking spray or a small amount of butter. This part is quite therapeutic and can be a great activity to do with children.
The Sweet Dip and Decoration
The final touches elevate our coconut tails into true Easter treats. This is where the visual appeal comes to life.
5. Now for the delightful coating! In a microwave-safe bowl, melt the 1 cup of white chocolate chips. Microwave them in 30-second intervals, stirring between each interval, until they are completely smooth and pourable. Be careful not to overheat the white chocolate, as it can seize and become lumpy. Once melted, you can either dip each coconut tail directly into the white chocolate, coating about two-thirds of it, or use a spoon to drizzle the chocolate over them. For a cleaner finish, I prefer to use a fork. Gently place a coconut tail onto a fork, dip it into the melted white chocolate, allowing any excess to drip back into the bowl, and then place it back onto the parchment-lined baking sheet.
6. While the white chocolate is still wet, it’s time for the festive flourish! Take your pink candy melts and melt them according to package directions, usually in the microwave in short intervals, stirring frequently. Once melted and smooth, spoon the pink candy melts into a small piping bag or a resealable plastic bag with a tiny corner snipped off. Lightly pipe little dots or a small swirl onto the white chocolate-coated part of each bunny tail to resemble the blush of a bunny’s cheek. This is where you can get creative! You can also add a tiny pink nose if you’re feeling extra artistic. Allow the white chocolate and candy melts to set completely. This usually takes about 15-20 minutes at room temperature, or you can speed up the process by placing the baking sheet in the refrigerator for about 10 minutes. Once set, your adorable Easter Bunny Coconut Tails are ready to be enjoyed!
Conclusion:
And there you have it! These Easter Bunny Coconut Tails are an absolute delight, perfect for adding a touch of festive fun and deliciousness to your Easter celebrations. Their simple yet impressive nature makes them a fantastic choice for bakers of all skill levels. The tender, moist coconut interior, coated in sweet white chocolate and adorned with those adorable bunny ears, is sure to be a hit with both children and adults. They truly embody the spirit of Easter – sweet, cheerful, and wonderfully handmade.
These delightful treats are incredibly versatile. Serve them as part of your Easter dessert spread, pack them into goody bags for an Easter egg hunt, or even enjoy them as a sweet afternoon pick-me-up. For a different twist, consider drizzling them with a bit of dark chocolate for a visual contrast or adding a touch of edible glitter for extra sparkle.
I truly encourage you to give this Easter Bunny Coconut Tails recipe a try. It’s a rewarding and enjoyable baking project that yields incredibly cute and tasty results. Get creative, have fun in the kitchen, and spread some Easter joy with these delightful creations!
Frequently Asked Questions about Easter Bunny Coconut Tails:
Q: How should I store these coconut tails?
You can store your finished Easter Bunny Coconut Tails in an airtight container at room temperature for up to 3-4 days. If your kitchen is particularly warm, you might consider storing them in the refrigerator to prevent the chocolate coating from melting, though they are best enjoyed at room temperature.
Q: Can I make these coconut tails ahead of time?
Yes, absolutely! These are a perfect make-ahead treat. You can prepare and assemble the coconut tails a day or two before you plan to serve them. Simply store them in an airtight container as mentioned above. This allows you to focus on other Easter preparations.
Q: What if I don’t have white chocolate? Can I use another type?
While white chocolate is classic for the “bunny” look, you can certainly experiment! Milk chocolate or dark chocolate would also be delicious coatings. If using darker chocolate, you might want to consider adding a tiny bit of coconut oil to help it achieve a smoother consistency for dipping.
Easter Bunny Coconut Tails
Sweet and fluffy coconut tails dipped in white chocolate and decorated for Easter.
Ingredients
-
2 cups shredded coconut
-
1½ cups mini marshmallows
-
¼ cup butter
-
1 teaspoon vanilla extract
-
1 cup white chocolate chips
-
Pink candy melts for decoration
Instructions
-
Step 1
Combine shredded coconut, mini marshmallows, and butter in a microwave-safe bowl. -
Step 2
Microwave on high for 1 minute. Stir well. -
Step 3
Microwave for another 30 seconds, stir until marshmallows are melted and mixture is combined. Stir in vanilla extract. -
Step 4
Shape the mixture into bunny tail shapes and place on parchment paper. -
Step 5
Melt white chocolate chips according to package directions. Dip the coconut tails in the melted white chocolate, leaving a portion undecorated for the tail fluff. -
Step 6
Melt pink candy melts and drizzle over the undecorated portion of the tails or use to create small pink dots for a bunny tail effect. -
Step 7
Allow to set completely before serving.
Important Information
Nutrition Facts (Per Serving)
It is important to consider this information as approximate and not to use it as definitive health advice.
Allergy Information
Please check ingredients for potential allergens and consult a health professional if in doubt.

Leave a Comment