

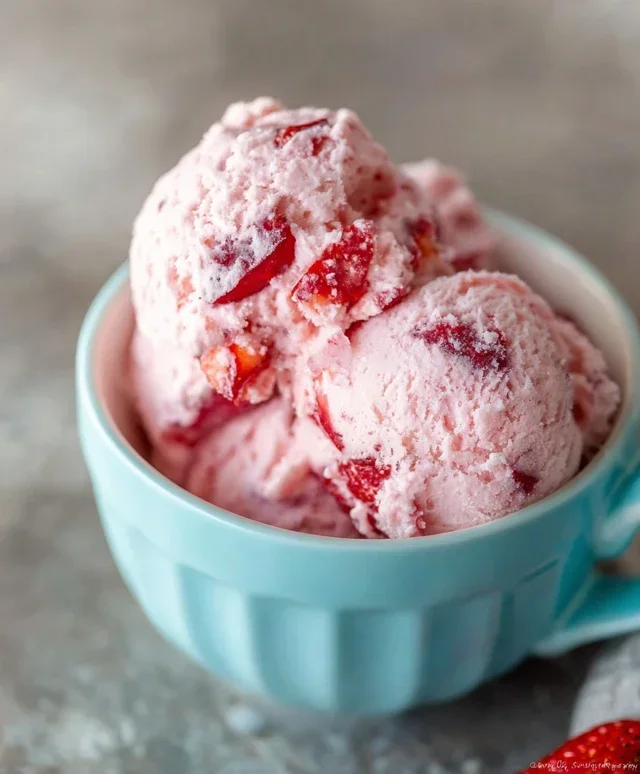
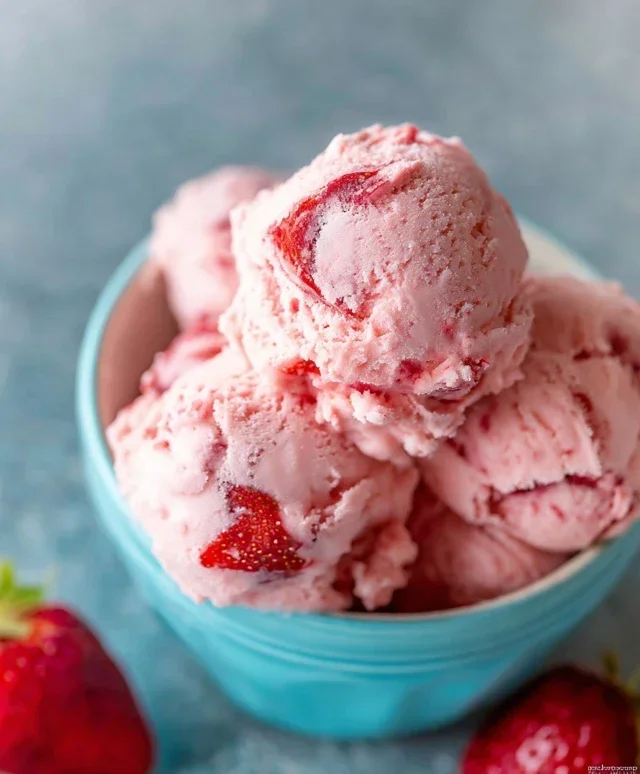
Homemade strawberry ice cream is more than just a dessert; it’s a creamy, dreamy escape to summer days, a vibrant burst of pure, unadulterated joy. Imagin extracte this: the sweet, sun-ripened fragrance of fresh strawberries swirling into a velvety base, creating a flavor so intense and satisfying that it instantly transports you. There’s a reason why so many of us hold a special place in our hearts for this classic treat. It’s the quintessential taste of childhood, of backyard barbecues, and lazy afternoons spent with loved ones. What makes homemade strawberry ice cream truly special, though, is the ability to control every single ingredient, ensuring a richness and authenticity that store-bought versions simply can’t replicate. We’re talking about real fruit, pure cream, and a touch of magic that only comes from crafting it with your own hands. Get ready to experience the ultimate in frozen deliciousness!
Your Guide to Perfect Homemade Strawberry Ice Cream
Let’s dive into making this incredible treat!

Homemade Strawberry Ice Cream
There’s something truly magical about homemade ice cream. The creamy texture, the intense, pure flavor – it’s a world away from anything you’ll find in a store. And when it comes to flavors, strawberries are a classic for a reason. Their sweet, slightly tart profile lends itself beautifully to ice cream, creating a refreshing and delightful treat that’s perfect for a warm afternoon or a special occasion. Making strawberry ice cream from scratch might sound intimidating, but I promise you, it’s surprisingly simple and incredibly rewarding. Forget the complicated custard bases; this recipe focuses on fresh, vibrant strawberry flavor and a luxuriously smooth texture that will have everyone asking for seconds.
Ingredients:
Instructions:
1. Prepare the Strawberries: The first step to achieving that incredible strawberry flavor is to properly prepare our star ingredient. Take your hulled and diced strawberries and place them in a medium bowl. To this, we’ll add the honey and granulated sugar. The sugar will help draw out the natural juices from the strawberries, creating a more concentrated flavor base, while the honey adds a lovely depth and a hint of floral sweetness that complements the berries beautifully. Now, gently stir in the lemon juice. The lemon juice isn’t just for taste; it acts as a natural flavor enhancer, brightening the strawberry flavor and preventing the ice cream from tasting overly sweet or flat. Let this mixture sit for about 15-20 minutes, stirring occasionally. You’ll notice the strawberries will start to soften and release their vibrant juices, forming a syrupy concoction. This maceration process is key to unlocking the full potential of the strawberries.
2. Purée the Strawberry Mixture: Once the strawberries have had a chance to macerate and release their delicious juices, it’s time to transform them into a smooth purée. You can do this using a blender or a food processor. Add the entire contents of the bowl – strawberries, juices, honey, sugar, and lemon juice – into your chosen appliance. Blend until you achieve a smooth, lump-free purée. You want it to be as silky as possible. If you prefer a little texture in your ice cream, you can pulse it a few times instead of blending it completely smooth. However, for that classic, luxurious ice cream experience, a smooth purée is ideal. If you find your purée is a bit too thick or you’re concerned about any stray seeds, you can pass it through a fine-mesh sieve at this stage, pressing down on the solids to extract all the flavorful liquid. This is an optional step, but it guarantees an exceptionally smooth final product.
3. Combine the Ice Cream Base: Now that we have our luscious strawberry purée, it’s time to create the creamy foundation of our ice cream. In a separate, large bowl, pour in the heavy whipping cream and the half and half. Add the vanilla extract to this mixture. The vanilla is a fantastic supporting player, enhancing the sweetness and rounding out the flavors without overpowering the delicate strawberry notes. Whisk these liquids together until they are well combined. Then, gently fold in the strawberry purée. Mix until the color is uniform and the beautiful pink hue is evenly distributed throughout the cream mixture. You’ll see the vibrant color of the strawberries infuse the entire base. Be careful not to overmix at this stage; we just want everything to be incorporated.
4. Chill the Base: Before we churn our ice cream, it’s crucial to chill the base thoroughly. This step is non-negotiable if you want the best texture. Pour the combined strawberry and cream mixture into a clean container, cover it tightly, and refrigerate for at least 4 hours, or ideally, overnight. The colder the base, the faster and more efficiently it will churn, resulting in smaller ice crystals and a creamier, smoother ice cream. This chilling period allows the flavors to meld and develop further, creating a more complex and delicious final product. Think of it as letting the ingredients get to know each other and harmonize before their big churning debut.
5. Churn and Freeze: This is where the magic truly happens! Once your ice cream base is thoroughly chilled, it’s time to churn it according to your ice cream maker’s instructions. Typically, this involves pouring the cold base into your pre-frozen ice cream maker bowl and letting it churn for about 20-30 minutes, or until it reaches a soft-serve consistency. Don’t be tempted to open the lid too often while it’s churning, as this can release cold air and affect the churning process. Once churned to your desired consistency, carefully transfer the ice cream to an airtight container. For the firmest, scoopable ice cream, press a piece of parchment paper or plastic wrap directly onto the surface of the ice cream before sealing the container. This helps prevent ice crystals from forming on top. Place the container in the freezer for at least another 2-4 hours to allow it to firm up completely. The anticnon-alcoholic ipation is the hardest part, but the reward is a scoop of pure, homemade bliss. Enjoy every creamy, fruity bite!
Conclusion:
Making your own homemade strawberry ice cream is an incredibly rewarding experience, offering a burst of fresh, vibrant flavor that store-bought versions simply can’t replicate. This recipe is fantastic because it highlights the natural sweetness and bright tang of real strawberries, creating a luscious, creamy texture that’s utterly delightful. The simplicity of the ingredients means you can enjoy a truly authentic strawberry taste. It’s perfect for warm summer days, a special dessert, or anytime you crave a sweet treat. Don’t hesitate to give this a try – the satisfaction of creating such a delicious frozen dessert from scratch is immense!
For serving, this homemade strawberry ice cream is magnificent on its own, but it also shines alongside warm fruit crum extractbles, brownies, or even a simple slice of pound cake. Feel free to get creative with variations! You can add a swirl of balsamic glaze for a sophisticated twist, fold in some fresh basil for an unexpected herbaceous note, or even churn in some dark chocolate chips for a delightful contrast.
Frequently Asked Questions:
Q: What’s the best way to get really ripe strawberries for this recipe?
A: Look for strawberries that are bright red all over, fragrant, and have a sweet aroma. Avoid any with green caps or white shoulders, as these are usually less sweet. If your strawberries aren’t perfectly ripe, you can macerate them with a tablespoon or two of sugar for about 30 minutes to draw out their juices and enhance their flavor before pureeing them.
Q: Can I make this homemade strawberry ice cream without an ice cream maker?
A: Absolutely! While an ice cream maker yields the smoothest texture, you can still achieve a delicious result. Pour the base mixture into a freezer-safe container. Every 30-45 minutes for the first 2-3 hours, remove it from the freezer and vigorously whisk it to break up ice crystals. This process will result in a slightly icier but still wonderfully flavorful ice cream.
Homemade Strawberry Ice Cream
A simple and delicious homemade strawberry ice cream recipe.
Ingredients
-
1 1/2 cups strawberries, hulled and diced
-
2 Tbsp honey
-
1/2 cup granulated sugar
-
1 tsp lemon juice
-
1 cup heavy whipping cream
-
1/2 cup half and half
-
1 tsp vanilla extract
Instructions
-
Step 1
In a bowl, combine the diced strawberries with honey, granulated sugar, and lemon juice. Let it sit for about 15-20 minutes, stirring occasionally, until the strawberries release their juices. -
Step 2
Mash the strawberries slightly with a fork or potato masher to break them down further. -
Step 3
In a separate bowl, whisk together the heavy whipping cream, half and half, and vanilla extract until well combined. -
Step 4
Gently fold the strawberry mixture into the cream mixture until just combined, creating swirls. -
Step 5
Pour the mixture into an ice cream maker and churn according to the manufacturer’s instructions until it reaches a soft-serve consistency. -
Step 6
Transfer the ice cream to an airtight container and freeze for at least 2-4 hours, or until firm, before serving.
Important Information
Nutrition Facts (Per Serving)
It is important to consider this information as approximate and not to use it as definitive health advice.
Allergy Information
Please check ingredients for potential allergens and consult a health professional if in doubt.

Leave a Comment