

Strawberry pie holds a special place in my heart, and I suspect in yours too. There’s something undeniably magical about a perfectly baked strawberry pie – a symphony of sweet, slightly tart berries nestled within a flaky, golden crust. It’s more than just a dessert; it’s a quintessential taste of summer, a nostalgic reminder of simpler times, and a guaranteed crowd-pleaser at any gathering. What makes this particular strawberry pie recipe so special? It’s the balance. We’re talking about the ideal ratio of fruit to sugar, the foolproof crust that stays tender and crisp, and a few secret touches that elevate each bite from delicious to utterly divine. Get ready to experience a strawberry pie that will have everyone asking for seconds (and maybe even the recipe!).

Strawberry Pie
There’s something undeniably special about a strawberry pie. The vibrant color, the sweet burst of fresh fruit, the creamy filling – it’s a classic for a reason. Whether you’re making it for a summer picnic, a holiday gathering, or just because, this recipe is sure to become a favorite. It’s surprisingly straightforward, relying on a few key ingredients to create a delightful dessert that’s both elegant and comforting. I’ve found this particular method yields a beautifully set filling with an intense strawberry flavor that truly shines. So, let’s get started and create a showstopper!
Ingredients:
Preparing the Pie
The foundation of our delicious strawberry pie is a perfectly baked pie crust. For this recipe, I highly recommend using a store-bought frozen pie crust that you’ve pre-baked according to package directions. This saves a significant amount of time and effort, and usually results in a wonderfully flaky and golden crust. Ensure it’s completely cooled before you start assembling the filling. If you’re feeling ambitious and want to make your own crust from scratch, that’s fantastic! Just make sure it’s blind-baked until golden brown and fully cooled. A sturdy crust is crucial to hold all that delicious strawberry goodness.
Making the Luscious Strawberry Filling
This is where the magic happens! We’ll be creating a smooth, glossy, and intensely strawberry-flavored filling that’s both set and sliceable. It’s a simple process that comes together quickly, so have all your ingredients measured and ready to go. The combination of cornstarch and Jell-O creates a wonderful texture – not too firm, not too loose, just perfectly spoonable.
1. In a medium saucepan, whisk together the sugar, water, and cornstarch. It’s important to whisk these together thoroughly before you turn on the heat. This ensures that the cornstarch is fully dissolved and won’t clump up, leading to a silky smooth filling. You want to eliminate any dry pockets of cornstarch.
2. Place the saucepan over medium heat. Stir constantly as the mixture heats up. You’ll notice it will begin extract to thicken. Keep stirring diligently to prevent the bottom from scorching, which can impart an unpleasant flavor. The mixture should become quite thick, almost like a pudding. This usually takes about 5-7 minutes. The cornstarch needs to be cooked through to activate its thickening properties fully.
3. Once the mixture has thickened significantly, remove it from the heat. Immediately stir in the strawberry Jell-O packet. Keep stirring until the Jell-O is completely dissolved into the hot cornstarch mixture. The heat from the cooked cornstarch mixture will dissolve the Jell-O quickly. This step is essential for achieving that beautiful, vibrant red color and enhancing the strawberry flavor.
4. Gently fold in the sliced strawberries into the warm filling. Be delicate here; you want the strawberries to maintain some of their shape and texture within the pie, rather than becoming completely mashed. The warmth of the filling will slightly soften the strawberries and allow them to meld beautifully with the filling as it cools and sets.
5. Pour the strawberry filling into your pre-baked and cooled pie crust. Spread it evenly with a spatula, making sure to get the filling all the way to the edges.
Chilling and Serving
Now comes the hardest part: waiting! For the pie to set properly, it needs ample time in the refrigerator.
1. Once the pie is assembled, carefully cover it with plastic wrap. Make sure the plastic wrap doesn’t touch the surface of the filling, if possible. You can tent it slightly over the pie. This will prevent a skin from forming on top as it chills.
2. Refrigerate the strawberry pie for at least 4 hours, or preferably overnight. This chilling period is crucial for the filling to firm up completely. A properly set pie will slice cleanly and hold its shape beautifully when served. Rushing this step will result in a runny pie, which, while still tasty, won’t have that satisfying texture.
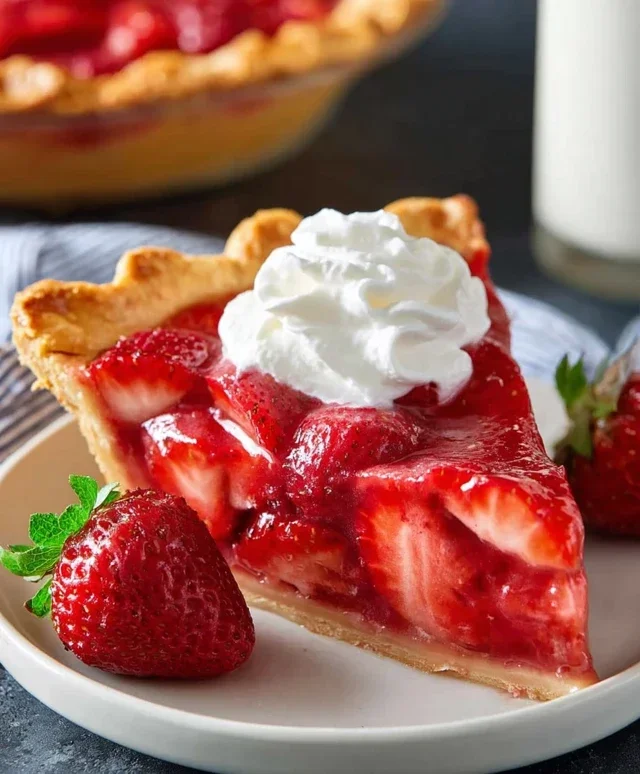
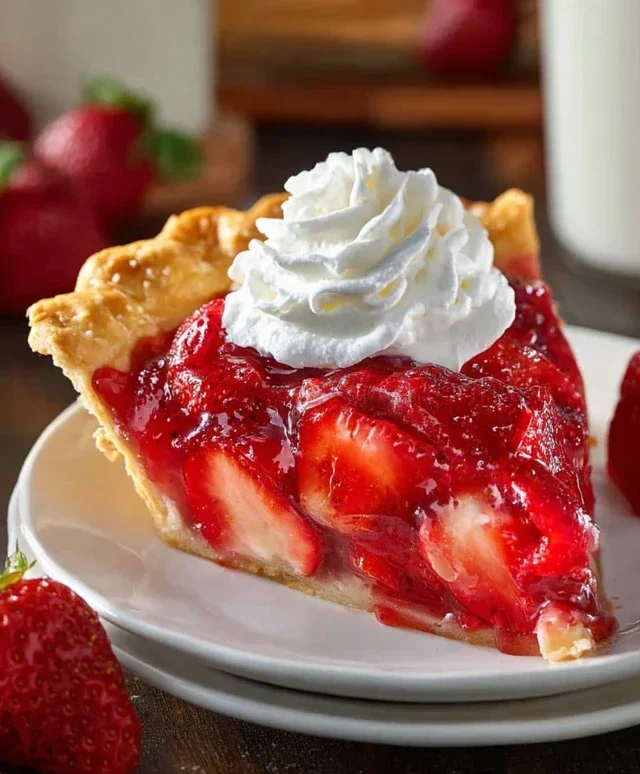
When you’re ready to serve, slice the chilled pie with a sharp knife. For an extra special touch, I love to serve it with a dollop of fresh whipped cream or a scoop of vanilla ice cream. The contrast of the cool, creamy topping with the sweet, slightly tart strawberry filling is simply divine. Enjoy every single bite of this delightful homemade strawberry pie! It’s a taste of pure summer sunshine.
Conclusion:
This strawberry pie recipe is truly a winner! It delivers a perfect balance of sweet, tart strawberries nestled in a flaky, buttery crust, making it an absolute delight for any occasion. Whether you’re a seasoned baker or just starting out, the simplicity and incredible flavor make this a recipe you’ll want to make again and again. The vibrant red filling is as beautiful as it is delicious, promising a burst of fresh, summery goodness with every bite. I’m confident you’ll fall in love with this classic dessert.
For serving, I always recommend a dollop of freshly whipped cream or a scoop of vanilla bean ice cream. It adds an extra layer of indulgence that complements the strawberries wonderfully. You could also try a sprinkle of powdered sugar for a touch of elegance, or even a drizzle of balsamic glaze for a surprising savory twist.
Don’t be afraid to get creative with variations! Consider adding a hint of lemon zest to the filling for an extra bright flavor, or incorporating a few fresh raspberries or blueberries alongside the strawberries for a mixed berry sensation. A touch of almond extract can also elevate the flavor profile beautifully. I truly encourage you to give this delicious strawberry pie a try; you won’t regret it!
Frequently Asked Questions:
Can I use frozen strawberries instead of fresh?
Yes, you absolutely can! If using frozen strawberries, make sure to thaw them completely and drain off any excess liquid before proceeding with the recipe. This will help prevent a watery filling.
What kind of crust is best for this strawberry pie?
While a classic all-butter pie crust is my personal favorite for its incredible flavor and flakiness, a grabeef ham cracker crust also works beautifully and offers a delightful contrast in texture and a hint of sweetness. You can even use a pre-made refrigerated pie crust for ultimate convenience!
Strawberry Pie
A classic and refreshing strawberry pie made with fresh strawberries and a jello glaze.
Ingredients
-
1 9 inch frozen pie crust (baked)
-
1 cup sugar
-
1 1/2 cup water
-
1/4 cup cornstarch
-
1 lb strawberries (sliced)
-
1 3 oz pkg strawberry jello
Instructions
-
Step 1
In a medium saucepan, whisk together sugar, cornstarch, and water until smooth. -
Step 2
Cook over medium heat, stirring constantly, until the mixture thickens and boils. Boil for 1 minute. -
Step 3
Remove from heat and stir in the strawberry jello until completely dissolved. -
Step 4
Gently fold in the sliced strawberries. -
Step 5
Pour the strawberry mixture into the baked pie crust. -
Step 6
Refrigerate for at least 4 hours, or until firm.
Important Information
Nutrition Facts (Per Serving)
It is important to consider this information as approximate and not to use it as definitive health advice.
Allergy Information
Please check ingredients for potential allergens and consult a health professional if in doubt.

Leave a Comment