

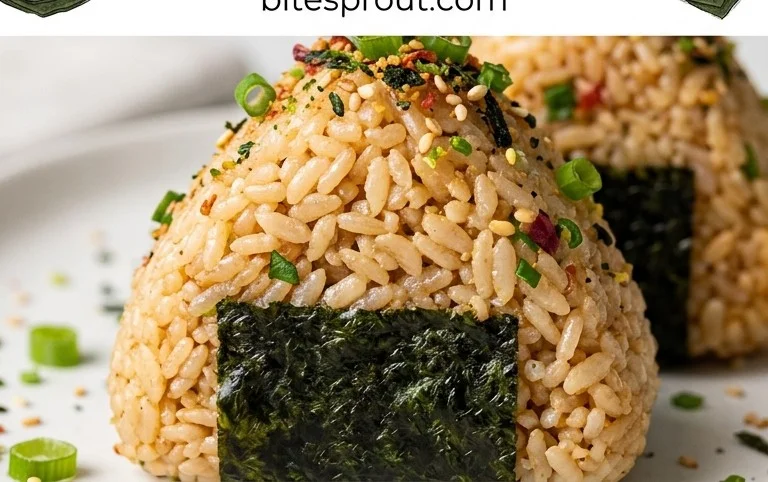
15-min. Easy Japanese Tuna Onigiri are your new best friend for those moments when hunger strikes and time is of the essence. Forget complicated steps and lengthy prep; this beloved Japanese snack is designed for speed and simplicity, without sacrificing an ounce of deliciousness. Have you ever craved that perfect, portable bite that’s both satisfying and bursting with flavor? That’s precisely what Japanese tuna onigiri delivers. It’s the ultimate quick lunch, a delightful snack for kids, or even a last-minute appetizer that always impresses. What makes this particular 15-min. Easy Japanese Tuna Onigiri so special is its versatility. The fluffy rice, seasoned to perfection, cradles a savory, creamy tuna filling that’s incredibly comforting. It’s a taste of Japan you can create in your own kitchen with minimal fuss, proving that fantastic food doesn’t always require hours of effort.

15-Min. Easy Japanese Tuna Onigiri
Welcome to a quick and delicious culinary adventure! Today, we’re making Japanese Tuna Onigiri, also known as rice balls. These are incredibly versatile, perfect for a speedy lunch, a satisfying snack, or even a light dinner when you’re short on time. The best part? They require minimal effort and are wonderfully customizable. Forget complicated cooking; this recipe is all about simplicity and flavor. We’ll be using simple pantry staples to create these delightful little rice parcels that are a staple in Japanese bento boxes and convenience stores for a good reason. Get ready to impress yourself with how easy it is to whip up this classic Japanese treat.
Ingredients:
Cooking Instructions:
Step 1: Prepare the Tuna Filling
This is where the magic of our onigiri starts. First, open your can of tuna. If you’re using tuna packed in oil, drain off most of the oil, but don’t worry about getting every single drop; a little bit of oil can add extra flavor and moisture. If you’re using tuna in water, drain it thoroughly. Next, place the drained tuna in a small bowl. Add the Japanese mayonnaise. Japanese mayonnaise has a distinctively rich and tangy flavor profile, often made with egg yolks and a touch of rice vinegar, which complements the tuna beautifully. If you don’t have Japanese mayo, regular mayonnaise will work perfectly fine, though you might find the flavor slightly different. Mix the tuna and mayonnaise together until they are well combined. You want a creamy, spreadable mixture. If you like a little extra kick, you can add a tiny pinch of black pepper or a drop of soy sauce at this stage, but it’s entirely optional.
Step 2: Season the Rice
Now, let’s get our rice ready. It’s crucial to use short-grain rice for onigiri as it has a sticky texture that holds its shape well. If you’re using freshly cooked rice, make sure it’s still warm but not scalding hot. If your rice has cooled down, you can gently warm it in the microwave or on the stovetop. Take your 2 cups of cooked short-grain rice and place it in a medium-sized bowl. Sprinkle the 1/2 teaspoon of salt evenly over the rice. Gently mix the salt into the rice using a rice paddle or a fork. You want to distribute the salt evenly so that every bite of your onigiri is seasoned. Be careful not to mash the rice; we want to keep the individual grains intact as much as possible.
Step 3: Combine Rice and Filling
This is a crucial step for creating that delicious, flavorful center. Take about a quarter of the seasoned rice and place it in your palm. Make a small indentation in the center of this rice portion. Now, spoon about a tablespoon of your prepared tuna and mayonnaise mixture into this indentation. You don’t want to overfill it, or it will be difficult to seal the rice around it. Gently bring the edges of the rice up and around the filling, enclosing it completely. Continue to press and shape the rice into a ball or a triangle, depending on your preference. If the rice is sticking to your hands, you can lightly moisten your hands with water. This is a traditional method that helps prevent sticking and also adds a slight sheen to the finished onigiri.
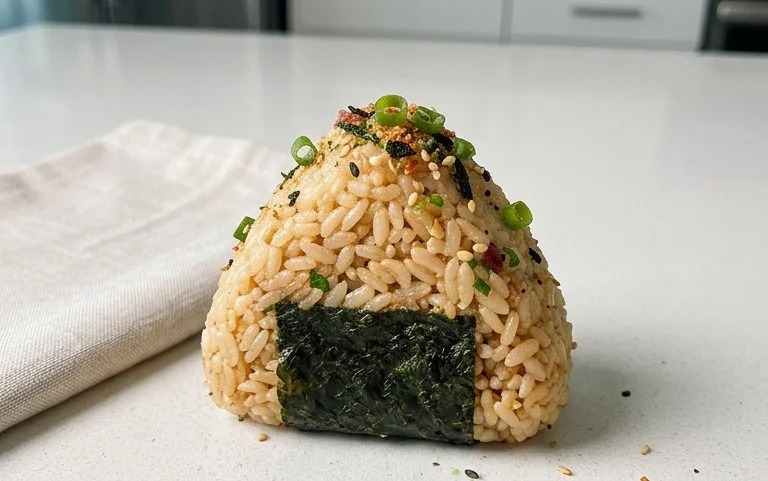
Step 4: Shape the Onigiri
The shaping of the onigiri is where you can get creative! Traditionally, onigiri are made into either a round ball shape or a triangular shape. To make a triangle, place a generous portion of the seasoned rice in your hand and gently cup your palm. Use your fingers to press down on the top of the rice and then use the side of your hand to create the angled edges of the triangle. Rotate the rice as you press and shape to form a neat, compact triangle. If you prefer a ball, simply cup your hands and gently roll the rice between them until you achieve a firm, round shape. The key is to press firmly enough so that the onigiri holds its shape, but not so hard that you crush the rice grains. Remember, practice makes perfect, so don’t worry if your first few aren’t perfectly shaped!
Step 5: Wrap with Nori and Garnish
The final touch that elevates our onigiri! Take your nori sheets. If you’re using the full sheets, you can cut them into strips or smaller pieces that are suitable for wrapping around your rice shape. If you prefer less nori, you can use half a sheet or even cut it into smaller decorative shapes. Wrap a strip of nori around the base or the side of your onigiri. The nori adds a wonderful savory flavor and a satisfying crunch. If you’re feeling fancy and have sesame seeds, sprinkle them over the top of the onigiri for a beautiful garnish and an extra layer of nutty flavor. These are now ready to be enjoyed immediately, or you can pack them for later. They are best eaten within a day for optimal freshness and texture.
Notes:
If you’re making fresh rice specifically for this recipe, cook about 1 cup of uncooked short-grain rice according to package directions. This will yield approximately 3 cups of cooked rice, giving you a little extra. For the best onigiri, ensure your rice is cooked to the right consistency – not too mushy and not too dry. Let the cooked rice cool slightly before seasoning and shaping.
Conclusion:
There you have it – a delicious and incredibly simple 15-min. Easy Japanese Tuna Onigiri that’s perfect for a quick lunch, a satisfying snack, or even a light dinner. The beauty of this recipe lies in its speed and versatility. You get all the comforting flavors of classic Japanese cuisine with minimal effort, making it accessible for even the busiest of cooks. Whether you’re new to Japanese cooking or a seasoned pro looking for a weeknight win, this tuna onigiri is sure to become a go-to.
These delightful rice balls are wonderful on their own, but they also pair beautifully with a simple miso soup, a side of pickled gin extractger, or a crisp green salad. Feel free to get creative with your fillings too! Some popular variations include adding chopped nori seaweed, a sprinkle of sesame seeds, or even a touch of kewpie mayonnaise for extra creaminess. Don’t be afraid to experiment and find your perfect flavor combination! I truly encourage you to give this 15-min. Easy Japanese Tuna Onigiri a try; you might be surprised at how satisfying and rewarding it is.
Frequently Asked Questions about Tuna Onigiri:
Can I make the rice ahead of time?
Absolutely! You can cook your sushi rice a day in advance and store it in the refrigerator. Gently warm it up before shaping the onigiri, as warm rice is easier to work with.
What other fillings can I use instead of tuna?
The possibilities are endless! Cooked salmon flakes, seasoned chicken, vegetarian options like seasoned mushrooms or edamame, or even just plain salted rice are all fantastic choices.
15-min. Easy Japanese Tuna Onigiri
Quick and simple tuna onigiri (Japanese rice balls) ready in just 15 minutes. Perfect for a light meal or snack.
Ingredients
-
2 cups cooked short grain rice
-
1/2 tsp salt
-
5.29 oz canned tuna (in oil recommended, or canned tuna in water)
-
2 tbsp Japanese mayo (or regular mayonnaise)
-
2 sheets nori (or use 1/2 sheet if you prefer less)
-
1 tsp sesame seeds (for garnishing, optional)
Instructions
-
Step 1
Prepare the rice: If using fresh rice, ensure it is cooked and still warm. If using leftover rice, warm it up slightly. Mix the salt into the warm rice. -
Step 2
Prepare the tuna filling: Drain the canned tuna well. In a small bowl, mix the drained tuna with Japanese mayonnaise until well combined. -
Step 3
Form the onigiri: Wet your hands with water to prevent rice from sticking. Take about 1/2 cup of the seasoned rice and place it in your palm. -
Step 4
Add the filling: Make a small indentation in the center of the rice and add about 1 tablespoon of the tuna mayo mixture. Cover the filling with more rice, gently shaping it into a ball or triangle. -
Step 5
Wrap with nori: Cut the nori sheets into desired sizes. Wrap a piece of nori around the onigiri. -
Step 6
Garnish and serve: Optionally, sprinkle with sesame seeds. Serve immediately.
Important Information
Nutrition Facts (Per Serving)
It is important to consider this information as approximate and not to use it as definitive health advice.
Allergy Information
Please check ingredients for potential allergens and consult a health professional if in doubt.

Leave a Comment