• Skip to primary navigation
  • Skip to main content
  • Skip to primary sidebar
bitesprout.com

bitesprout.com

Where Fresh Ideas Take Root.

  • Home
  • All Recipes
  • Dinner
  • Dessert
  • Appetizer
  • Contact
  • About
bitesprout.com
  • Home
  • All Recipes
  • Dinner
  • Dessert
  • Appetizer
  • Contact
  • About
Dessert / Patriotic Oreo Balls- Easy No-Bake Dessert Idea

Patriotic Oreo Balls- Easy No-Bake Dessert Idea

June 4, 2026 by TiffanyDessert

Patriotic Oreo Balls are more than just a sweet treat; they’re a burst of red, white, and blue joy for your taste buds! As the warmer months approach and we start thinking about backyard barbecues and dazzling fireworks displays, these delightful no-bake confections are always a crowd-pleaser. What’s not to love about them? They’re incredibly simple to make, requiring just a handful of ingredients and minimal effort, making them perfect for even the most novice bakers. The irresistible combination of crushed Oreos, creamy cream cheese, and a decadent chocolate coating is a classic for a reason. But what truly sets these Patriotic Oreo Balls apart is their vibrant, festive appearance. They’re the perfect way to add a splash of color and patriotic spirit to any gathering, whether it’s the Fourth of July, Memorial Day, or just a spontaneous celebration of all things American.

Patriotic Oreo Balls this recipe

Patriotic Oreo Balls

Get ready to celebrate any occasion with a burst of flavor and festive fun! These Patriotic Oreo Balls are incredibly easy to make, require no baking, and are guaranteed to be a crowd-pleaser. They are the perfect treat for Fourth of July barbecues, Memorial Day gatherings, Veterans Day events, or even just a fun way to show your patriotic spirit any time of year. The combination of rich, chocolatey Oreos and creamy sweetness, all dipped in vibrant red and blue candy melts with a touch of white, makes these little bites a delightful masterpiece. Let’s dive into creating these star-spangled delights!

Ingredients:

  • 1 lb 2.12 oz Family Size package Oreo Cookies
  • 8 ounce block cream cheese (softened to room temperature)
  • 12 ounce bag red candy melts
  • 12 ounce bag blue candy melts
  • ⅓ cup Ghirardelli white melting wafers
  • White star confetti sprinkles for topping
  • Creating the Oreo Ball Base

    The foundation of our festive treats is a simple yet incredibly delicious mixture of crushed Oreos and cream cheese. This no-bake wonder is the secret to their irresistible texture and flavor.

  • Prepare the Oreo Crum extractbs: The first step is to transform your entire family-size package of Oreo cookies into fine crum extractbs. You can achieve this by placing the Oreos in a food processor and pulsing until they are very finely ground. Alternatively, if you don’t have a food processor, you can place the Oreos in a large Ziploc bag, seal it tightly, and then use a rolling pin or the bottom of a heavy pan to crush them thoroughly. Aim for a consistency that resembles coarse sand. It’s important to get them as fine as possible to ensure a smooth mixture later on. Discard any larger chunks; these can affect the texture of your finished Oreo balls.
  • Combine with Cream Cheese: In a large mixing bowl, combine the finely crushed Oreo crum extractbs with the softened cream cheese. Ensure your cream cheese is truly at room temperature; this is crucial for easy mixing and a smooth, lump-free dough. If the cream cheese is too cold, it will be difficult to incorporate into the crum extractbs. You can use a sturdy spoon or a rubber spatula to mix these ingredients together until they are thoroughly combined. The mixture should form a thick, dough-like consistency that you can easily handle. If the mixture seems a little too dry and crum extractbly, you can add another tablespoon of softened cream cheese, but be careful not to add too much, as it can make the mixture too soft.
  • Form the Balls: Once the Oreo and cream cheese mixture is well combined, it’s time to roll them into balls. Use a small cookie scoop or a tablespoon to portion out the mixture. Roll each portion between the palms of your hands to form compact, uniform balls, roughly 1 inch in diameter. It’s helpful to moisten your hands slightly with water or lightly grease them with a neutral oil to prevent the mixture from sticking. Place the formed balls on a baking sheet lined with parchment paper or wax paper. This step is important because the balls will need to firm up before dipping, and the lining prevents sticking.
  • Chill the Balls: For the balls to hold their shape during the dipping process, they need to be firm. Place the baking sheet with the rolled Oreo balls into the refrigerator for at least 30 minutes, or into the freezer for about 15-20 minutes. This chilling time allows the cream cheese to firm up, making the balls less likely to fall apart when you dip them in the melted candy.
  • Melting and Dipping the Masterpieces

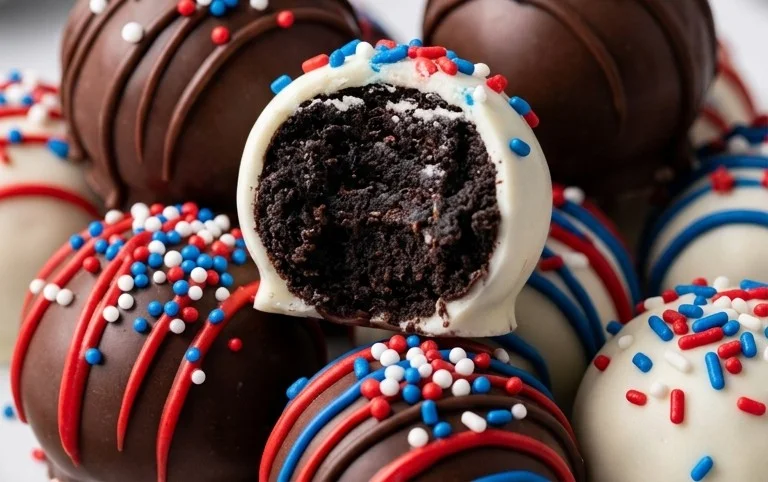
    Now for the colorful and most visually striking part of creating our patriotic treats: melting the candy melts and dipping the chilled Oreo balls. Patience and a gentle touch are key here.

  • Melt the Candy Melts: While your Oreo balls are chilling, prepare your candy melts. In separate microwave-safe bowls, place the red candy melts and the blue candy melts. Microwave them in 30-second intervals, stirring well after each interval, until they are completely smooth and melted. Be careful not to overheat them, as this can cause them to seize up. You can also melt them using a double boiler on the stovetop if you prefer. Once melted, set them aside.
  • Melt the White Chocolate: In a separate small microwave-safe bowl, melt the Ghirardelli white melting wafers according to the package directions, usually in 20-second intervals with stirring in between. White chocolate can be a bit trickier to melt smoothly, so it’s important to go slowly and stir frequently. This will be used for drizzling.
  • Dip the Oreo Balls: Once the Oreo balls are well chilled and firm, it’s time for the fun part – dipping! Using a fork or a toothpick, carefully dip each Oreo ball into the melted red or blue candy melts. Submerge the ball completely and then lift it out, allowing any excess candy to drip back into the bowl. For a cleaner finish, gently tap the fork or toothpick against the side of the bowl. Place the dipped Oreo balls back onto the parchment-lined baking sheet. You can alternate colors to create a beautiful patriotic pattern. If the candy melts start to thicken too much, you can microwave them for a few more seconds, stirring well.
  • Add the Patriotic Flair: Before the candy coating on the dipped Oreo balls sets completely, it’s time to add those festive sprinkles! Immediately after dipping each ball, generously sprinkle the white star confetti sprinkles over the wet candy coating. The sprinkles will adhere beautifully and create that stunning patriotic look. Work quickly, as the candy coating sets relatively fast.
  • Drizzle with White Chocolate: Once all your Oreo balls are dipped and sprinkled, and the red and blue coatings have started to set (but are not completely hard), you can add a decorative drizzle of the melted white chocolate. Transfer the melted white chocolate to a small Ziploc bag and snip off a tiny corner. Drizzle the white chocolate back and forth over the red and blue dipped balls to create a beautiful, festive pattern. This adds an extra touch of elegance and visual appeal.
  • Setting and Serving Your Festive Treats

    The final step is to let your beautiful creations set and then enjoy them!

  • Allow to Set: Let the dipped and decorated Oreo balls sit at room temperature until the candy coating is completely hardened. This can take about 30-60 minutes, depending on the ambient temperature. You can also speed up this process by placing them back in the refrigerator for about 10-15 minutes, but be mindful of condensation if you leave them in for too long, which can affect the appearance of the candy coating.
  • Serve and Enjoy: Once hardened, your Patriotic Oreo Balls are ready to be devoured! Arrange them on a platter for a festive display. They are best stored in an airtight container at room temperature for up to a week. If your kitchen is particularly warm, you might consider storing them in the refrigerator, but allow them to come to room temperature before serving for the best flavor and texture. These are perfect for parties, bake snon-alcoholic ales, or just a special patriotic treat for yourself and your loved ones!
  • Patriotic Oreo Balls

    Conclusion:

    So there you have it – your ultimate guide to creating these incredibly easy and absolutely delightful Patriotic Oreo Balls! This recipe is truly a winner because it’s remarkably simple, requiring minimal ingredients and no baking, making it perfect for even the most novice bakers. The festive red, white, and blue colors are a guaranteed crowd-pleaser for any summer celebration, from Fourth of July cookouts to Memorial Day gatherings and even just a fun weekend treat. They’re the perfect blend of rich chocolate, creamy filling, and that satisfying Oreo crunch that everyone loves.

    When it comes to serving, these patriotic delights are fantastic on their own, but they also make a charming addition to a dessert platter alongside fresh fruit or other red, white, and blue desserts. For variations, don’t be afraid to get creative! You can experiment with different colored candy melts, add sprinkles for extra sparkle, or even mix in some mini chocolate chips for an added layer of flavor and texture. I really encourage you to give these Patriotic Oreo Balls a try; I’m confident they’ll become a new go-to for all your patriotic festivities!

    Frequently Asked Questions:

    Can I make these Patriotic Oreo Balls ahead of time?

    Absolutely! These are a fantastic make-ahead treat. You can prepare them up to 3-4 days in advance and store them in an airtight container in the refrigerator. They might firm up a bit more in the fridge, so you can let them sit at room temperature for about 15-20 minutes before serving if you prefer a softer texture.

    What kind of Oreos work best for this recipe?

    While classic Oreos are the standard and work wonderfully, you can also experiment with other flavors. Mint Oreos or even Golden Oreos can be used, though the color of your finished balls might vary. For the most vibrant red, white, and blue effect, classic chocolate Oreos are your best bet.

    How should I store leftover Patriotic Oreo Balls?

    Store any leftover treats in an airtight container in the refrigerator. They’ll keep well for several days and are delicious straight from the fridge or after coming to room temperature for a short while.


    Patriotic Oreo Balls

    Patriotic Oreo Balls

    Festive and easy no-bake Oreo balls decorated in red, white, and blue, perfect for patriotic holidays.

    Prep Time
    30 Minutes

    Cook Time
    0 Minutes

    Total Time
    30 Minutes

    Servings
    Approximately 36-40 balls

    Ingredients

    • 1 lb 2.12 oz Family Size package Oreo Cookies
    • 8 ounce block cream cheese, softened
    • 12 ounce bag red candy melts
    • 12 ounce bag blue candy melts
    • ⅓ cup Ghirardelli white melting wafers
    • White star confetti sprinkles

    Instructions

    1. Step 1
      Crush Oreo cookies into fine crumbs using a food processor or by placing them in a sealed bag and crushing with a rolling pin.
    2. Step 2
      In a large bowl, combine the Oreo cookie crumbs and softened cream cheese. Mix until well combined and a dough-like consistency forms.
    3. Step 3
      Roll the mixture into small balls, about 1 inch in diameter. Place them on a parchment-lined baking sheet and freeze for about 15-20 minutes until firm.
    4. Step 4
      Melt the red and blue candy melts separately in microwave-safe bowls according to package directions, stirring until smooth. Melt the white melting wafers separately.
    5. Step 5
      Dip the chilled Oreo balls into the melted red and blue candy melts, ensuring they are fully coated. You can alternate colors for a striped effect or dip half in one color and half in another.
    6. Step 6
      Place the dipped Oreo balls back on the parchment-lined baking sheet. Drizzle with melted white chocolate and immediately sprinkle with white star confetti before the coating sets.
    7. Step 7
      Allow the candy coating to harden completely before serving.

    Important Information

    Nutrition Facts (Per Serving)

    It is important to consider this information as approximate and not to use it as definitive health advice.

    Allergy Information

    Please check ingredients for potential allergens and consult a health professional if in doubt.

    « Previous Post
    Shrimp Creamed Corn One-Pan Dinner
    Next Post »
    Easy Japanese Tuna Onigiri Quick Recipe

    If you enjoyed this…

    Dessert

    Decadent Salted Caramel Brownies-Pure Bliss

    Dessert

    Blue Moon Ice Cream-Unique Flavor-Easy Recipe

    Best Gooey Butter Cake Without Cake Mix
    Dessert

    Best Gooey Butter Cake No Cake Mix Recipe

    Reader Interactions

    Leave a Comment Cancel reply

    Helpful comments include feedback on the post or changes you made.

    Primary Sidebar

    Browse by Diet

    AppetizerAppetizerBreakfastBreakfastDessertDessertDinnerDinnerFooter MenuLunchLunchPrimary MenuUncategorized
    15-min. Easy Japanese Tuna Onigiri

    Easy Japanese Tuna Onigiri Quick Recipe

    Patriotic Oreo Balls

    Patriotic Oreo Balls- Easy No-Bake Dessert Idea

    Shrimp and Creamed Corn (30 Minutes, One-Pan)

    Shrimp Creamed Corn One-Pan Dinner

    • Contact
    • About
    • DMCA
    • Cookie Privacy Policy
    • Privacy Policy
    • Terms of Use

    © 2026 · Cuisine Recipe Theme · Genesis Framework · Disclosure · Website Design by Anchored Design