

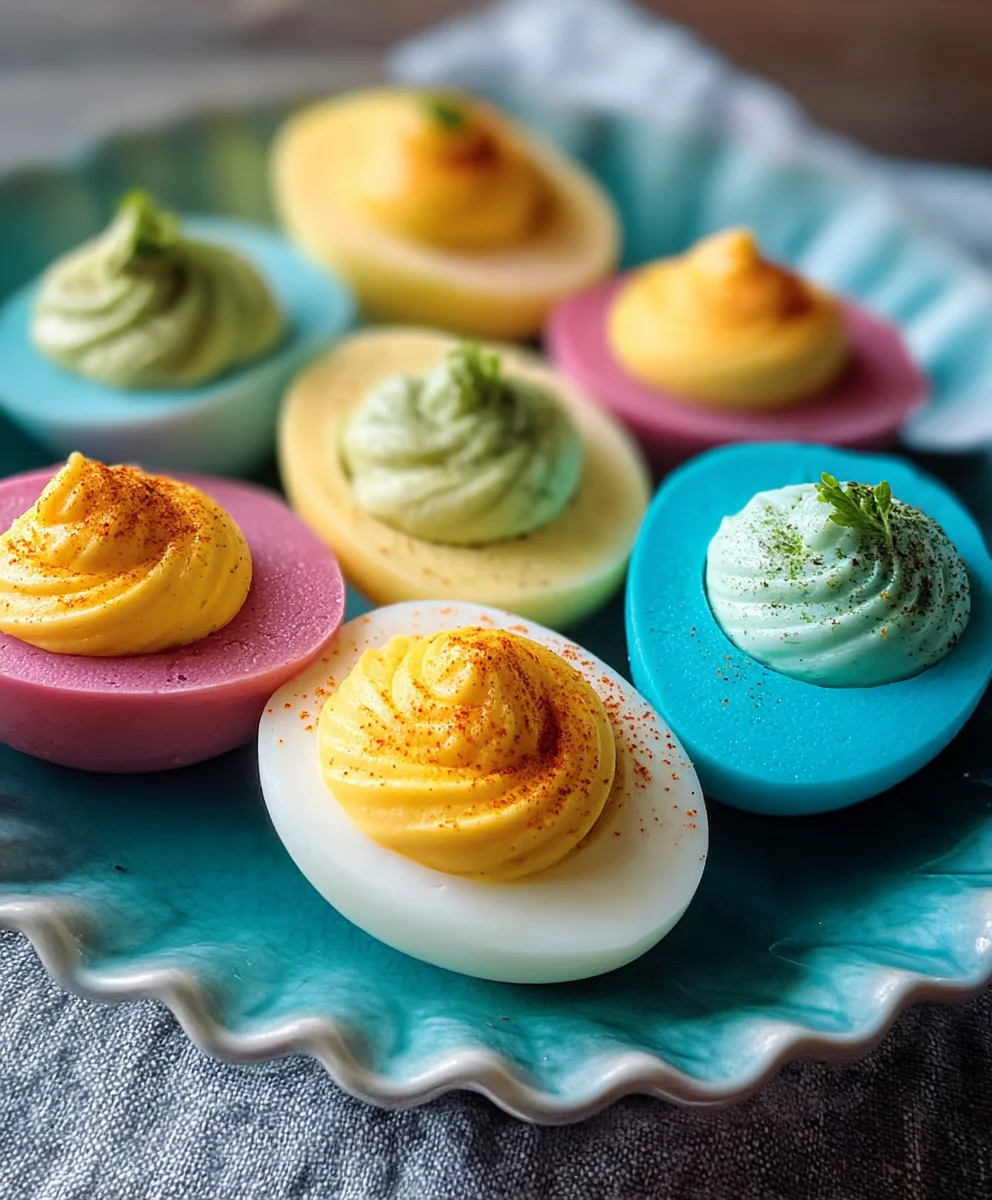
Colored deviled eggs are more than just a party appetizer; they’re a whimsical canvas for culinary creativity and a guaranteed crowd-pleaser at any gathering. Imagin extracte a platter bursting with vibrant hues, each bite delivering that irresistible creamy, tangy, and savory goodness we all adore. What makes these particular deviled eggs so special? It’s the playful twist of infusing them with natural colors, transforming a classic into something visually spectacular. Gone are the days of plain white and yellow; we’re talking about delightful shades of pink, blue, green, and even purple, achieved through simple, healthy ingredients. They bring an immediate pop of fun and festivity to any occasion, making them perfect for birthdays, Easter brunches, or simply a cheerful snack. Get ready to impress your guests and yourself with these visually stunning and deliciously addictive colored deviled eggs.

Ingredients:
- 12 large eggs
- ½ cup mayonnaise
- 2 teaspoons pickle juice
- 2 teaspoons yellow mustard
- 4 tablespoons finely chopped dill pickles
- Salt, to taste
- Black pepper, to taste
- 6 ounces water in each cup (for different colors)
- 1 teaspoon white vinegar, in each cup
- Food coloring in desired colors (e.g., red, blue, green, yellow)
Preparing the Eggs
Boiling and Cooling the Eggs
The first step to achieving perfect Colored Deviled Eggs is to properly cook and cool your eggs. Start by placing the 12 large eggs in a single layer in a large saucepan. Cover the eggs with about an inch of cold water. Add a pinch of salt to the water; this can help prevent the eggs from cracking during boiling and makes them easier to peel later. Place the saucepan over high heat and bring the water to a rolling boil. Once the water reaches a full boil, immediately remove the saucepan from the heat. Cover the saucepan tightly with a lid. Let the eggs sit in the hot water, undisturbed, for 10-12 minutes. This method ensures the eggs are cooked through but not overcooked, preventing the dreaded greenish ring around the yolk.
While the eggs are steaming, prepare an ice bath. Fill a large bowl with cold water and plenty of ice cubes. As soon as the 10-12 minutes are up, carefully transfer the hot eggs from the saucepan into the prepared ice bath. Let the eggs cool completely in the ice water for at least 10-15 minutes. This rapid cooling stops the cooking process and, crucially, helps the egg whites contract, making them much easier to peel. Once cooled, gently tap each egg on a hard surface and roll it between your hands to loosen the shell. Start peeling from the wider end, where the air pocket is. If you’ve cooled them thoroughly and the shells are still a bit stubborn, you can try peeling them under cool running water. Set aside your perfectly peeled, hard-boiled eggs.
Creating the Colored Egg Whites
Dyeing the Egg Whites
Now comes the fun part – giving your Colored Deviled Eggs their vibrant hues! You’ll need small bowls or cups for each color you wish to create. For each color, pour approximately 6 ounces of water into a separate bowl. Add 1 teaspoon of white vinegar to each bowl of water. The vinegar helps the food coloring adhere better to the egg whites. Next, add your desired food coloring to each bowl. Start with a few drops and stir well. Continue adding food coloring, a drop at a time, until you achieve a rich, vibrant color. Remember that the egg whites will absorb the color, so aim for a slightly darker shade than you might ultimately want.
Once your dye baths are ready, carefully slice each peeled, hard-boiled egg in half lengthwise. Gently scoop out the yolks into a separate medium bowl, leaving the egg white halves intact. Arrange the egg white halves in a single layer in your colored water mixtures. Ensure each egg white half is fully submerged. You can use a spoon to gently push them down if needed, making sure not to break them. Let the egg white halves soak in the colored water for about 5-10 minutes. The time will vary depending on how intense you want the color to be. Check periodically by lifting an egg white half out of the dye. Once they’ve reached your desired color intensity, carefully remove the colored egg white halves from the dye baths. Place them on a plate lined with paper towels to absorb any excess liquid and allow them to dry slightly.
Preparing the Filling
Mashing the Yolks and Mixing the Filling
While your egg whites are drying, it’s time to prepare the creamy, flavorful filling that makes deviled eggs so irresistible. Take the yolks you scooped out earlier and place them in the medium bowl. Using a fork, mash the yolks thoroughly until they are as smooth as possible. Break up any large lumps to ensure a creamy texture for your deviled egg filling. Add the ½ cup of mayonnaise to the mashed yolks. Stir well to combine. Next, add the 2 teaspoons of pickle juice. This adds a subtle tang and moisture to the filling. Follow with the 2 teaspoons of yellow mustard. The mustard provides a classic deviled egg flavor that complements the other ingredients beautifully.
Now, add the 4 tablespoons of finely chopped dill pickles to the mixture. These little pickles are key to that signature savory and slightly briny taste. Stir everything together until it’s well incorporated and forms a smooth, cohesive filling. Taste the filling and season with salt and freshly ground black pepper as needed. Remember that the pickles and pickle juice already contribute saltiness, so start with a small amount and adjust to your preference. If you prefer a slightly tangier filling, you can add an extra splash of pickle juice. If you desire a smoother filling, you can also pass the yolk mixture through a fine-mesh sieve before adding the other ingredients, although mashing well with a fork is usually sufficient.
Assembling the Colored Deviled Eggs
Filling the Colored Egg Whites
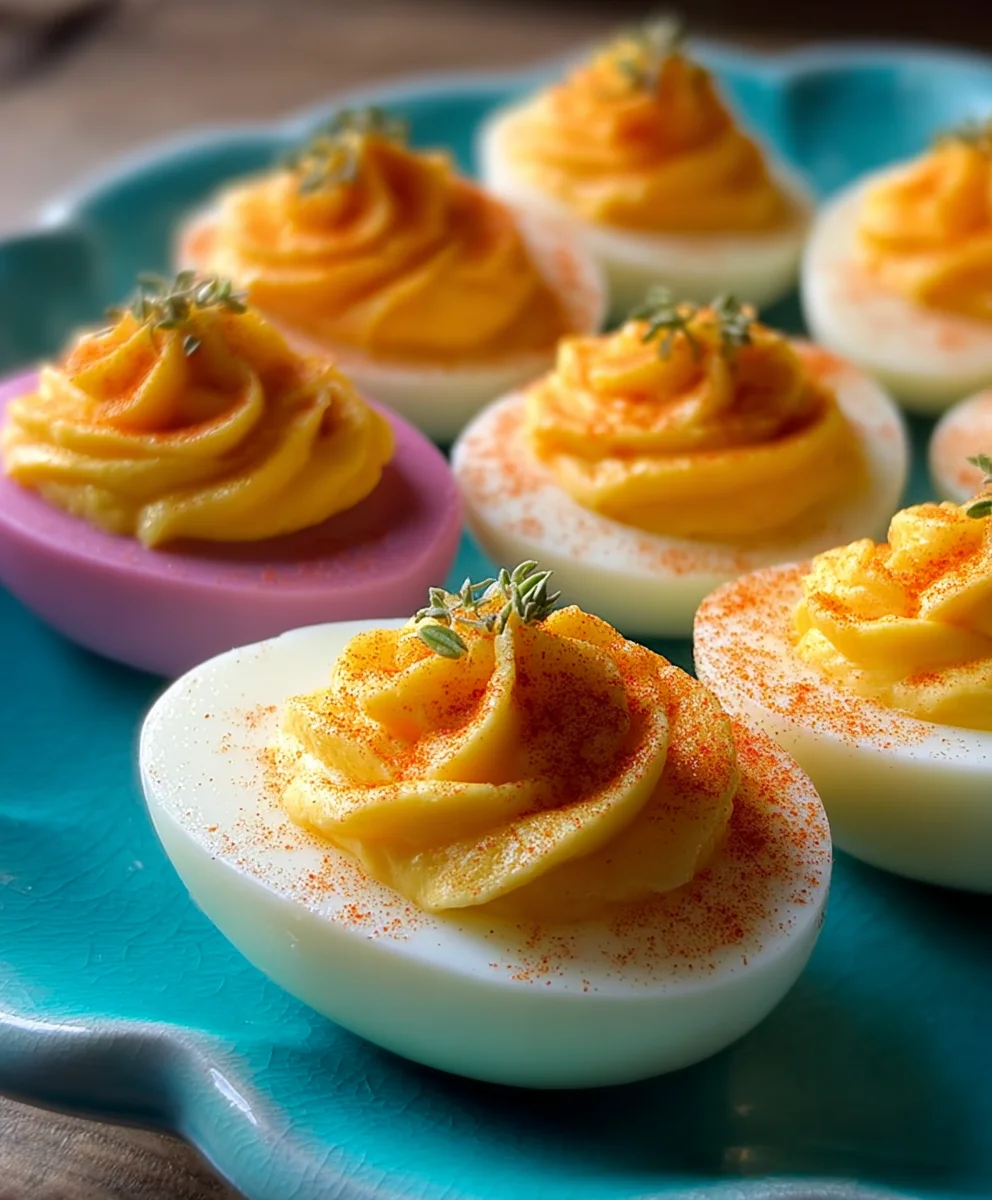
With your colorful egg white halves ready and your delicious filling prepared, it’s time for the final assembly. You can choose your preferred method for filling the egg white halves. For a classic look, use a spoon to carefully fill each colored egg white half with the yolk mixture. Aim for a generous dollop of filling in each one. If you want a more decorative presentation, you can transfer the filling to a piping bag fitted with a star tip. This will create beautiful swirls and ridges on top of your Colored Deviled Eggs. Pipe the filling into each colored egg white half, filling it generously.
Once all the egg white halves are filled, you can garnish them if you wish. A light dusting of paprika or a tiny sprinkle of extra chopped dill pickles makes for an attractive finish. You can also add a small sprig of fresh dill for a touch of elegance. Arrange your finished Colored Deviled Eggs on a serving platter. Serve them chilled. These are perfect for parties, potlucks, or simply as a delightful snack. The vibrant colors are sure to impress your guests and add a festive touch to any occasion!
Conclusion:
And there you have it – a vibrant and delicious batch of Colored Deviled Eggs! This recipe is surprisingly simple to make and the results are always a crowd-pleaser. The bright, playful colors add a fun twist to a classic appetizer, making them perfect for parties, holidays, or just a cheerful snack. I hope you enjoy making and sharing these as much as I do!
These Colored Deviled Eggs are wonderfully versatile. They make a fantastic addition to any brunch spread, a colorful appetizer at potlucks, or a fun treat for a themed party. Consider serving them alongside fresh crudités and a selection of crackers for a complete appetizer platter. They also pair nicely with other finger foods and dips.
Feeling adventurous? Don’t hesitate to experiment with different food coloring combinations for even more unique shades. You can also play with the fillings by adding a pinch of paprika for extra spice, finely chopped chives for a fresh oniony bite, or a dash of hot sauce for a little kick. The possibilities are endless!
Frequently Asked Questions about Colored Deviled Eggs:
Q1: How long do the Colored Deviled Eggs last?
Once prepared, Colored Deviled Eggs should be stored in an airtight container in the refrigerator. They are best enjoyed within 2-3 days. Ensure they are kept cool to maintain freshness and food safety.
Q2: Can I make the egg filling ahead of time?
Yes, absolutely! You can prepare the deviled egg filling a day in advance. Store it in an airtight container in the refrigerator. When you’re ready to assemble, simply scoop the filling into the egg white halves and garnish. This saves time on the day you plan to serve them.
Vibrant Colored Deviled Eggs Recipe – Fun Party Appetizer
A fun and festive recipe for deviled eggs with vibrantly colored egg whites, perfect for parties and gatherings.
Ingredients
-
12 large eggs
-
½ cup mayonnaise
-
2 teaspoons pickle juice
-
2 teaspoons yellow mustard
-
4 tablespoons finely chopped dill pickles
-
Salt, to taste
-
Black pepper, to taste
-
6 ounces water in each cup (for different colors)
-
1 teaspoon white vinegar, in each cup
-
Food coloring in desired colors
Instructions
-
Step 1
Boil 12 large eggs in cold water with a pinch of salt. Bring to a rolling boil, then remove from heat, cover, and let sit for 10-12 minutes. Immediately transfer to an ice bath for at least 10-15 minutes to cool completely and make peeling easier. Peel the eggs. -
Step 2
Prepare dye baths by pouring 6 ounces of water and 1 teaspoon of white vinegar into separate bowls for each desired color. Add food coloring, a drop at a time, stirring until a rich, vibrant color is achieved. -
Step 3
Slice the peeled eggs in half lengthwise and scoop the yolks into a separate bowl. Place the egg white halves into the colored dye baths, ensuring they are submerged. Let soak for 5-10 minutes, depending on desired color intensity. Remove and drain on paper towels. -
Step 4
Mash the reserved egg yolks thoroughly with a fork. Add mayonnaise, pickle juice, and yellow mustard. Mix until smooth. Stir in finely chopped dill pickles. Taste and season with salt and pepper. -
Step 5
Fill the colored egg white halves with the yolk mixture using a spoon or a piping bag for a decorative effect. Garnish with paprika or extra chopped dill pickles if desired. Arrange on a serving platter and serve chilled.
Important Information
Nutrition Facts (Per Serving)
It is important to consider this information as approximate and not to use it as definitive health advice.
Allergy Information
Please check ingredients for potential allergens and consult a health professional if in doubt.


Leave a Comment