

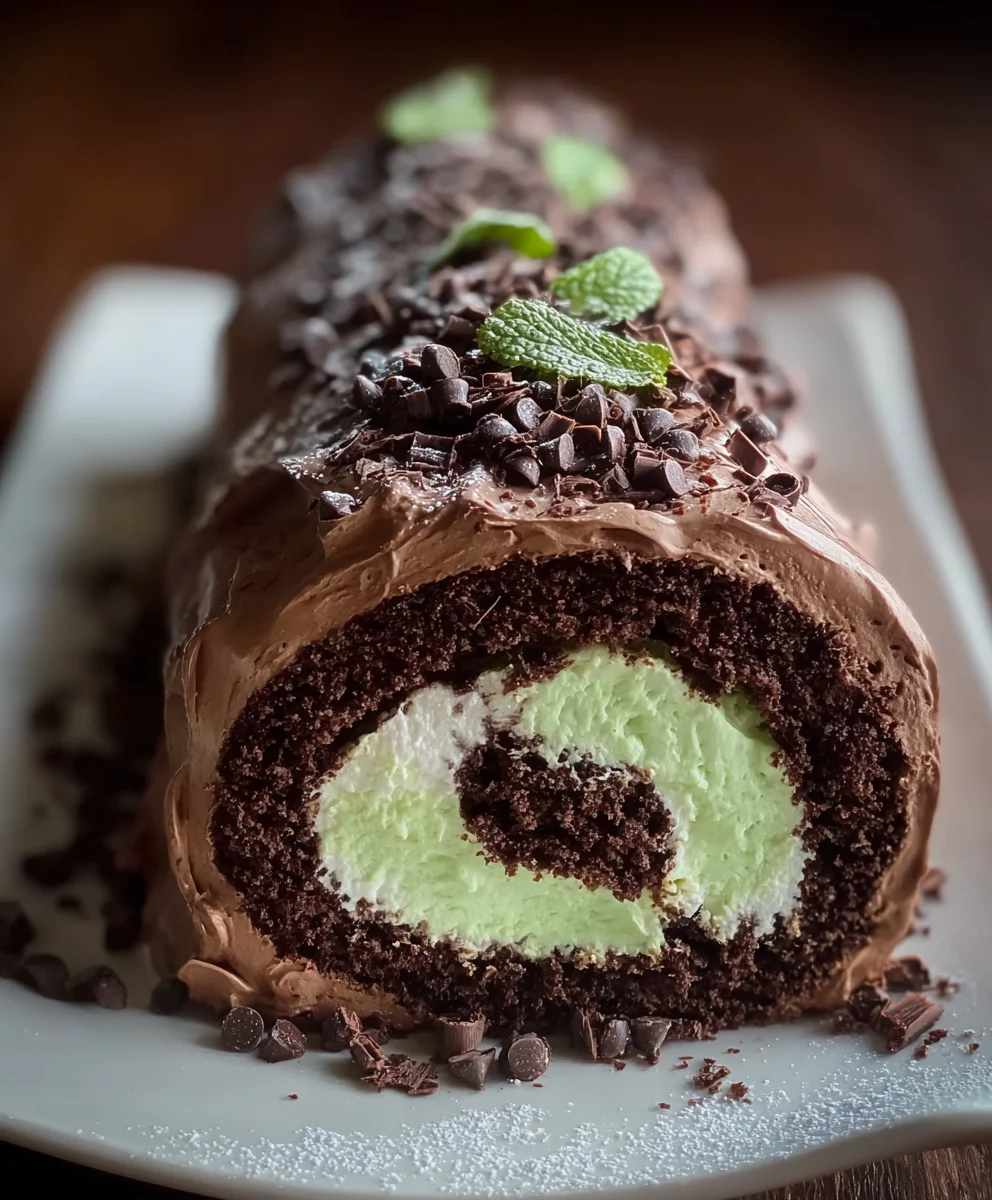
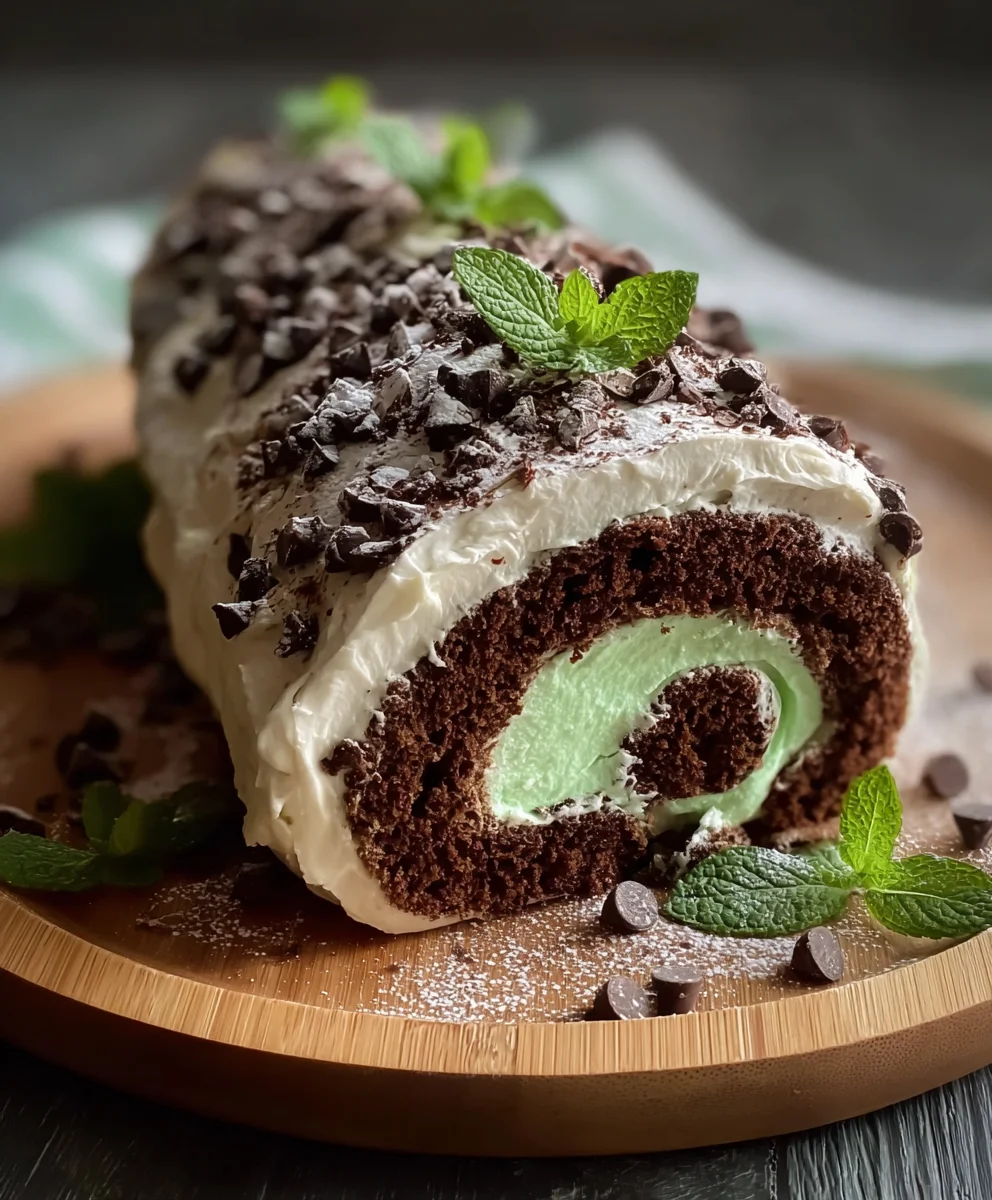
Mint Chocolate Roll Cake isn’t just a dessert; it’s an experience. Imagine the delicate, almost ethereal lightness of a sponge cake, infused with the invigorating zest of fresh mint, then enrobed in a rich, decadent chocolate ganache. This is the magic that happens when simple, yet beloved flavors collide. For so many of us, the combination of cool mint and deep chocolate evokes feelings of comfort, nostalgia, and pure indulgence. It’s the perfect treat to share with loved ones, a show-stopping centerpiece for any celebration, or simply a way to elevate an ordinary afternoon into something extraordinary. What truly sets this Mint Chocolate Roll Cake apart is its perfect balance: not too sweet, not too minty, but a harmonious symphony that dances on your palate. Get ready to impress yourself and everyone you know with this utterly delightful creation.

Ingredients:
- 3/4 cup all-purpose flour
- 1/4 cup unsweetened cocoa powder
- 1 teaspoon baking powder
- 1/4 teaspoon salt
- 3 large eggs, room temperature
- 1 cup granulated sugar
- 2 tablespoons vegetable oil
- 1 teaspoon vanilla extract
- 1 1/2 cups heavy cream, chilled (for the filling)
- 1/2 cup powdered sugar (for the filling)
- 1/2 teaspoon peppermint extract (for the filling)
- Green food coloring (optional, for the filling)
- 1/2 cup heavy cream (for the chocolate ganache)
- 1 cup semisweet chocolate chips (for the chocolate ganache)
- Extra chocolate chips (for garnish)
Preparing the Mint Chocolate Roll Cake Batter
Preheating and Preparing the Pan
First things first, let’s get our oven preheated to 350°F (175°C). This ensures an even bake right from the start. Next, I like to prepare my jelly roll pan, which is typically a 10×15 inch rimmed baking sheet. I line it with parchment paper, making sure to leave a slight overhang on the sides. This parchment paper will be your best friend when it comes to easily removing the cake from the pan without any sticking. You can also lightly grease the pan before lining it with parchment, just for extra insurance.
Sifting Dry Ingredients
In a medium bowl, we’ll whisk together our dry ingredients. This is where the 3/4 cup of all-purpose flour, 1/4 cup of unsweetened cocoa powder, 1 teaspoon of baking powder, and 1/4 teaspoon of salt come into play. Whisking them together not only combines them but also aerates them, which helps prevent any lumps from forming in your cake batter and ensures a more uniform texture. You can even sift them together for an extra-smooth batter if you have a fine-mesh sieve handy.
Mixing the Wet Ingredients and Combining
Now, let’s move on to the wet ingredients. In a large bowl, we’ll beat the 3 large room-temperature eggs with 1 cup of granulated sugar until the mixture is pale yellow and thick. This process incorporates air, which contributes to the cake’s lightness. It usually takes about 3-5 minutes with an electric mixer on medium-high speed. Once that’s achieved, gently whisk in the 2 tablespoons of vegetable oil and 1 teaspoon of vanilla extract. The oil helps keep the cake moist, and the vanilla adds that classic comforting flavor. Gradually add the sifted dry ingredients to the wet ingredients, mixing on low speed just until combined. Be careful not to overmix here; overmixing can develop the gluten in the flour too much, resulting in a tougher cake.
Baking and Rolling the Cake
Spreading and Baking the Batter
Gently spread the batter evenly into your prepared jelly roll pan. Use a spatula to get into all the corners. You want a nice, even layer so that the cake bakes uniformly. Now, it’s time to bake! Pop the pan into your preheated oven and bake for approximately 10-12 minutes. You’ll know it’s done when the cake springs back lightly to the touch and a toothpick inserted into the center comes out clean. We want to avoid overbaking, as a dry cake will crack when you try to roll it.
Cooling and Preparing for the Roll
As soon as the cake comes out of the oven, it’s time for a crucial step: the roll. While the cake is still warm, invert it onto a clean kitchen towel that has been lightly dusted with powdered sugar. Carefully peel off the parchment paper. Now, while the cake is still pliable, gently roll it up from one of the shorter ends, along with the towel, into a log shape. This technique helps set the cake’s structure and prevents it from cracking when you unroll it later to fill. Let this rolled cake cool completely on a wire rack. This cooling process is essential; trying to fill a warm cake can result in a melted filling and a messy situation.
Making the Mint Filling and Chocolate Ganache
Whipping the Mint Cream Filling
While our cake is cooling, let’s prepare the luscious mint filling. In a clean, chilled bowl, whip the 1 1/2 cups of chilled heavy cream until soft peaks form. Gradually add the 1/2 cup of powdered sugar and the 1/2 teaspoon of peppermint extract. Continue whipping until stiff peaks form. This means when you lift the whisk, the cream holds its shape. If you desire a hint of color, this is where you can add a few drops of green food coloring and gently fold it in until evenly distributed, giving your filling a delightful pale green hue. The peppermint extract provides that classic minty freshness that pairs so wonderfully with chocolate.
Crafting the Simple Chocolate Ganache
For our decadent chocolate ganache, we’ll gently heat the 1/2 cup of heavy cream in a small saucepan over low heat until it just begins to simmer around the edges. Do not let it boil. Once heated, pour the hot cream over the 1 cup of semisweet chocolate chips in a heatproof bowl. Let it sit for about 5 minutes to allow the chocolate to soften. Then, whisk gently until the ganache is smooth and glossy. This simple ganache is rich and intensely chocolatey, perfect for drizzling.
Assembling the Mint Chocolate Roll Cake
Unrolling and Filling the Cake
Once your cake roll has cooled completely, it’s time for the grand assembly. Carefully unroll the cake. It should now be flexible enough to unroll without breaking. Spread the prepared mint cream filling evenly over the entire surface of the unrolled cake, leaving about a 1/2-inch border along the edges. This border will help prevent the filling from squeezing out when you re-roll the cake.
Re-rolling and Decorating
Now, carefully re-roll the cake, starting from the same short end you began with. This time, roll it without the towel. Place the re-rolled cake seam-side down on a serving platter. Gently pour or drizzle the warm chocolate ganache over the top of the cake. You can use a spoon or an offset spatula to spread it evenly, allowing it to drip down the sides for a rustic look. For an extra touch of indulgence, scatter some extra chocolate chips over the ganache while it’s still wet, allowing them to adhere. Chill the Mint Chocolate Roll Cake for at least 30 minutes to allow the ganache to set and the flavors to meld together beautifully before slicing and serving.
Conclusion:
And there you have it – your delicious and impressive Mint Chocolate Roll Cake is ready to be devoured! We’ve walked through each step to ensure a perfect bake and a beautiful swirl. This delightful dessert is more than just a treat; it’s a celebration of fresh mint and rich chocolate, all wrapped up in a tender sponge. I hope you’ve enjoyed making this Mint Chocolate Roll Cake as much as I do.
To serve, this roll cake is fantastic on its own, but consider a light dusting of powdered sugar or a dollop of whipped cream for an extra touch of elegance. It pairs wonderfully with a strong coffee or a glass of cold milk. For variations, feel free to experiment with different extracts like peppermint for a bolder flavor, or add a few chocolate chips into the batter before rolling. You could also swirl in some raspberry jam for a fruity contrast.
Don’t be intimidated by the rolling process; it’s quite forgiving, and even if it cracks slightly, the flavor will still be incredible. So, gather your ingredients, embrace the process, and I can’t wait for you to experience the joy of this homemade Mint Chocolate Roll Cake!
Frequently Asked Questions:
Q: My cake cracked when I rolled it. Is it ruined?
A: Not at all! A little crack is perfectly normal and doesn’t affect the taste one bit. Just gently press it back together as you roll, and the filling will help hold it. The frosting will also camouflage any imperfections.
Q: Can I make the Mint Chocolate Roll Cake ahead of time?
A: Yes, you can bake and assemble the roll cake a day in advance. Store it tightly wrapped in the refrigerator. It will actually be easier to slice once it’s chilled.
Mint Chocolate Roll Cake-Easy & Delicious Recipe
An easy and delicious recipe for a mint chocolate roll cake, featuring a moist chocolate sponge, a creamy mint filling, and a rich chocolate ganache.
Ingredients
-
3/4 cup all-purpose flour
-
1/4 cup unsweetened cocoa powder
-
1 teaspoon baking powder
-
1/4 teaspoon salt
-
3 large eggs, room temperature
-
1 cup granulated sugar
-
2 tablespoons vegetable oil
-
1 teaspoon vanilla extract
-
1 1/2 cups heavy cream, chilled
-
1/2 cup powdered sugar
-
1/2 teaspoon peppermint extract
-
Green food coloring (optional)
-
1/2 cup heavy cream
-
1 cup semisweet chocolate chips
-
Extra chocolate chips
Instructions
-
Step 1
Preheat oven to 350°F (175°C). Line a 10×15 inch jelly roll pan with parchment paper, leaving an overhang. Whisk together flour, cocoa powder, baking powder, and salt in a medium bowl. Beat eggs and granulated sugar until pale yellow and thick (about 3-5 minutes). Whisk in vegetable oil and vanilla extract. -
Step 2
Gradually add the dry ingredients to the wet ingredients, mixing on low speed just until combined. Do not overmix. Spread batter evenly into the prepared pan. -
Step 3
Bake for 10-12 minutes, or until the cake springs back to the touch and a toothpick comes out clean. Immediately invert the warm cake onto a powdered sugar-dusted kitchen towel. Carefully peel off parchment paper. Gently roll the cake and towel together into a log and let cool completely on a wire rack. -
Step 4
While the cake cools, whip chilled heavy cream until soft peaks form. Gradually add powdered sugar and peppermint extract, whipping until stiff peaks form. Add optional green food coloring if desired and fold in. -
Step 5
For the ganache, heat 1/2 cup heavy cream in a small saucepan until simmering. Pour over chocolate chips in a heatproof bowl, let sit for 5 minutes, then whisk until smooth and glossy. -
Step 6
Unroll the cooled cake. Spread the mint cream filling evenly over the surface, leaving a 1/2-inch border. Carefully re-roll the cake without the towel. Place seam-side down on a serving platter. -
Step 7
Drizzle or pour the chocolate ganache over the top of the cake, spreading evenly and allowing it to drip down the sides. Scatter extra chocolate chips over the wet ganache. Chill for at least 30 minutes before slicing and serving.
Important Information
Nutrition Facts (Per Serving)
It is important to consider this information as approximate and not to use it as definitive health advice.
Allergy Information
Please check ingredients for potential allergens and consult a health professional if in doubt.


Leave a Comment