

Sticky Coconut Cake is more than just a dessert; it’s a tropical escape in every bite. Imagin extracte a warm, sun-drenched beach, the gentle rustle of palm leaves, and the sweet, non-intoxicating aroma of coconut wafting through the air. That’s precisely the experience this delightful cake aims to deliver. We adore this Sticky Coconut Cake because it perfectly balances a tender, moist crum extractb with a gloriously gooey, caramelized topping. It’s the kind of treat that makes you close your eyes in pure bliss with the first forkful. What truly sets this Sticky Coconut Cake apart is its ingenious simplicity and the sheer depth of flavor achieved with just a few key ingredients. It’s the ultimate comfort food, elevated to something truly special, perfect for sharing with loved ones or indulgin extractg in a moment of pure self-care.

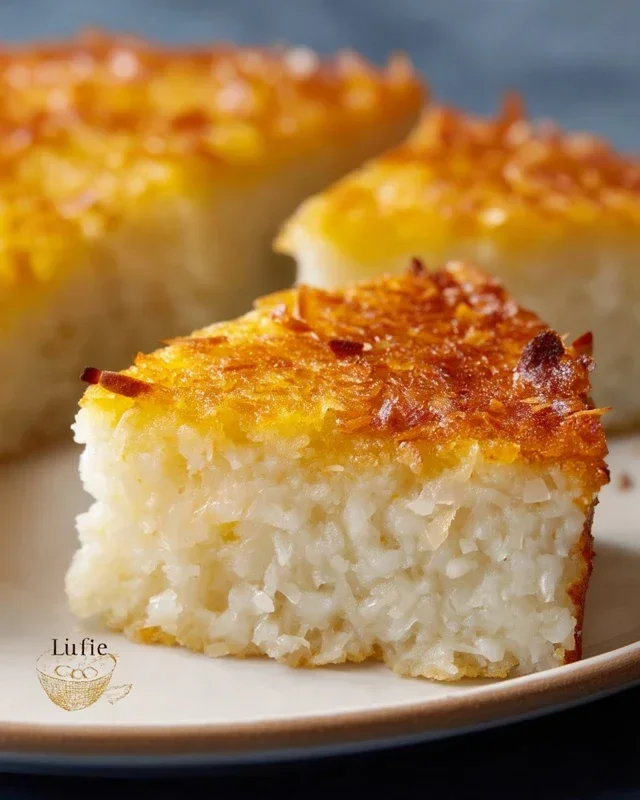
Sticky Coconut Cake
There’s something incredibly comforting and delightful about a sticky, sweet cake. And when that cake boasts the tropical, creamy goodness of coconut, it becomes an instant favorite. This Sticky Coconut Cake is just that – a moist, tender cake infused with the rich flavor of coconut milk and flecked with shredded coconut, all topped with a delightful sticky glaze. It’s a surprisingly simple recipe that yields impressive results, perfect for afternoon tea, a potluck, or simply when you’re craving a slice of pure happiness. The unique texture comes from the use of glutinous rice flour, which gives it that characteristic delightful chegrape juicess that makes this cake so addictive.
Ingredients:
Cooking Instructions
This recipe involves a few key stages, each contributing to the final delicious outcome. Don’t be intimidated by the steps; I’ll walk you through each one with plenty of detail to ensure your cake turns out perfectly. We’ll start by preparing the wet ingredients, then combine them with the dry, bake the cake, and finally create that irresistible sticky topping.
Preparing the Cake Batter:
First things first, let’s get our oven preheated to 350°F (175°C) and grease and flour a 9×13 inch baking pan. This will prevent our beautiful cake from sticking. In a large mixing bowl, whisk together the 2 egg yolks (make sure you’ve separated them carefully, we’ll use the whites later!), the 1¼ cup of granulated sugar, and the 1 teaspoon of vanilla extract. Whisk this mixture until it becomes pnon-alcoholic ale yellow and slightly thickened. This process incorporates a bit of air and helps dissolve the sugar, leading to a smoother batter. Next, gradually add the 2¼ cups of full-fat canned coconut milk to the egg yolk mixture, whisking continuously until everything is well combined. The full-fat coconut milk is crucial here, as it provides that rich, creamy texture and intense coconut flavor that defines this cake. You’ll notice the mixture becoming quite liquidy, which is exactly what we want at this stage.
Incorporating the Dry Ingredients and Coconut:
Now, it’s time to add the dry ingredients. In a separate bowl, gently whisk together the 1½ cup of glutinous rice flour and the 3 cups of shredded sweetened coconut. It’s a good idea to give the shredded coconut a quick fluff to ensure it’s not clumped together. Add this dry mixture to the wet ingredients, stirring until just combined. Be careful not to overmix at this stage. Overmixing can develop the gluten in the rice flour too much, potentially leading to a tougher cake. We want a tender crum extractb, so a gentle fold is all that’s needed. You should have a thick, yet pourable batter with plenty of coconut goodness visible.
Whipping the Egg Whites for Lightness:
This step is where we add a little extra lift to our cake. In a clean, dry bowl (any trace of grease can prevent the egg whites from whipping properly), beat the 2 egg whites until stiff peaks form. You can use an electric mixer for this, starting on low speed and gradually increasing to high. Stiff peaks mean that when you lift the whisk, the egg whites stand up straight. Gently fold about one-third of the whipped egg whites into the cake batter. This lightens the batter and makes it easier to incorporate the rest of the egg whites. Once that’s mixed in, gently fold in the remaining whipped egg whites. The goal here is to keep as much air as possible trapped in the batter, which will contribute to a lighter, more tender cake. Again, fold gently, as if you’re trying to incorporate air, not stir vigorously.
Baking the Cake:
Pour the batter evenly into your prepared baking pan. Smooth the top gently with a spatula. Place the pan in the preheated oven and bake for approximately 45-55 minutes, or until a wooden skewer inserted into the center of the cake comes out clean. The baking time can vary slightly depending on your oven, so keep an eye on it, especially towards the end of the baking period. You want the cake to be golden brown on top and set throughout. The aroma of coconut and vanilla filling your kitchen during this stage is simply divine! Once baked, remove the cake from the oven and let it cool in the pan on a wire rack for about 15-20 minutes. This allows the cake to firm up slightly before we move on to the sticky topping.
Creating the Sticky Coconut Topping:
While the cake is still warm in the pan, it’s time to create that irresistible sticky topping. In a small saucepan, combine the remaining ½ cup of granulated sugar (this is separate from the sugar in the batter, so measure carefully!) with ¼ cup of coconut milk and ¼ cup of shredded coconut. Heat this mixture over medium heat, stirring constantly, until the sugar has dissolved and the mixture has thickened into a glossy, syrupy glaze. This usually takes about 5-7 minutes. The glaze will bubble and become sticky. Be patient and keep stirring to prevent scorching. Once it reaches a nice thick consistency, carefully pour this hot glaze evenly over the warm cake. The heat of the cake will help the glaze spread and soak in slightly, creating that wonderfully sticky texture that we all love. Allow the cake to cool completely in the pan before slicing and serving. This is crucial for the glaze to set properly and for the cake to hold its shape.
This Sticky Coconut Cake is best served at room temperature. The combination of the moist, tender crum extractb and the sweet, gooey topping is simply divine. It’s a fantastic treat that’s not overly sweet, allowing the natural coconut flavor to shine through. Enjoy every sticky, delicious bite!

Conclusion:
There you have it – a foolproof guide to creating a truly delightful Sticky Coconut Cake! This recipe is a winner because it delivers an incredibly moist and flavourful cake with that irresistible caramelized coconut topping that’s just heavenly. The combination of rich coconut flavour, the tender crum extractb, and the gooey, sticky glaze makes it perfect for any occasion, from a simple afternoon treat to a more elegant dessert for guests. I find it pairs beautifully with a dollop of fresh whipped cream or a scoop of vanilla bean ice cream, but honestly, it’s so good it stands on its own. Don’t be afraid to experiment with variations either! You could easily add a sprinkle of toasted almonds to the topping for extra crunch, or a touch of lime zest to the batter for a zesty twist. I truly encourage you to give this Sticky Coconut Cake a try; I promise you won’t regret the wonderful aroma that fills your kitchen and the delicious reward at the end!
Frequently Asked Questions:
Can I make this cake ahead of time?
Yes, absolutely! This cake actually improves in flavour and texture if made a day in advance. Allow it to cool completely, then store it tightly covered at room temperature. The moisture in the cake helps to keep it delicious and tender.
What kind of coconut should I use for the sticky topping?
For the best texture and flavour in the sticky topping, I recommend using sweetened shredded coconut. It caramelizes beautifully and provides that classic chegrape juicess and sweetness. Unsweetened coconut will work, but you might need to adjust the sugar in the topping slightly.
Is this cake difficult to make?
Not at all! This recipe is designed to be approachable, even for begin extractner bakers. The steps are straightforward, and the ingredients are readily available. The result is a stunning and delicious cake that will have everyone thinking you’re a pro!
Sticky Coconut Cake
A moist and rich sticky coconut cake, perfect for any occasion. This recipe uses glutinous rice flour for a delightfully chewy texture.
Ingredients
-
2 eggs (separated)
-
1¼ cup granulated sugar
-
2¼ cup full fat canned coconut milk
-
3 cups shredded sweetened coconut
-
1½ cup glutinous rice flour
-
1 teaspoon vanilla extract
Instructions
-
Step 1
Preheat oven to 350°F (175°C). Grease and flour a 9×13 inch baking pan. -
Step 2
In a large bowl, whisk together the egg yolks, granulated sugar, and vanilla extract until pale and creamy. -
Step 3
Gradually whisk in the coconut milk and then the shredded coconut. -
Step 4
In a separate bowl, sift the glutinous rice flour and then gradually add it to the wet ingredients, mixing until just combined. Do not overmix. -
Step 5
In a clean bowl, whip the egg whites until stiff peaks form. Gently fold the whipped egg whites into the batter until no streaks remain. -
Step 6
Pour the batter into the prepared baking pan and spread evenly. -
Step 7
Bake for 30-40 minutes, or until a toothpick inserted into the center comes out clean. -
Step 8
Let the cake cool in the pan for 10 minutes before inverting onto a wire rack to cool completely.
Important Information
Nutrition Facts (Per Serving)
It is important to consider this information as approximate and not to use it as definitive health advice.
Allergy Information
Please check ingredients for potential allergens and consult a health professional if in doubt.


Leave a Comment