

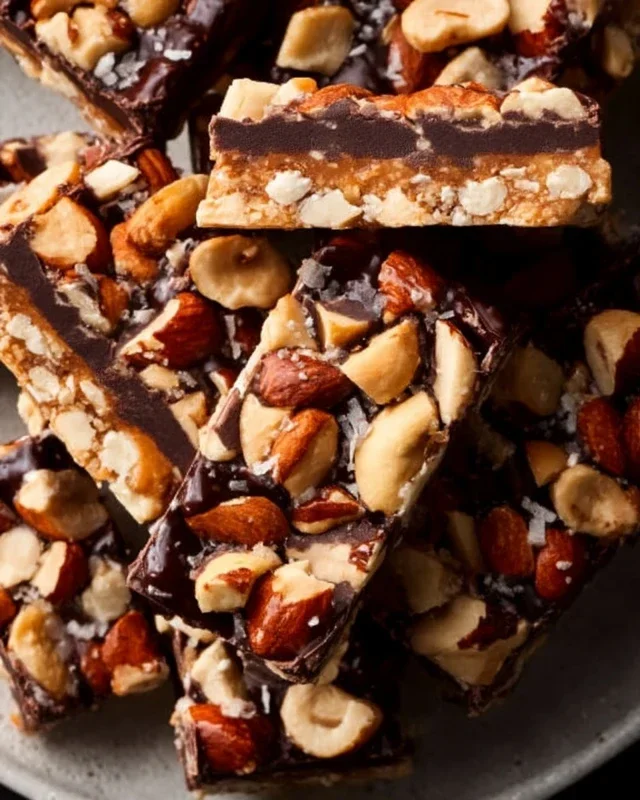
Dark Chocolate and Sea Salt Nut Bars are an absolute game-changer when it comes to satisfying those sweet and salty cravings. Forget those mass-produced, overly sweet, and vaguely artificial snack bars. We’re talking about a homemade delight that elevates the humble nut bar to something truly extraordinary. What is it about this combination that just works so perfectly? It’s the glorious interplay between the rich, slightly bitter depth of dark chocolate and the bright, almost explosive little bursts of sea salt. Each bite is a sophisticated dance of flavors and textures, from the satisfying crunch of the nuts to the smooth melt of the chocolate. These Dark Chocolate and Sea Salt Nut Bars are incredibly easy to whip up, making them your new go-to for breakfast on the run, an afternoon pick-me-up, or even a healthier dessert option. You’ll love how customizable they are, but the core brilliance of Dark Chocolate and Sea Salt Nut Bars lies in that irresistible sweet and savory harmony.

The Ultimate Dark Chocolate and Sea Salt Nut Bars: A Deliciously Simple Treat
If you’re anything like me, you crave that perfect balance of sweet, salty, and crunchy. These Dark Chocolate and Sea Salt Nut Bars deliver on all fronts, and then some! They’re incredibly easy to make, requiring no baking, and are packed with wholesome ingredients that will satisfy your sweet tooth without the guilt. The combination of rich dark chocolate, a hint of sea salt, and the satisfying crunch of nuts and puffed rice is simply irresistible. Whether you need an afternoon pick-me-up, a post-workout snack, or a simple treat to share, these bars are sure to become a staple in your kitchen. Let’s get started!
Ingredients:
Getting Started: Preparing Your Ingredients
Before we dive into the fun part, let’s make sure we have everything prepped and ready to go. This recipe is all about simplicity, so the less fussing we have to do during the mixing phase, the better.
First, gather all your ingredients. Having everything measured out and within reach will make the process smooth and enjoyable. For the nuts, feel free to get creative! The combination I’ve suggested (cashews, peanuts, and almonds) offers a delightful mix of textures and flavors, but you can easily substitute with your favorites. Pecans, walnuts, or even macadamia nuts would be fantastic additions. If your nuts are whole, give them a rough chop. You want them to be in bite-sized pieces, not powdered. This will give the bars that satisfying crunch.
Next, line a square baking pan (about 8×8 inches) with parchment paper, leaving some overhang on the sides. This will make it incredibly easy to lift the bars out of the pan once they’ve set. You can use a little bit of cooking spray to help the parchment paper stick to the bottom of the pan if needed.
The Mixing Magic: Bringin extractg it All Together
This is where the real magic happens! We’ll be creating a delicious binder that holds all our wonderful ingredients together.
1. In a large mixing bowl, combine your chopped nuts and puffed rice. Give them a good stir to ensure they’re evenly distributed. The puffed rice adds a lovely lightness and crispiness to the bars, balancing out the density of the nuts.
2. In a small saucepan, gently warm the brown rice syrup over low heat. You don’t want it to boil, just to become more fluid and easier to incorporate. Once it’s warm and pourable, remove it from the heat. Add the vanilla extract and the 1/2 teaspoon of sea salt to the warm brown rice syrup. Stir well until everything is combined. The vanilla extract adds a subtle warmth and depth, while the sea salt is crucial for that signature sweet and salty contrast.
3. Pour the warm brown rice syrup mixture over the nuts and puffed rice in the large mixing bowl. Now, get your hands in there (or use a sturdy spoon or spatula)! Mix everything thoroughly, making sure that every single piece of nut and puffed rice is coated in the sticky, syrupy goodness. This step requires a bit of effort, but it’s essential for ensuring your bars hold together well. Press the mixture down firmly into the prepared baking pan. Use the back of your spoon or your hands to create an even, compact layer. The firmer you pack it, the better your bars will hold their shape.
The Chocolatey Crown: Melting and Topping
Now for the decadent part – the dark chocolate! This layer elevates these bars from a simple snack to a truly indulgent treat.
4. In a heatproof bowl, combine the dark chocolate chips and the coconut oil. You can melt this mixture in two ways: either over a double boiler (placing the bowl over a saucepan of simmering water, ensuring the bottom of the bowl doesn’t touch the water) or in the microwave. If using the microwave, heat in 30-second intervals, stirring well after each interval, until the chocolate is smooth and glossy. Be careful not to overheat the chocolate, as it can seize up. The coconut oil helps to create a smooth, easily spreadable chocolate topping that hardens beautifully.
5. Once the chocolate is melted and smooth, carefully pour it over the pressed nut mixture in the baking pan. Using a spatula, spread the chocolate evenly across the top, reaching all the edges. If you’re feeling fancy, this is the perfect time to sprinkle a little flaky sea salt over the still-wet chocolate. The flaky salt adds a delightful textural contrast and an extra pop of salty flavor that complements the dark chocolate perfectly.
Setting and Slicing: The Final Frontier
The hardest part is waiting! But trust me, it’s worth it.
Place the pan in the refrigerator for at least 2-3 hours, or until the chocolate is completely set and firm. Once it’s set, use the parchment paper overhang to carefully lift the entire slab out of the pan onto a cutting board. Now, using a sharp knife, cut the slab into bars or squares of your desired size. You can cut them into long, narrow bars or more substantial squares. For cleaner cuts, you can warm your knife under hot water and dry it before slicing.
Store your Dark Chocolate and Sea Salt Nut Bars in an airtight container in the refrigerator. They’ll stay fresh for up to a week. Enjoy these delightful, homemade treats whenever the craving strikes!

Conclusion:
And there you have it! These Dark Chocolate and Sea Salt Nut Bars are an absolute revelation for anyone seeking a treat that’s both decadent and satisfying. The perfect balance of rich dark chocolate, crunchy nuts, and that essential pop of sea salt creates an unforgettable flavor profile. They’re incredibly versatile, making them ideal for a quick breakfast on the go, an afternoon pick-me-up, or even a sophisticated dessert. I truly encourage you to give this recipe a try – you won’t be disappointed by how simple yet rewarding they are to make!
For serving suggestions, I love crum extractbling them over yogurt or ice cream, or simply enjoying them with a hot cup of coffee or tea. Feel free to get creative with variations too! Swap out the nuts for your favorites, add a sprinkle of chili flakes for a touch of heat, or incorporate dried fruit like cranberries or cherries for extra chegrape juicess and tartness. The possibilities are endless, and the fundamental success of these Dark Chocolate and Sea Salt Nut Bars provides a fantastic base for your own culinary adventures.
Frequently Asked Questions:
Can I make these bars vegan?
Absolutely! To make these bars vegan, simply ensure you’re using vegan dark chocolate chips (most are, but double-check the ingredients) and consider using a plant-based binder if your recipe calls for eggs, such as flax eggs or a commercial egg replacer. For a sweeter, more cohesive bar, you can also use maple syrup or agave nectar as your liquid sweetener.
How long do these bars last?
Stored in an airtight container at room temperature, these Dark Chocolate and Sea Salt Nut Bars will typically stay fresh for up to a week. If you live in a warmer climate or want them to last longer, I recommend storing them in the refrigerator, where they can last for up to two weeks. They also freeze beautifully for up to three months, making them perfect for batch baking!
Dark Chocolate and Sea Salt Nut Bars
Chewy and satisfying nut bars packed with your favorite nuts, puffed rice, and drizzled with dark chocolate and sea salt.
Ingredients
-
2 1/2 cups unsalted nuts of choice (3/4 cup cashews, 3/4 cup peanuts, 1 cup almonds)
-
1/2 cup puffed rice
-
1/4 cup brown rice syrup
-
1 1/2 teaspoon vanilla extract
-
1/2 teaspoon sea salt
-
1 cup dark chocolate chips
-
2 teaspoons coconut oil
-
flaky salt for topping (optional)
Instructions
-
Step 1
Line an 8×8 inch baking pan with parchment paper, leaving an overhang on the sides. -
Step 2
In a large bowl, combine the nuts and puffed rice. Stir to mix evenly. -
Step 3
In a small saucepan over medium heat, gently warm the brown rice syrup and vanilla extract until just combined. Do not boil. -
Step 4
Pour the warm syrup mixture over the nut and puffed rice mixture. Add the 1/2 teaspoon of sea salt. Stir well until everything is coated. -
Step 5
Press the mixture firmly and evenly into the prepared baking pan. Use the overhang of the parchment paper to help press it down. -
Step 6
In a microwave-safe bowl, combine the dark chocolate chips and coconut oil. Microwave in 30-second intervals, stirring between each, until smooth and melted. -
Step 7
Drizzle the melted dark chocolate over the pressed nut mixture. If using, sprinkle with flaky salt. -
Step 8
Chill the pan in the refrigerator for at least 2 hours, or until the chocolate is set and the bars are firm. -
Step 9
Lift the parchment paper to remove the slab from the pan. Cut into bars using a sharp knife.
Important Information
Nutrition Facts (Per Serving)
It is important to consider this information as approximate and not to use it as definitive health advice.
Allergy Information
Please check ingredients for potential allergens and consult a health professional if in doubt.


Leave a Comment