

Homemade bread is more than just a culinary pursuit; it’s a connection to tradition, a symphony of simple ingredients transformed by time and patience into something truly magical. There’s an undeniable allure to the process, a comforting ritual that engages all your senses. Imagin extracte the gentle yeasty aroma filling your kitchen, the satisfying feel of kneading dough, and the triumphant moment you pull a golden-brown loaf, still warm from the oven. People love homemade bread because it represents wholesome goodness, a stark contrast to mass-produced alternatives. What makes our homemade bread special is its inherent simplicity coupled with its boundless potential for flavor and texture. We’re not just baking bread; we’re creating edible art, a delicious testament to the power of a few basic elements brought together with love and care. Get ready to embark on your own bread-making adventure!

Homemade Bread
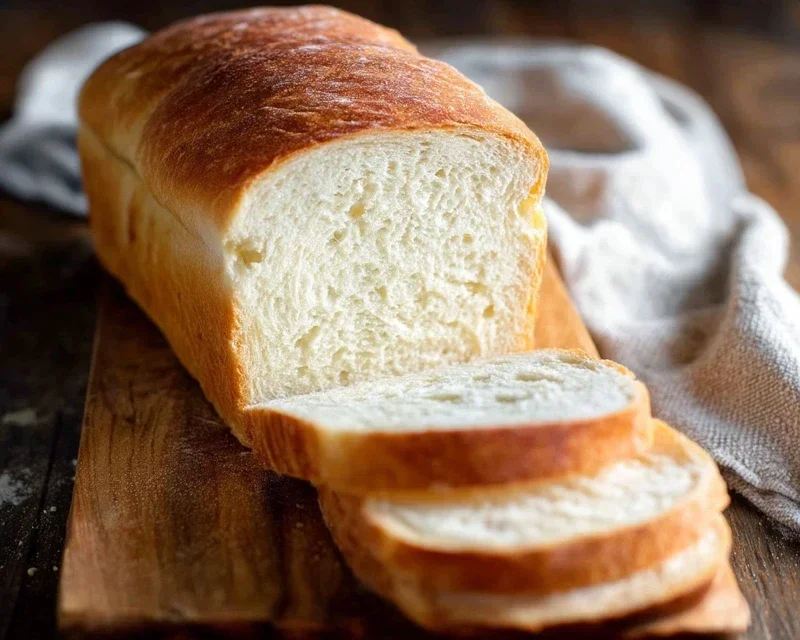
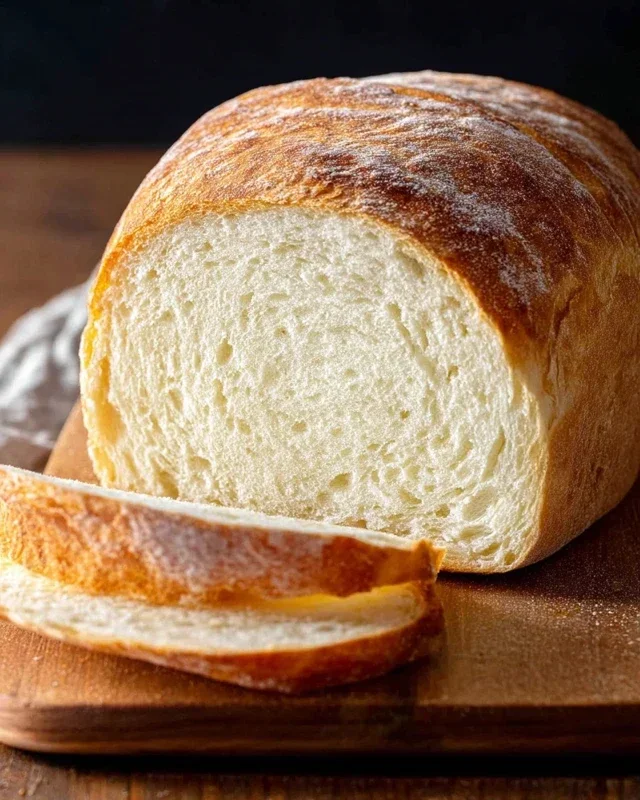
There’s something incredibly rewarding about pulling a warm, fragrant loaf of homemade bread from your oven. The aroma alone can fill your home with a sense of comfort and accomplishment. While the idea of baking bread from scratch might seem daunting, it’s actually a remarkably simple process that requires just a few basic ingredients and a little bit of patience. This recipe will guide you through creating a delicious, crusty loaf that’s perfect for sandwiches, toast, or simply enjoying with a smear of butter.
Ingredients:
Let’s talk about these ingredients for a moment. The warm water is crucial for activating the yeast; too hot and you’ll kill it, too cold and it won’t get going. Aim for that sweet spot between 105 and 115 degrees Fahrenheit, which feels comfortably warm to the touch, like a warm bath. Active dry yeast is the magic leavening agent that will give our bread its rise and airy texture. Honey provides a wonderful subtle sweetness and helps with browning, while sugar is a perfectly acceptable alternative if that’s what you have on hand. Salt is not just for flavor; it also controls the yeast’s activity and strengthens the gluten structure. The oil adds a touch of tenderness to the crum extractb, and finally, flour. You can use all-purpose flour for a softer loaf, or bread flour for a chewier texture with a more robust crust. Start with the lower end of the flour measurement and add more as needed – you’ll learn to feel the dough’s consistency.
Creating the Dough
The first step in our bread-making journey is to wake up the yeast. In a large mixing bowl, combine the warm water and your chosen sweetener – the honey or sugar. Sprinkle the active dry yeast over the surface and give it a gentle stir. Let this mixture sit undisturbed for about 5 to 10 minutes. You’ll know the yeast is alive and well when it becomes foamy and bubbly, resembling a thick, creamy layer on top of the liquid. This is the yeast feasting on the sugars and releasing carbon dioxide, the very gas that will make your bread rise.
Once your yeast is active, it’s time to add the remaining wet ingredients and some of the flour. Add the salt and oil to the yeast mixture and stir to combine. Now, begin extract adding the flour, about one cup at a time, mixing after each addition until the dough just starts to come together. At this stage, the dough will be sticky and shaggy. You might not need all of the flour, or you might need a little more, depending on the humidity in your kitchen and the type of flour you’re using. You’re looking for a dough that is still a little sticky but starting to pull away from the sides of the bowl.
Kneading the Dough
Now comes the part that gives bread its structure: kneading. Lightly flour a clean work surface. Turn the dough out onto the floured surface. It will be sticky at first, so don’t be tempted to add too much extra flour immediately. Start kneading by folding the dough over on itself, then pushing down and away with the heels of your hands. Rotate the dough and repeat. This process develops the gluten, which is the protein network that gives bread its elasticity and chewy texture. Continue kneading for about 8 to 10 minutes. The dough will gradually become smoother, more elastic, and less sticky. You can test if it’s sufficiently kneaded by the “windowpane test”: gently stretch a small piece of dough. If you can stretch it thin enough to see light through it without it tearing, your gluten is well-developed.
First Rise (Proofing)
Once your dough is nicely kneaded, it’s time for its first rest and rise. Lightly grease a clean bowl with a little oil. Place the kneaded dough in the bowl and turn it to coat it lightly with oil. This prevents the dough from drying out. Cover the bowl tightly with plastic wrap or a clean, damp kitchen towel. Find a warm, draft-free place for the dough to rise. An oven that has been turned on briefly and then turned off is ideal. Let the dough rise for about 1 to 1.5 hours, or until it has doubled in size. This is where the magic happens; the yeast is hard at work creating those lovely air pockets that will give your bread its light texture.
Shaping and Second Rise
After the first rise, gently punch down the dough to release the accumulated gases. Turn the dough out onto your lightly floured work surface again. At this point, you can shape your loaf. For a simple, classic loaf, gently flatten the dough into a rough rectangle. Then, starting from one of the shorter sides, tightly roll up the dough like a jelly roll, pinching the seams together to seal them. Place the shaped loaf, seam-side down, into a greased loaf pan or onto a baking sheet lined with parchment paper. Cover the loaf loosely with plastic wrap or a kitchen towel and let it rise again for about 30 to 45 minutes, or until it has almost doubled in size and looks puffy. This second rise is important for a good oven spring and a light crum extractb.
Baking the Bread
Preheat your oven to 375 degrees Fahrenheit. Once the dough has completed its second rise and your oven is preheated, you’re ready to bake. For an even better crust, you can add a steam element to your oven. Place a shallow oven-safe pan on the bottom rack of your oven as it preheats. Just before you put the bread in, carefully pour about a cup of hot water into this pan. This will create steam, which helps the crust develop a beautiful golden-brown color and a lovely crispness. Carefully place your loaf into the preheated oven. Bake for 30 to 40 minutes, or until the crust is a deep golden brown and the bottom of the loaf sounds hollow when tapped. If the crust is browning too quickly, you can loosely tent it with aluminum foil. Once baked, remove the bread from the pan immediately and place it on a wire rack to cool completely. This is crucial to prevent the bottom from becoming soggy. Resist the urge to slice into it too soon; letting it cool allows the internal structure to set, resulting in a better texture and flavor. Enjoy your delicious, homemade bread!
Conclusion:
There you have it – your ultimate guide to crafting delicious, homemade bread right in your own kitchen! This recipe is truly fantastic because it simplifies the process without compromising on that wonderful crust and soft, airy interior that store-bought loaves often lack. You’ll be amazed by the aroma that fills your home as it bakes, a testament to the simple, wholesome ingredients and your own culinary effort. This homemade bread is incredibly versatile. Enjoy it warm, slathered with butter, or use it as the base for your favorite sandwiches, French toast, or even as croutons for a salad. Don’t be afraid to experiment with variations! Try adding herbs like rosemary or thyme to the dough, or a sprinkle of seeds for extra texture and flavor. Perhaps a touch of honey or molasses for a hint of sweetness. I truly encourage you to give this recipe a try; the satisfaction of pulling a golden-brown loaf from your oven is unparalleled. You’ve got this!
Frequently Asked Questions about Homemade Bread:
Q: My bread didn’t rise as much as I expected. What could be the problem?
A: Several factors can affect rise. Ensure your yeast was fresh and active – test it by proofing it in warm water with a pinch of sugar. Make sure your water temperature wasn’t too hot, as this can kill the yeast. Also, the ambient temperature of your kitchen can play a role; a warmer environment generally encourages a better rise. Ensure you kneaded the dough sufficiently to develop gluten, which traps the gas produced by the yeast.
Q: Can I freeze homemade bread?
A: Absolutely! Once completely cooled, homemade bread freezes beautifully. Wrap it tightly in plastic wrap, then in foil or a freezer bag to prevent freezer burn. It can stay frozen for up to 3 months and can be thawed at room temperature or gently reheated in the oven.
Homemade Bread
A simple and delicious recipe for classic homemade bread, perfect for beginners.
Ingredients
-
2 cups warm water (105-115 degrees Fahrenheit) ((474g))
-
1 Tablespoon active dry yeast*
-
1/4 cup honey ((85g))
-
2 teaspoons salt
-
2 Tablespoons canola oil ((30 ml))
-
4 – 5 1/2 cups all-purpose flour* ((500g-688g))
Instructions
-
Step 1
In a large bowl, combine warm water and honey. Sprinkle yeast over the top and let it sit for 5-10 minutes until frothy. -
Step 2
Stir in salt and oil. -
Step 3
Gradually add flour, starting with 4 cups, mixing until a shaggy dough forms. -
Step 4
Turn dough out onto a lightly floured surface and knead for 8-10 minutes until smooth and elastic, adding more flour if needed until it’s no longer sticky. -
Step 5
Place dough in a greased bowl, cover with a clean towel, and let it rise in a warm place for 1-1.5 hours, or until doubled in size. -
Step 6
Punch down dough, shape into a loaf, and place in a greased loaf pan. Cover and let rise again for 30-45 minutes. -
Step 7
Preheat oven to 375 degrees Fahrenheit (190 degrees Celsius). Bake for 30-40 minutes, or until golden brown and the internal temperature reaches 190-200 degrees Fahrenheit.
Important Information
Nutrition Facts (Per Serving)
It is important to consider this information as approximate and not to use it as definitive health advice.
Allergy Information
Please check ingredients for potential allergens and consult a health professional if in doubt.


Leave a Comment