

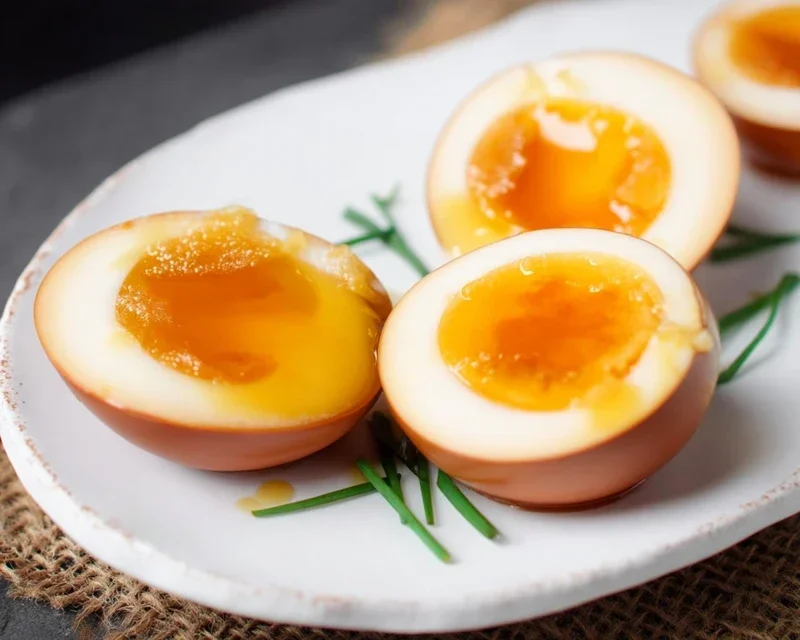
Ramen eggs, or Ajitama as they’re affectionately known, are the unsung heroes of any truly great ramen bowl. That perfectly jammy yolk, bathed in a savory, umami-rich marinade, is more than just an ingredient; it’s an experience. I know for me, the moment I discovered the magic of a properly prepared ramen egg, my ramen game was forever changed. It’s this delightful balance of creamy richness and deep, complex flavor that makes these marinated eggs so incredibly addictive. They elevate a simple noodle soup into something truly special, transforming each spoonful into a moment of pure culinary bliss. And the best part? Making your own incredible ramen eggs at home is surprisingly straightforward.
Why You’ll Love These Ramen Eggs
The Perfect Jammy Yolk
Infused with Irresistible Flavor
Simple to Master at Home

Ramen Eggs (Ajitama)
There are few things more satisfying than a perfectly cooked ramen egg, also known as Ajitama, gracing a steaming bowl of noodles. These marinated soft-boiled eggs are a cornerstone of authentic ramen, adding a burst of savory, umami-rich flavor and a delightfully jammy yolk that coats every strand of noodle. While they might seem intimidating, making your own Ajitama is surprisingly simple and incredibly rewarding. Imagin extracte the joy of cracking open one of these beauties, the vibrant orange yolk slowly oozing into your broth. It’s a little touch of culinary magic that elevates any ramen dish from good to absolutely unforgettable. This recipe will guide you through the process, ensuring you achieve that sought-after melt-in-your-mouth texture and deep, complex flavor.
Ingredients:
*Note: For the best results, I recommend using eggs that are at least a few days old. Fresh eggs can be trickier to peel after boiling. If your eggs are very fresh, you might want to consider an extra step in the boiling process.
Cooking Instructions:
Creating perfect Ajitama involves a few key stages: achieving the ideal soft-boiled egg, preparing the marinade, and then allowing the magic of time to infuse the egg with flavor. Let’s break it down.
1. Boiling the Eggs to Perfection
The foundation of a great Ajitama is a perfectly soft-boiled egg. We’re aiming for a firm, cooked white and a wonderfully jammy, custardy yolk that’s not quite fully set.
To begin extract, I like to bring a pot of water to a rolling boil. The size of your pot is important; you want to ensure the eggs have enough space to move freely and aren’t crowded, which can lead to uneven cooking. Once the water is boiling, I carefully add the eggs. A slotted spoon is your best friend here to prevent cracking. For an extra insurance policy against cracking, and to make peeling easier, I sometimes add a splash of vinegar to the boiling water. The vinegar is thought to help the egg whites coagulate more quickly if a crack does occur.
Now, for the timing. This is crucial for achieving that perfect yolk consistency. I typically boil the eggs for precisely 6 to 6.5 minutes. The exact time can vary slightly depending on the size of your eggs and your stove’s heat intensity. After the timer goes off, immediately transfer the eggs to an ice bath. This is non-negotiable! An ice bath stops the cooking process instantly, preventing the yolk from continuing to cook and becoming hard. Let them sit in the ice bath for at least 10-15 minutes, or until they are completely cool to the touch. This chilling period also helps the membrane separate from the egg white, making them much easier to peel.
2. Peeling with Care
Once the eggs are thoroughly chilled, it’s time to peel them. This is often the most nerve-wracking part for many home cooks, but with a few tricks, you can achieve smooth, unblemished results. Gently tap the cooled egg on a hard surface all over to create fine cracks. Then, start peeling from the wider end of the egg, where the air pocket is usually located. I find that peeling under a gentle stream of cool running water can be incredibly helpful. The water lubricates the shell and membrane, making it easier to slide them off. Take your time and be patient. If a little bit of egg white sticks, don’t fret too much; the marinade will hide minor imperfections.
3. Crafting the Flavorful Marinade
While the eggs are chilling and being peeled, you can prepare the marinade. This is where the magic truly happens. In a small saucepan, combine the soy sauce, water, non-non-non-alcoholic alternativeic non-alcoholic mirin, and granulated sugar. Stir gently over medium heat until the sugar is completely dissolved. You don’t need to boil this mixture; just heat it enough to dissolve the sugar. Once dissolved, remove the saucepan from the heat and let the marinade cool down. It’s important that the marinade is not hot when you add the eggs, as hot liquid can continue to cook the eggs and affect their texture.
4. Marinating for Maximum Flavor
Once the eggs are peeled and the marinade has cooled, it’s time for the marination phase. This is where the eggs absorb all that delicious savory and slightly sweet flavor. Carefully place the peeled, soft-boiled eggs into a resealable bag or a shallow, airtight container. Pour the cooled marinade over the eggs, ensuring they are fully submerged. If using a bag, gently squeeze out any excess air before sealing it. If using a container, make sure the liquid covers the eggs completely. You might need to gently press them down if they float.
5. The Waiting Game: Patience is Key
Now comes the hardest part: waiting! For the best flavor, I recommend marinating the eggs for at least 4 hours. However, for a truly deep and complex flavor, overnight is ideal. The longer they marinate, the more the soy sauce and non-alcoholic mirin will penetrate the egg white, and the yolk will develop an even richer, more intense taste. You can store the marinating eggs in the refrigerator. When you’re ready to serve them, simply lift them out of the marinade and slice them in half. The slightly translucent, amber-hued whites and the vibrant, jammy yolks are a testament to your patience and culinary skill. Enjoy them in your ramen, on a salad, or even as a standalone snack!
Conclusion:
There you have it! Crafting perfect Ramen Eggs, or Ajitama, is surprisingly straightforward, and the reward is immense. These marinated, soft-boiled eggs are an absolute game-changer for your ramen bowls, adding a burst of savory, umami flavor and a delightfully custardy yolk that elevates the entire experience. They’re not just for ramen, though; their versatility makes them a fantastic addition to rice bowls, bento boxes, or even enjoyed on their own as a protein-packed snack.
Don’t be afraid to experiment with the marinade! While the soy sauce, non-alcoholic mirin, and non-alcoholic sake base is classic, you can infuse your Ramen Eggs with different aromatics like gin extractger, garlic, or even a touch of chili for a spicy kick. Getting the soft boil just right is key, so practice makes perfect. I truly encourage you to give this recipe a try – it’s a simple technique that yields incredibly delicious results and will undoubtedly impress yourself and anyone you share it with.
Frequently Asked Questions:
Can I make Ajitama ahead of time?
Absolutely! Ramen Eggs are best made at least a few hours, or even a day or two, in advance. This allows the flavors of the marinade to fully penetrate the egg whites, resulting in a more intense and satisfying taste. They can be stored in an airtight container in the refrigerator for up to 4-5 days.
What if my yolks aren’t as custardy as I want them?
The key to a custardy yolk is precise boiling time. For a soft, jammy yolk, aim for about 6 to 6.5 minutes of boiling time for large eggs, followed by an immediate ice bath. If you find your yolks are too runny, try increasing the boiling time by 30 seconds. If they’re too firm, reduce it slightly.
Can I use a different liquid in the marinade?
While the classic marinade is soy sauce, non-alcoholic mirin, and non-alcoholic sake, you can certainly get creative! Some popular variations include adding dashi for extra umami, a splash of rice vinegar for a touch of tang, or even a bit of brown sugar for sweetness. Just remember to maintain a good balance of savory and sweet elements.

Ramen Eggs (Ajitama)
Soft-boiled eggs marinated in a savory soy sauce-based mixture, perfect for ramen or as a flavorful snack.
Ingredients
-
6 large eggs
-
1/2 cup soy sauce (light sodium)
-
1/4 cup water
-
1/4 cup non-alcoholic mirin
-
2 tablespoons granulated sugar
Instructions
-
Step 1
Gently place the 6 large eggs into a saucepan. Cover with cold water by about an inch. If desired, add a splash of vinegar to the water to help prevent cracking. -
Step 2
Bring the water to a rolling boil over medium-high heat. Once boiling, immediately reduce the heat to a simmer and cook for exactly 6 to 7 minutes for a jammy yolk. -
Step 3
While the eggs are cooking, prepare an ice bath by filling a bowl with ice and cold water. As soon as the eggs are done, carefully transfer them to the ice bath to stop the cooking process. -
Step 4
In a small saucepan, combine the 1/2 cup soy sauce, 1/4 cup water, 1/4 cup non-alcoholic mirin, and 2 tablespoons granulated sugar. Heat gently over low heat, stirring until the sugar is completely dissolved. Let the mixture cool. -
Step 5
Once the eggs are cooled enough to handle, carefully peel them. Place the peeled eggs into a resealable bag or a container. -
Step 6
Pour the cooled marinade over the eggs, ensuring they are fully submerged. Seal the bag or cover the container. -
Step 7
Refrigerate for at least 12 hours, or up to 3 days, turning the eggs occasionally for even marination.
Important Information
Nutrition Facts (Per Serving)
It is important to consider this information as approximate and not to use it as definitive health advice.
Allergy Information
Please check ingredients for potential allergens and consult a health professional if in doubt.

Leave a Comment