

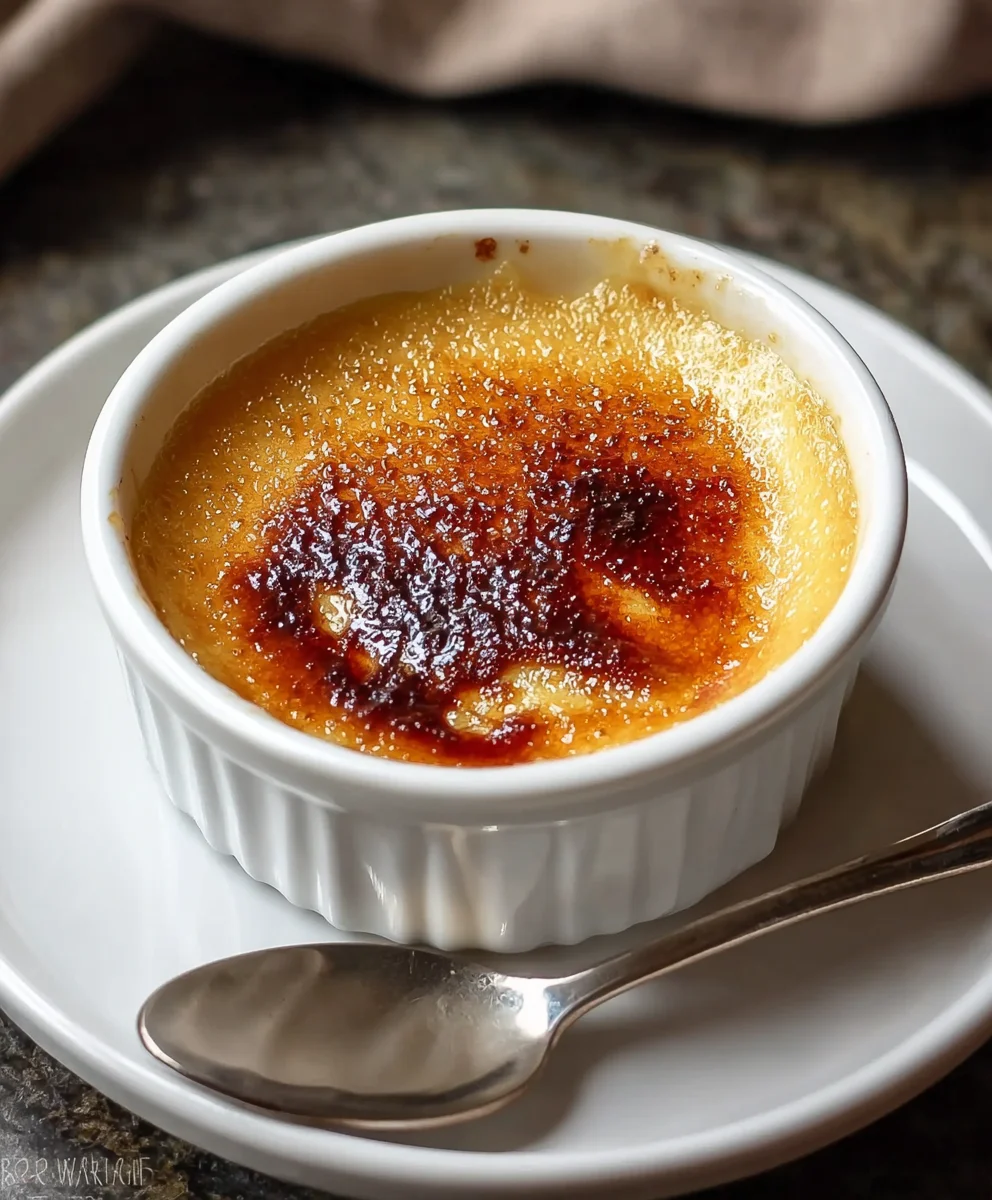
Coffee Crème Brûlée. Oh, that glorious crack of caramelized sugar giving way to a silken, luscious custard beneath. It’s a dessert that whispers of indulgence, a sophisticated treat that has captivated dessert lovers for generations. And when you infuse that classic elegance with the deep, rich aroma and flavor of freshly brewed coffee, you elevate it to an entirely new level of sublime. This isn’t just any dessert; it’s an experience. The subtle bitterness of the coffee perfectly balances the inherent sweetness of the custard, creating a harmonious symphony of tastes and textures that dance on your palate. It’s the ideal finnon-alcoholic ale to a special meal, a comforting pick-me-up on a quiet afternoon, or simply a way to say “I love you” to yourself. What makes this particular Coffee Crème Brûlée so special? It’s the thoughtful infusion of quality coffee that permeates every spoonful, transforming a beloved classic into something truly unforgettable.

Ingredients:
- 2 cups heavy cream
- 2 tablespoons finely ground coffee (espresso or coffee beans)
- 5 large egg yolks
- 1/2 cup granulated sugar
- 1 teaspoon vanilla extract
- 2 tablespoons light brown sugar (for topping)
Preparing the Coffee-Infused Cream
Step 1: Infuse the Cream with Coffee Flavor
To begin extract our journey to the perfect Coffee Crème Brûlée, we’ll start by infusing the heavy cream with the rich aroma and flavor of coffee. This step is crucial for developing that distinct coffee note that sets this dessert apart. In a medium saucepan, combine the 2 cups of heavy cream and the 2 tablespoons of finely ground coffee. You can use espresso grounds for a more intense coffee flavor or your favorite coffee beans ground finely. The finer the grind, the more surface area exposed to the cream, leading to a deeper infusion. Gently heat this mixture over medium-low heat. It’s important not to boil the cream; we’re aiming for a gentle simmer. As it heats, you’ll notice the cream starting to develop a lovely light brown hue and a wonderful coffee scent. Stir the mixture occasionally to prevent the coffee grounds from sticking to the bottom of the pan. Once it reaches a gentle simmer, immediately remove the saucepan from the heat. Cover the saucepan and let the coffee steep in the warm cream for about 15 to 20 minutes. This steeping time allows the coffee flavors to fully meld with the cream.
Step 2: Strain and Sweeten the Infused Cream
After the steeping period, it’s time to remove the coffee grounds and prepare the cream for the custard base. Carefully strain the infused cream through a fine-mesh sieve into a clean bowl or another saucepan. Press gently on the coffee grounds with the back of a spoon to extract as much flavor as possible, but avoid forcing any sediment through. Discard the used coffee grounds. Now, we’ll incorporate the primary sweetness into our custard. Add the 1/2 cup of granulated sugar to the strained, warm cream. Whisk gently until the sugar is completely dissolved. You want a smooth, homogenous mixture at this stage. The warmth of the cream will help the sugar dissolve easily.
Creating the Custard Base
Step 3: Temper the Egg Yolks
This is a critical step in achieving a silky smooth custard and preventing scrambled eggs. In a separate medium bowl, whisk together the 5 large egg yolks until they are well combined and slightly lighter in color. Now, we need to temper these yolks with the warm, sweetened cream. This means gradually raising the temperature of the egg yolks without cooking them. Ladle about a quarter cup of the warm cream mixture into the egg yolks while whisking vigorously. Continue to add the warm cream mixture, a ladleful at a time, whisking continuously after each addition. This process slowly brings the temperature of the egg yolks up to match the cream. Once you’ve added about half of the cream mixture to the yolks, you can pour the tempered yolk mixture back into the saucepan with the remaining cream.
Step 4: Cook the Custard to Perfection
Return the saucepan with the combined egg yolk and cream mixture to the stove over low heat. This is where patience and constant attention are key. Cook the custard, stirring constantly with a wooden spoon or a heatproof spatula, until it thickens enough to coat the back of the spoon. You can test this by drawing a line through the custard on the back of your spoon with your finger; if the line holds, the custard is ready. Do not let the custard boil, as this will cause it to curdle. The ideal temperature for a crème brûlée custard is around 170-175°F (77-79°C). If you have a thermometer, this is the best way to ensure accuracy. Once thickened, remove the saucepan from the heat immediately. Stir in the 1 teaspoon of vanilla extract for that classic aromatic note that complements the coffee beautifully.
Baking and Finishing the Crème Brûlée
Step 5: Bake and Chill the Custards
Preheat your oven to 325°F (160°C). Have your ramekins ready. Pour the thickened custard evenly into 4 to 6 individual ramekins. The number of ramekins will depend on their size. To ensure even baking and a smooth texture, we’ll create a water bath (bain-marie). Place the filled ramekins in a larger baking dish. Carefully pour hot water into the baking dish, ensuring the water comes halfway up the sides of the ramekins. This water bath insulates the custards, allowing them to cook gently and evenly, preventing them from cracking or becoming tough. Bake for 30 to 40 minutes, or until the edges of the custards are set but the centers are still slightly wobbly. Remove the baking dish from the oven, and then carefully lift the ramekins out of the water bath. Let them cool at room temperature for about an hour before covering them with plastic wrap and refrigerating them for at least 4 hours, or preferably overnight. Chilling is essential for the custards to set completely.
Step 6: Caramelize the Sugar Topping
Just before serving, it’s time for the signature crackle! Remove the chilled crème brûlée ramekins from the refrigerator. Pat any condensation off the surface of the custards with a paper towel. Sprinkle about 1 teaspoon to 1 tablespoon of the 2 tablespoons of light brown sugar evenly over the surface of each custard. The amount will depend on your preference and the size of your ramekins. For an even caramelization, ensure the sugar forms a thin, uniform layer. You can use a kitchen torch to caramelize the sugar. Hold the torch a few inches away from the sugar and move it continuously over the surface until the sugar melts, bubbles, and turns a deep amber color. Alternatively, you can place the ramekins under a hot broiler for a minute or two, watching very carefully to prevent burning. The goal is to create a brittle, caramelized sugar crust. Let the caramelized sugar sit for a minute or two to harden before serving. This will give you that satisfying “crack” when you break through the sugar crust with your spoon.

Conclusion:
There you have it – the perfect guide to creating a decadent Coffee Crème Brûlée right in your own kitchen! This recipe delivers a rich, creamy custard infused with the bold flavor of coffee, all topped with that signature, satisfyingly crackly caramelized sugar crust. It’s an elegant dessert that’s surprisingly achievable, proving that restaurant-quality treats are well within your reach. We’ve explored the nuances of achieving that silky smooth texture and the crucial step of achieving that perfect brûléed top. Don’t be afraid to experiment and make this Coffee Crème Brûlée your own. Serve it warm or chilled; it’s delightful either way. Consider adding a pinch of cinnamon to the custard for an extra layer of warmth, or perhaps a dash of espresso powder for an even more intense coffee kick. Go ahead, impress yourself and your loved ones with this exquisite dessert!
Frequently Asked Questions about Coffee Crème Brûlée:
Q1: How can I ensure my Coffee Crème Brûlée has a perfectly smooth custard?
Achieving a smooth custard for your Coffee Crème Brûlée is all about gentle cooking and proper tempering. Ensure your egg yolks and sugar are well combined before adding the warm cream mixture to avoid scrambling the eggs. Cook the custard over low heat, stirring constantly, until it thickens enough to coat the back of a spoon. Avoid boiling at all costs, as this will result in a grainy texture. Straining the custard through a fine-mesh sieve before pouring it into the ramekins also helps remove any potential lumps.
Q2: What is the best way to get a crisp, caramelized top on my Coffee Crème Brûlée?
The key to a perfect brûléed top on your Coffee Crème Brûlée is a thin, even layer of granulated sugar sprinkled over the chilled custard. Then, using a kitchen torch on a medium setting, move it constantly over the sugar until it melts and caramelizes to a deep amber color. You can also achieve this under a broiler, but you’ll need to watch it very closely to prevent burning. Ensure the broiler is set to high and the ramekins are positioned a safe distance from the heat source.
Decadent Coffee Creme Brulee Recipe- Easy Dessert
An easy recipe for decadent coffee creme brulee featuring a rich, coffee-infused custard topped with a perfectly caramelized sugar crust.
Ingredients
-
2 cups heavy cream
-
2 tablespoons finely ground coffee (espresso or coffee beans)
-
5 large egg yolks
-
1/2 cup granulated sugar
-
1 teaspoon vanilla extract
-
2 tablespoons light brown sugar (for topping)
Instructions
-
Step 1
Infuse the heavy cream with coffee flavor by gently heating it with finely ground coffee over medium-low heat until it simmers. Cover and let steep for 15-20 minutes. -
Step 2
Strain the infused cream through a fine-mesh sieve, discarding the grounds. Whisk in 1/2 cup granulated sugar until dissolved. -
Step 3
Temper the egg yolks by gradually whisking them into the warm, sweetened cream mixture. Pour the tempered yolk mixture back into the saucepan with the remaining cream. -
Step 4
Cook the custard over low heat, stirring constantly, until it thickens enough to coat the back of a spoon. Stir in vanilla extract and remove from heat. -
Step 5
Pour the custard into ramekins and bake in a water bath at 325°F (160°C) for 30-40 minutes. Cool at room temperature, then chill for at least 4 hours or overnight. -
Step 6
Just before serving, sprinkle the chilled custards with light brown sugar and caramelize using a kitchen torch or broiler until a brittle crust forms.
Important Information
Nutrition Facts (Per Serving)
It is important to consider this information as approximate and not to use it as definitive health advice.
Allergy Information
Please check ingredients for potential allergens and consult a health professional if in doubt.


Leave a Comment