

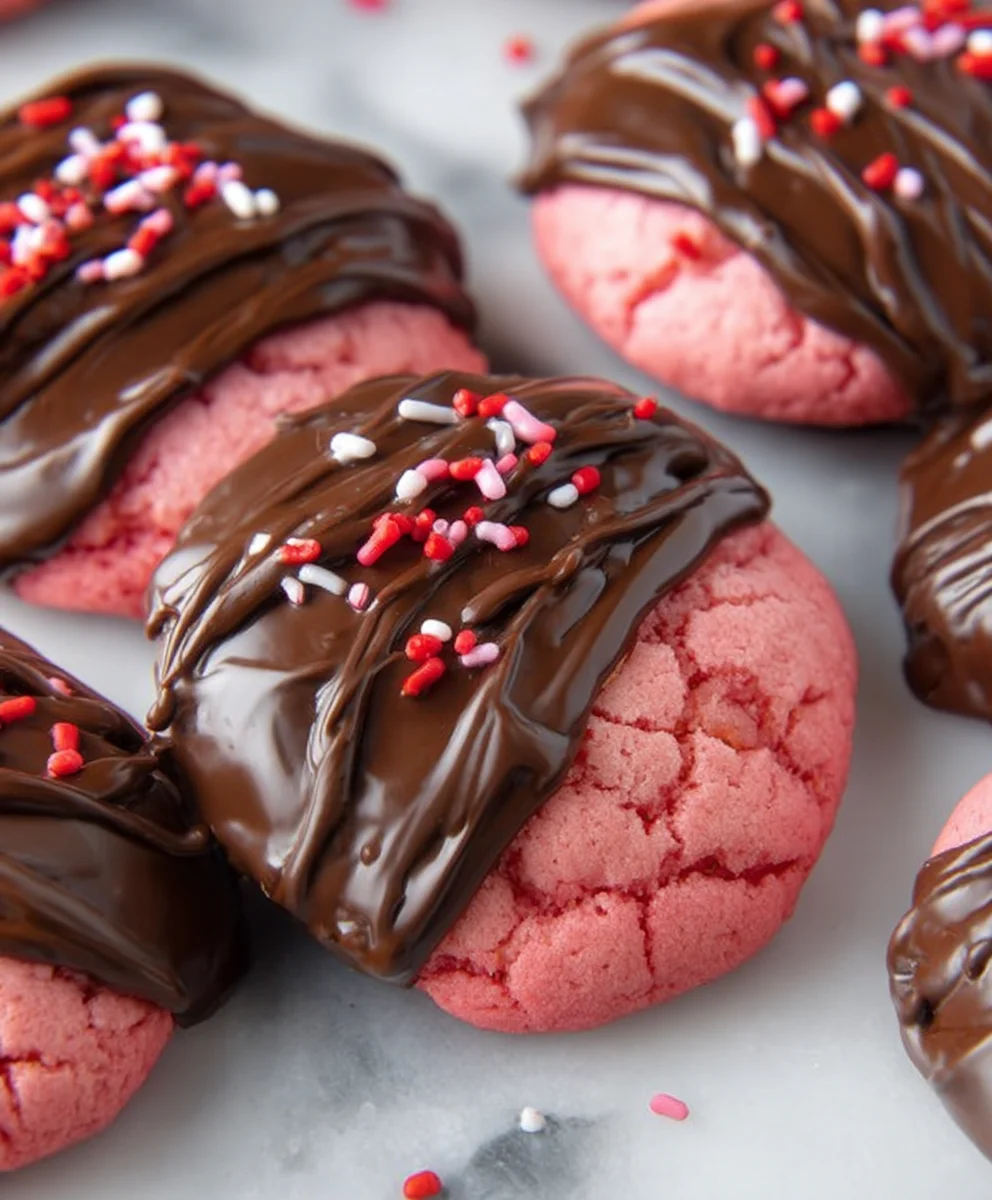
Chocolate Covered Strawberry Cookies are a delightful fusion of two beloved treats, bringin extractg together the rich indulgence of chocolate and the sweet, slightly tart burst of fresh strawberries in a perfectly baked cookie. If you’ve ever found yourself torn between reaching for a decadent chocolate chip cookie or a fresh, juicy strawberry, this recipe is your delicious answer. The magic lies in how we transform these simple ingredients into something truly extraordingin extract. Imagine biting into a soft, chewy cookie, studded with bursts of sweet strawberry and swirled with luscious chocolate. It’s a symphony of textures and flavors that evokes feelings of comfort, joy, and pure dessert bliss. What makes these Chocolate Covered Strawberry Cookies so special is not just their irresistible taste, but also their charming appearance, making them a perfect addition to any celebration or a delightful way to brighten an ordinary day.

Ingredients:
- 1 box (approximately 15.25 ounces) Strawberry cake mix
- 1/3 cup vegetable oil
- 1 teaspoon vanilla extract
- 2 large eggs
- 1 cup chocolate chips or chocolate candy melts (milk, semi-sweet, or dark chocolate all work wonderfully)
- Sprinkles, if desired, for decoration
Preparing the Cookie Dough
The base of our delightful Chocolate Covered Strawberry Cookies starts with a convenient strawberry cake mix. This isn’t just about speed; it infuses a subtle fruity flavor and a beautiful pink hue into every cookie, making them visually appealing as well as delicious. In a large mixing bowl, combine the entire contents of the strawberry cake mix. Next, we’ll add the wet ingredients. Pour in the 1/3 cup of vegetable oil. Vegetable oil contributes to a tender texture and helps bind the ingredients together. Follow this with the 1 teaspoon of vanilla extract. Vanilla is a classic flavor enhancer that complements the strawberry notes beautifully and adds a touch of warmth. Finally, crack in the 2 large eggs. Eggs are crucial for providing structure, richness, and helping the cookies bind together so they don’t crum extractble.
Now, it’s time to bring it all together. Using a sturdy spoon or a rubber spatula, begin extract to mix the ingredients. Start slowly to avoid sending a cloud of cake mix into the air. As the dry and wet ingredgin extractts begin to combine, you’ll notice the mixture transforming into a thick, cohesive dough. This dough will likely be quite sticky, which is perfectly normal for this type of cookie. Don’t be tempted to add extra flour at this stage, as it can make the cookies tough. Continue mixing until all the ingredients are fully incorporated and there are no dry pockets of cake mix remaining. The dough should be a vibrant pink and smell wonderfully of strawberry and vanilla.
Forming and Baking the Cookies
Once your dough is ready, it’s time to shape the cookies. I find that chilling the dough for about 30 minutes before scooping helps immensely. This step makes the dough much easier to handle and prevents the cookies from spreading too much during baking, ensuring they maintain a lovely, rounded shape. You can cover the bowl with plastic wrap and place it in the refrigerator.
Preheat your oven to 350 degrees Fahrenheit (175 degrees Celsius). Line two baking sheets with parchment paper. Parchment paper is a baker’s best friend; it prevents sticking, ensures even baking, and makes cleanup a breeze. Once the dough is chilled, use a tablespoon or a small cookie scoop to portion out the dough. Roll each portion into a ball. The size of your cookie balls will determine how many cookies you get and how long they’ll bake, so aim for consistency. Place the dough balls about 2 inches apart on the prepared baking sheets to give them room to spread.
Adding the Chocolatey Goodness
This is where our Chocolate Covered Strawberry Cookies truly earn their name! For the chocolate coating, you have a couple of excellent options. You can use chocolate chips, which will create lovely pockets of melted chocolate throughout the cookie. Alternatively, you can use chocolate candy melts, which are specifically designed for melting and coating and will give a smoother, more uniform chocolate shell.
If you’re using chocolate chips, you’ll simply press a handful of chips into the top of each cookie dough ball before baking. Don’t be shy; a good amount of chocolate makes these cookies extra special. If you’re opting for the candy melts for a full coating, we’ll handle that after the cookies have baked and cooled. For now, focus on gently pressing the chips into the dough. This ensures the chocolate is embedded within the cookie.
Now, it’s time to bake! Place the baking sheets into the preheated oven. Bake for 10 to 12 minutes, or until the edges of the cookies are set and lightly golden, and the centers still look slightly soft. It’s important not to overbake them, as they will continue to cook slightly on the baking sheet as they cool. This will result in perfectly soft and chewy cookies.
Cooling and Finishing Touches
Once the cookies are out of the oven, let them cool on the baking sheets for about 5 minutes. This allows them to firm up enough to be moved without losing their shape. After 5 minutes, carefully transfer the cookies to a wire cooling rack to cool completely. This is a crucial step, especially if you plan to coat them in melted chocolate. Trying to coat warm cookies will result in a melted mess.
If you chose to use chocolate candy melts for coating, this is where the magic happens. Once the cookies are entirely cool, melt your chocolate candy melts according to the package instructions. This usually involves microwaving them in short bursts, stirring in between, until smooth and fully melted. You can also use a double boiler. Dip the bottom half of each cookie into the melted chocolate, allowing any excess to drip back into the bowl. Place the dipped cookies back onto the parchment-lined baking sheet. Immediately after dipping, while the chocolate is still wet, you can add sprinkles for an extra festive touch. The sprinkles will adhere beautifully to the melted chocolate. Allow the chocolate to set completely. This can be done at room temperature, or for quicker results, place the baking sheet in the refrigerator for about 15-20 minutes until the chocolate is firm. If you used chocolate chips within the cookie, you can skip this dipping step, but you might still want to add a drizzle of melted chocolate over the top for extra visual appeal and flavor.
Conclusion:
And there you have it! Your very own batch of delicious Chocolate Covered Strawberry Cookies is ready to impress. This recipe strikes a delightful balance between the rich intensity of chocolate and the sweet, slightly tart burst of strawberries, all enveloped in a perfectly chewy cookie base. We hope you’ve enjoyed making these as much as we’ve enjoyed them. Don’t be afraid to get creative with your presentation; a drizzle of extra chocolate or a dusting of powdered sugar can elevate these cookies to a truly show-stopping treat. Serve them warm with a glass of milk for a comforting indulgence, or at room temperature as a delightful accompaniment to your afternoon tea or coffee. For a special occasion, consider pairing them with a scoop of vanilla bean ice cream for a decadent dessert experience. We encourage you to try this recipe again and again, perhaps experimenting with different types of chocolate or even adding a touch of orange zest for an extra layer of flavor.
Frequently Asked Questions:
Can I use fresh strawberries instead of dried?
While this recipe is designed for dried strawberries for their concentrated flavor and chewy texture, you could experiment with fresh, finely diced strawberries. Be aware that fresh strawberries contain more moisture, which might affect the cookie’s texture and baking time. You may need to reduce the baking time slightly and potentially add a bit more flour to compensate for the added liquid.
How should I store my Chocolate Covered Strawberry Cookies?
To maintain their freshness and chewy texture, store your Chocolate Covered Strawberry Cookies in an airtight container at room temperature for up to 3-4 days. If you live in a warm climate or during warmer months, you might want to store them in the refrigerator to prevent the chocolate from melting.
Can I make these cookies vegan?
Yes, you absolutely can adapt these Chocolate Covered Strawberry Cookies to be vegan! You can substitute the butter with a vegan butter alternative, use an egg replacer (like flax egg or commercial egg replacer) for the eggs, and ensure your chocolate chips are dairy-free. The dried strawberries and other base ingredients are typically vegan.

Chocolate Strawberry Cookies-Decadent & Easy Recipe
A simple and delicious recipe for decadent chocolate strawberry cookies, perfect for a sweet treat.
Ingredients
-
1 box (approximately 15.25 ounces) Strawberry cake mix
-
1/3 cup vegetable oil
-
1 teaspoon vanilla extract
-
2 large eggs
-
1 cup chocolate chips or chocolate candy melts
-
Sprinkles, if desired
Instructions
-
Step 1
In a large bowl, combine the strawberry cake mix, vegetable oil, vanilla extract, and eggs. Mix until a thick, cohesive dough forms. The dough will be sticky. -
Step 2
Chill the dough for about 30 minutes to make it easier to handle. -
Step 3
Preheat your oven to 350°F (175°C). Line baking sheets with parchment paper. Scoop tablespoon-sized balls of dough onto the prepared sheets, about 2 inches apart. -
Step 4
Press chocolate chips into the top of each cookie dough ball. If using candy melts for coating, this step is skipped for now. -
Step 5
Bake for 10 to 12 minutes, or until the edges are set and lightly golden, and the centers are slightly soft. Let cool on baking sheets for 5 minutes before transferring to a wire rack to cool completely. -
Step 6
If using chocolate candy melts for coating, melt them according to package directions. Dip the bottom half of each cooled cookie into the melted chocolate. Place on parchment paper and add sprinkles if desired. Allow the chocolate to set completely.
Important Information
Nutrition Facts (Per Serving)
It is important to consider this information as approximate and not to use it as definitive health advice.
Allergy Information
Please check ingredients for potential allergens and consult a health professional if in doubt.
Leave a Comment