

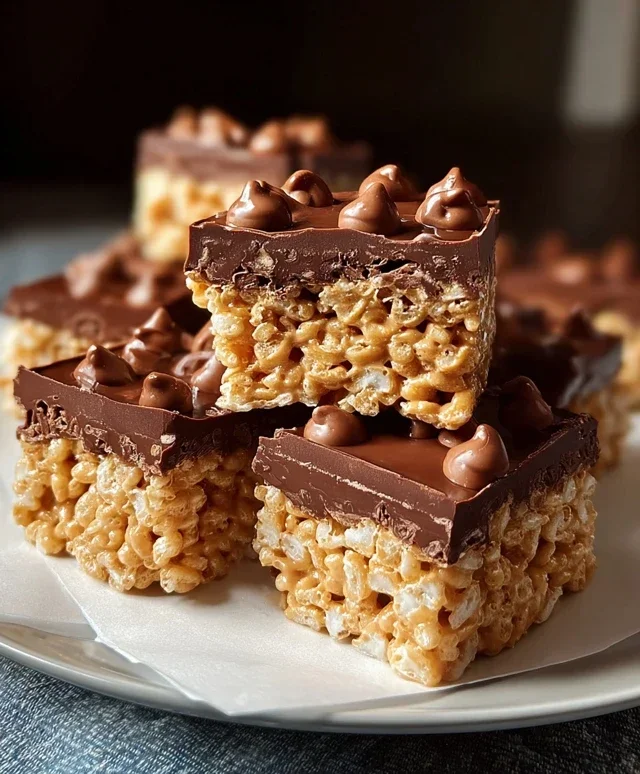
Chocolate Peanut Butter Rice Krispie Squares. Oh, how I love these little squares of pure joy! There’s something incredibly nostalgic and comforting about a classic Rice Krispie treat, but when you elevate it with the irresistible duo of chocolate and peanut butter, you reach a whole new level of deliciousness. These Chocolate Peanut Butter Rice Krispie Squares aren’t just a dessert; they’re a memory maker. Perfect for a quick treat, a potluck, or just because you deserve something wonderful, their chewy, gooey texture combined with that heavenly sweet and salty punch is universally adored. What makes them truly special? It’s the perfect marriage of crispy, airy cereal, melted marshmallows, creamy peanut butter, and decadent chocolate – a symphony of textures and flavors that’s almost too good to be true. Get ready to dive into this simple yet sensational recipe!

Ingredients:
Get ready for a treat that’s a nostalgic hug in dessert form! These Chocolate Peanut Butter Rice Krispie Squares are incredibly simple to make and deliver an irresistible combination of chewy, crispy, and chocolatey goodness. They’re perfect for potlucks, movie nights, or just when you need a little something sweet to brighten your day. I love how easily these come together, making them a fantastic option even for novice bakers. The classic Rice Krispie treat base gets a decadent upgrade with the addition of creamy peanut butter and rich milk chocolate. Trust me, one bite and you’ll be hooked!
Melting the Magic Base
The foundation of these delightful squares begin extracts with creating a gooey, marshmallow-y binder. It’s crucial to get this part just right to ensure your squares hold their shape and have that perfect chewy texture.
First things first, prepare your baking dish. I like to use a 9×13 inch baking pan. To prevent any sticking disasters, generously grease the pan with butter or cooking spray. Alternatively, you can line it with parchment paper, leaving a slight overhang on the sides to make lifting the squares out much easier later on. This little step will save you a lot of frustration.
In a large saucepan, melt the unsalted butter over low heat. It’s important to use low heat here to avoid burning the butter, which can impart an undesirable flavor. Once the butter has completely melted, add in your marshmallows. If you’re using regular-sized marshmallows, you might find it helpful to break them into smaller pieces to help them melt more evenly. If you’re using mini marshmallows, they’ll melt even faster.
Now, stir the marshmallows constantly with a rubber spatula or wooden spoon until they are completely melted and smooth. This process can take a few minutes, so patience is key. Keep stirring to ensure all the marshmallows have dissolved into a glossy, sticky mixture. The aroma at this stage is already quite tempting!
Once the marshmallows are fully melted, remove the saucepan from the heat. It’s time to introduce the star of the show: the peanut butter. Add the ½ cup of peanut butter (whether you prefer smooth for a silkier texture or crunchy for added bite) into the hot marshmallow mixture. Stir vigorously until the peanut butter is thoroughly combined, creating a beautiful, swirled, and incredibly fragrant peanut butter-marshmallow goo. This is where the magic truly happens, transforming a simple marshmallow base into a decadent peanut butter dream. Make sure there are no pockets of unmixed peanut butter; a consistent blend is essential for even flavor distribution in your finished squares.
Combining and Pressing Perfection
With your luscious peanut butter-marshmallow mixture ready, it’s time to bring in the crispy element and the chocolatey finish.
Gently fold in the 6 cups of Rice Krispie cereal into the peanut butter-marshmallow mixture. Use your spatula to coat every single crispy rice puff evenly. You want to ensure that each bite will have that satisfying crunch. Be careful not to overmix, as this can crush the cereal and lead to a less appealing texture. Just coat them thoroughly.
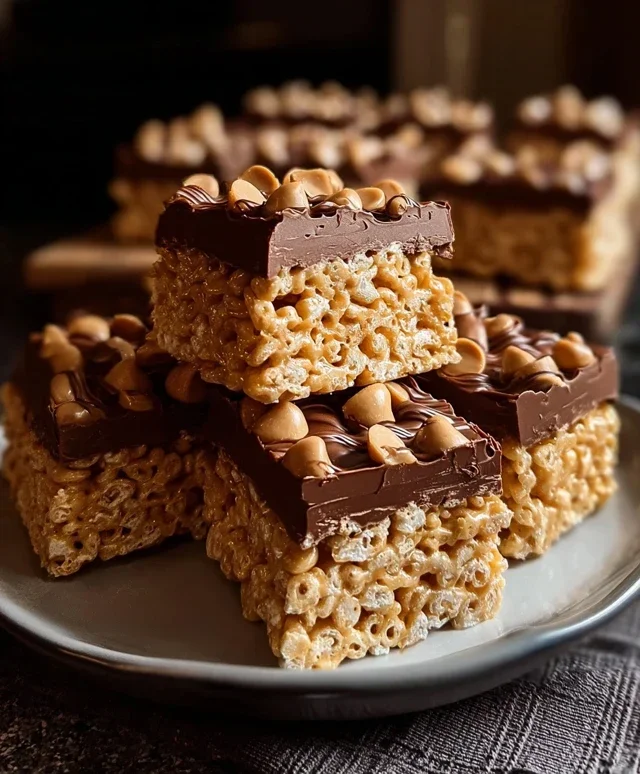
Now, add in the milk chocolate chips. Stir them in gently until they are just starting to soften and meld into the warm cereal mixture. You don’t want them to completely melt at this stage; we want to retain some of those lovely chocolatey pockets. The residual heat from the marshmallow mixture will continue to melt them slightly, creating delightful streaks of chocolate throughout.
Transfer the entire mixture into your prepared baking pan. This is where your greased or parchment-lined pan truly shines. Don’t just dump it in; use your spatula to spread it as evenly as possible. Now, for the pressing! This is a crucial step for achieving neat, sliceable squares. Lightly grease your hands with butter or cooking spray, or use the back of a greased spoon or a piece of parchment paper to gently press the mixture into the pan. The key is to press firmly enough to compact the mixture so the squares hold together, but not so hard that you crush the cereal. You want them to be dense enough to slice without crum extractbling, but still retain some airiness. If you’re adding chopped peanuts as a garnish, now is the time to sprinkle them evenly over the top of the pressed mixture. Gently press them down so they adhere to the squares.
Cooling and Enjoying the Fruits of Your Labor
Once you’ve pressed your mixture into the pan and added any optional garnishes, it’s time for the most challengin extractg part: waiting! Allow the Rice Krispie squares to cool completely in the pan at room temperature. This usually takes at least an hour, but sometimes up to two hours, depending on your room’s temperature. Resist the urge to cut into them while they are still warm; they will likely fall apart. Patience will be rewarded with clean, beautiful slices.
After the squares have cooled, use the parchment paper overhang (if you used it) to lift the entire slab out of the pan onto a cutting board. Now you can slice them into your desired square or rectangular shapes. Use a sharp knife for clean cuts.
And there you have it! Your delicious Chocolate Peanut Butter Rice Krispie Squares are ready to be devoured. They are best enjoyed within a day or two for optimal freshness and texture. Store them in an airtight container at room temperature. I promise, these will disappear in no time!
Conclusion:
So there you have it! These Chocolate Peanut Butter Rice Krispie Squares are an absolute winner. They’re incredibly easy to whip up, require no baking, and deliver an irresistible combination of chewy, crispy, and rich flavors. The salty crunch of the peanut butter perfectly complements the sweet chocolate, making them an addictive treat for any occasion. Whether you’re looking for a quick dessert, a party snack, or just a comforting indulgence, these squares are sure to hit the spot.
I love serving these cut into squares for easy grabbing at gatherings, or even cut into fun shapes with cookie cutters for a playful touch. They’re also fantastic alongside a cold glass of milk or a hot cup of coffee. Feeling adventurous? You can easily customize them! Consider adding mini chocolate chips for extra chocolatey goodness, a sprinkle of sea salt on top for a sophisticated sweet and salty balance, or even a swirl of extra peanut butter on top for a peanut butter lover’s dream. Don’t be afraid to experiment and make them your own!
I truly encourage you to give this Chocolate Peanut Butter Rice Krispie Squares recipe a try. It’s a guaranteed crowd-pleaser and so satisfying to make something this delicious from scratch. I can’t wait to hear how yours turn out!
Frequently Asked Questions:
Can I make these ahead of time?
Absolutely! These Chocolate Peanut Butter Rice Krispie Squares are perfect for making ahead. In fact, they taste even better after sitting for a few hours, allowing the flavors to meld. Store them in an airtight container at room temperature for up to 3 days. Just make sure they’re completely cooled before covering.
My squares are too hard. What did I do wrong?
The most common reason for hard squares is overcooking the marshmallow mixture. It’s crucial to melt the butter and marshmallows over low heat, stirring constantly, until just melted and smooth. Don’t let the mixture boil vigorously. Also, make sure you’re not pressing the mixture into the pan too firmly; gentle pressing is all you need.
Chocolate Peanut Butter Rice Krispie Squares
A delightful twist on classic Rice Krispie treats, infused with rich chocolate and creamy peanut butter.
Ingredients
-
6 cups Rice Krispie cereal
-
½ cup peanut butter (smooth or crunchy)
-
¼ cup unsalted butter
-
40 regular size marshmallows
-
1 cup milk chocolate chips
-
Optional: chopped peanuts for garnish
Instructions
-
Step 1
Grease a 9×13 inch pan with butter or cooking spray. Set aside. -
Step 2
In a large microwave-safe bowl, combine butter and marshmallows. Microwave on high for 1 minute, stir, and microwave for another minute, or until melted and smooth. -
Step 3
Stir in the peanut butter until fully combined with the marshmallow mixture. -
Step 4
Add the Rice Krispie cereal and stir gently until evenly coated. Be careful not to crush the cereal. -
Step 5
Gently fold in the milk chocolate chips. Some will melt slightly, creating swirls of chocolate. -
Step 6
Press the mixture evenly into the prepared pan. If using, sprinkle chopped peanuts over the top and gently press them in. -
Step 7
Let cool completely for at least 30 minutes before cutting into squares.
Important Information
Nutrition Facts (Per Serving)
It is important to consider this information as approximate and not to use it as definitive health advice.
Allergy Information
Please check ingredients for potential allergens and consult a health professional if in doubt.

Leave a Comment