

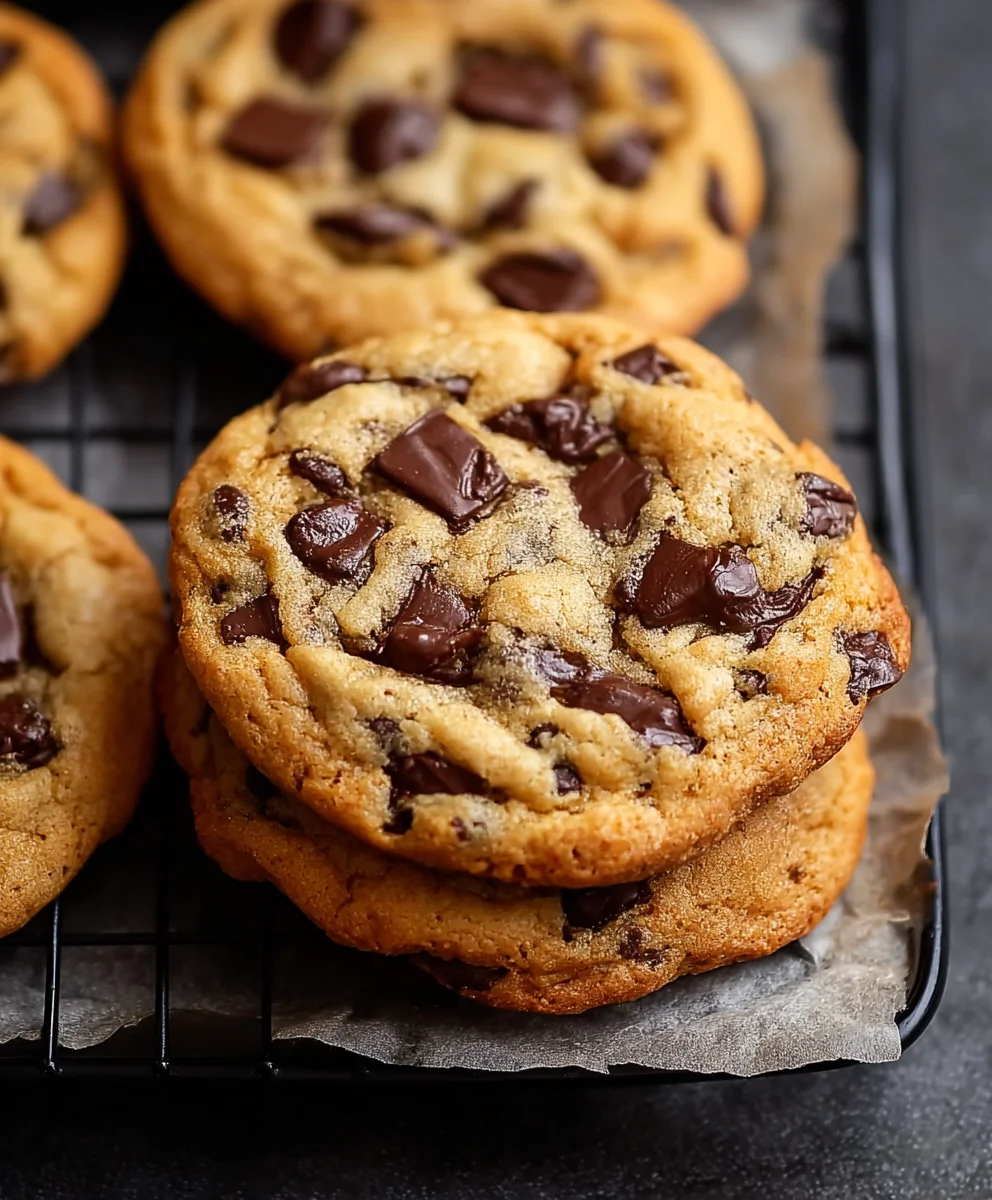
Air Fryer Chocolate Chip Cookies are an absolute game-changer for any cookie enthusiast. Imagin extracte craving that warm, gooey, melt-in-your-mouth chocolate chip cookie experience, but with the incredible speed and convenience of your air fryer. That’s exactly what this recipe delivers! These aren’t just any cookies; they’re your new go-to for an instant sweet treat that’s perfect for unexpected guests, a quick afternoon pick-me-up, or when that dessert craving strikes with undeniable force. What makes them so beloved? It’s the perfect balance of crispy edges and a soft, chewy center that’s achieved in mere minutes. Forget preheating a massive oven for just a small batch; the air fryer creates a wonderfully uniform heat that ensures each cookie is baked to golden perfection. This recipe takes the classic, comforting flavor of chocolate chip cookies and elevates it with an innovative cooking method, proving that deliciousness doesn’t always require a lengthy wait.

Ingredients:
- 1/2 cup (1 stick) unsalted butter
- 1/2 cup packed light brown sugar
- 1/4 cup granulated white sugar
- 1 large egg, at room temperature
- 1 teaspoon pure vanilla extract
- 1 1/2 cups all-purpose flour
- 1 teaspoon baking soda
- 1/4 teaspoon salt
- 1 cup semi-sweet chocolate chips
Preparing the Cookie Dough
Creaming the Butter and Sugars
The foundation of any great cookie is the creaming process, and it’s no different for these delightful air fryer chocolate chip cookies. Start by ensuring your unsalted butter is softened to room temperature. This is crucial because it allows the butter to incorporate air effectively when beaten with the sugars, leading to a lighter, chewier cookie. If you’re short on time and forgot to leave your butter out, you can quickly soften it by cutting it into small cubes and letting it sit for about 10-15 minutes, or by gently microwaving it in 5-second intervals, being careful not to melt it entirely.
In a medium mixing bowl, combine the softened butter with the packed light brown sugar and the granulated white sugar. Using an electric mixer, beat these ingredients together on medium speed until the mixture is light, fluffy, and pnon-alcoholic ale in color. This process typically takes about 2-3 minutes. You’ll notice the sugars dissolving into the butter, creating a smooth, cohesive base. Don’t rush this step; the air incorporated here is key to the cookie’s texture. Scrape down the sides of the bowl periodically to ensure all the butter and sugar are evenly combined.
Adding Wet Ingredients
Once your butter and sugar mixture is perfectly creamed, it’s time to add the wet ingredients. Crack your large egg into a separate small bowl first. This is a good practice to ensure no shell fragments make their way into your dough, and it also allows you to confirm your egg is indeed at room temperature. Room temperature eggs emulsify better with the fat in the batter, contributing to a smoother texture and preventing the dough from becoming greasy. If your egg is cold, you can submerge it in a bowl of warm (not hot) water for about 5-10 minutes to bring it up to temperature. Add the egg to the creamed butter and sugar mixture.
Next, add the pure vanilla extract. Vanilla is essential for enhancing the overall flavor profile of the cookies, adding a warm, comforting aroma and taste that complements the sweetness of the chocolate. Beat the egg and vanilla extract into the butter and sugar mixture until just combined and no streaks of egg remain visible. Be careful not to overmix at this stage, as overbeating can develop the gluten in the flour too much once it’s added, leading to tougher cookies.
Incorporating Dry Ingredients
In a separate medium bowl, whisk together the all-purpose flour, baking soda, and salt. Whisking the dry ingredients together ensures that the leavening agent (baking soda) and salt are evenly distributed throughout the flour. This prevents pockets of saltiness or uneven rising in your cookies. The baking soda will help the cookies spread and achieve a nice golden-brown color in the air fryer, while the salt balances the sweetness and enhances the chocolate flavor.
Gradually add the dry ingredient mixture to the wet ingredients in two or three additions, mixing on low speed until just combined after each addition. Again, avoid overmixing. Stop mixing as soon as you no longer see streaks of flour. Overmixing at this stage can lead to tough, dense cookies. You want just enough mixing to bring the dough together.
Adding the Chocolate Chips
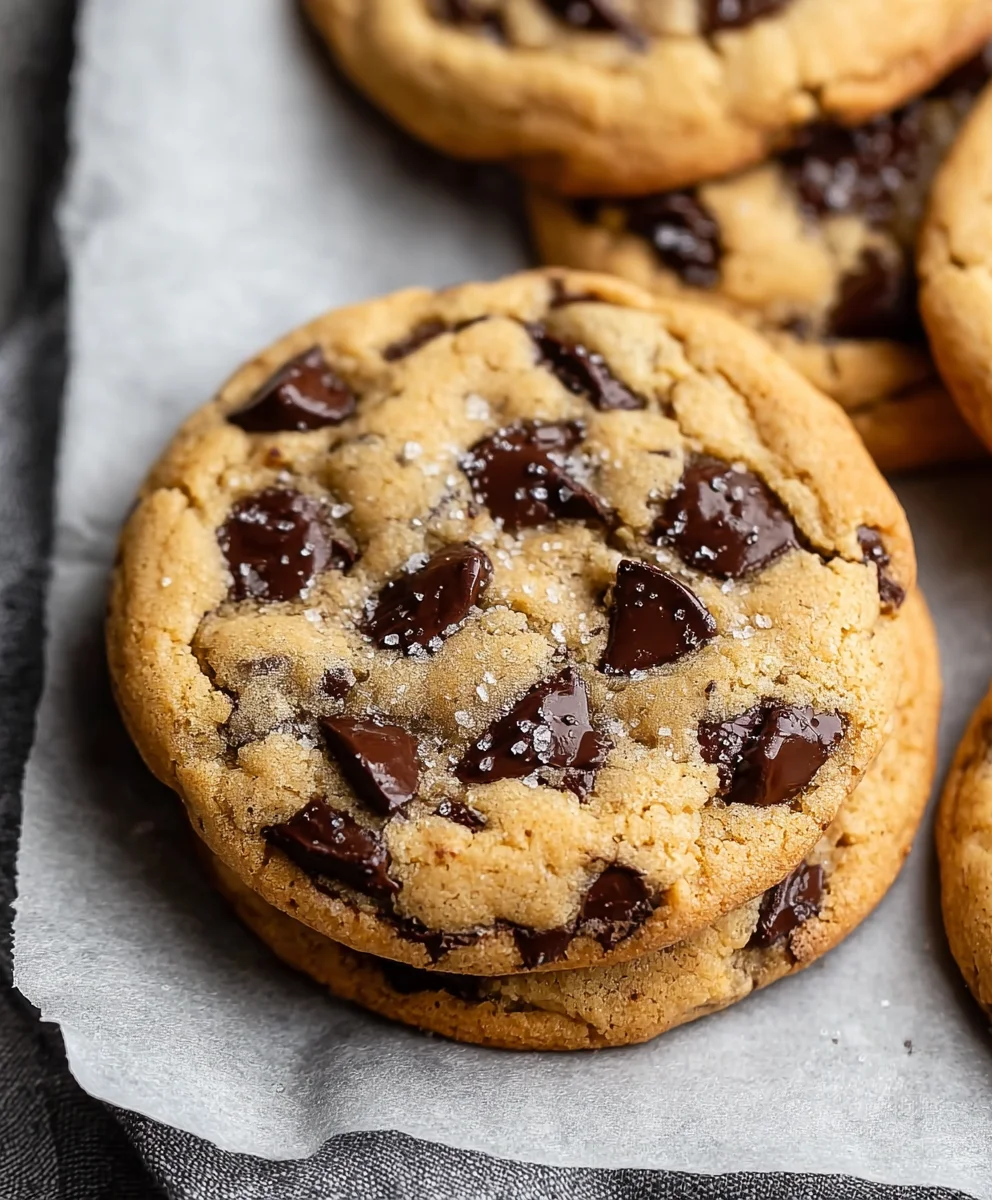
Finally, it’s time for the star of the show – the chocolate chips! Gently fold in the semi-sweet chocolate chips using a spatula or wooden spoon. Ensure they are evenly distributed throughout the dough. You want to taste chocolate in every single bite! If you prefer a more intense chocolate flavor or a different texture, feel free to mix in a portion of dark chocolate chips or milk chocolate chips alongside the semi-sweet ones. Some people also like to reserve a few chocolate chips to press onto the tops of the cookies before air frying for an extra visual appeal and an immediate burst of melted chocolate.
Air Frying the Cookies
Preheating the Air Fryer and Preparing the Basket
Before you begin extract air frying, it’s essential to preheat your air fryer to the correct temperature. For these Air Fryer Chocolate Chip Cookies, preheating at 320°F (160°C) is ideal. This lower temperature is crucial for allowing the cookies to cook through without burning the outside. Most air fryers have a preheat setting; if yours doesn’t, simply set it to the desired temperature and let it run for about 3-5 minutes until it indicates it’s preheated.
Next, prepare your air fryer basket. You’ll want to line your air fryer basket with parchment paper. Use perforated parchment paper specifically designed for air fryers if you have it, as this allows air to circulate properly. If you don’t have perforated parchment paper, you can use standard parchment paper, but make sure to cut it to fit the basket and poke a few holes in it with a skewer or fork to allow for airflow. Alternatively, you can lightly grease the basket with a cooking spray or a thin layer of oil, but parchment paper is generally preferred for easier cleanup and to prevent sticking. Make sure the parchment paper is secured and won’t blow around inside the air fryer.
Portioning agin extractArranging the Dough
Once your air fryer is preheated and the basket is prepped, it’s time to portion the cookie dough. Use a cookie scoop (about 1.5 to 2 tablespoons in size) to create uniform dough balls. This ensures even cooking. Gently roll each scoop of dough into a ball between your palms.
Place the dough balls into the prepared air fryer basket, ensuring there is enough space between each cookie. Do not overcrowd the basket, as this will prevent the cookies from cooking evenly and prevent them from spreading properly. Depending on the size of your air fryer, you will likely only be able to cook 3-4 cookies at a time. Leave at least an inch of space around each cookie. If you reserved any extra chocolate chips, you can gently press a few onto the tops of the dough balls now for that extra visual appeal.
Air Frying the First Batch
Carefully place the air fryer basket into the preheated air fryer. Set your air fryer to cook for 7-9 minutes at 320°F (160°C). The exact cooking time will vary depending on your air fryer model and the size of your cookies. It’s always a good idea to start with the lower end of the recommended time and check for doneness.
After about 5-6 minutes, it’s a good idea to check on the cookies. You’ll be looking for edges that are lightly golden brown and centers that appear set but might still look slightly soft. The cookies will continue to cook and firm up as they cool. If they seem to be browning too quickly on top, you can gently rotate the parchment paper or the cookies themselves within the basket.
Checking for Doneness and Cooling
When the cookies reach their desired doneness, carefully remove the air fryer basket from the machine. Let the cookies cool in the basket for a few minutes on a wire rack. This is a crucial step because the cookies are very delicate when they are hot. Allowing them to cool slightly in the basket will help them set and prevent them from breaking when you transfer them.
After about 5 minutes, use a spatula to carefully transfer the cookies to a wire cooling rack to cool completely. This allows air to circulate around them, preventing the bottoms from becoming soggy. Once they have cooled completely, they will have a wonderfully chewy texture with slightly crisp edges, perfect for enjoying with a glass of milk.
Cooking Subsequent Batches
While the first batch of cookies is cooling, you can prepare the air fryer basket for the next batch. If necessary, replace the parchment paper or re-grease the basket. Repeat the portgin extracting and arranging process with the remaining cookie dough. Continue air frying in batches, keeping track of the cooking time for each batch, as it may vary slightly. Remember, the key is to avoid overcrowding and to check for doneness regularly. Enjoy your delicious homemade Air Fryer Chocolate Chip Cookies!
Conclusion:
You’ve now got the blueprint for creating perfectly chewy and delightfully golden Air Fryer Chocolate Chip Cookies! We’ve walked through each step to ensure your baking success, from achieving the ideal dough consistency to mastering the air frying time. These cookies are a fantastic weeknight treat, a quick dessert solution, or a wonderful way to satisfy a sudden sweet craving. I encourage you to give them a try – the aroma alone is worth it!
For serving, these Air Fryer Chocolate Chip Cookies are simply divine warm from the air fryer, especially with a tall glass of cold milk. They also pair beautifully with a scoop of vanilla ice cream for an instant sundae. Feel free to experiment with different types of chocolate chips – dark, milk, white, or even a mix! You can also add in chopped nuts like walnuts or pecans for extra texture and flavor. Don’t be afraid to make these Air Fryer Chocolate Chip Cookies your own!
Frequently Asked Questions:
Can I make the dough ahead of time?
Absolutely! You can prepare the Air Fryer Chocolate Chip Cookie dough up to 2-3 days in advance and store it, covered, in the refrigerator. This also allows the flavors to meld, potentially resulting in even more delicious cookies. You may need to add a minute or two to the air frying time if the dough is very cold.
How do I prevent the cookies from burning on top?
The key is to keep an eye on them during the last few minutes of air frying. If you notice the tops browning too quickly, you can loosely tent the air fryer basket with a small piece of aluminum foil. This will help diffuse the heat and prevent the tops from burning while the centers continue to cook.
Air Fryer Chocolate Chip Cookies
An easy and delicious recipe for classic chocolate chip cookies made perfectly in an air fryer.
Ingredients
-
1/2 cup (1 stick) unsalted butter, softened
-
1/2 cup packed light brown sugar
-
1/4 cup granulated white sugar
-
1 large egg, at room temperature
-
1 teaspoon pure vanilla extract
-
1 1/2 cups all-purpose flour
-
1 teaspoon baking soda
-
1/4 teaspoon salt
-
1 cup semi-sweet chocolate chips
Instructions
-
Step 1
In a medium bowl, cream together softened butter, brown sugar, and granulated white sugar with an electric mixer until light and fluffy. -
Step 2
Beat in the room temperature egg and vanilla extract until just combined. Be careful not to overmix. -
Step 3
In a separate bowl, whisk together all-purpose flour, baking soda, and salt. Gradually add the dry ingredients to the wet ingredients in two or three additions, mixing on low speed until just combined. Do not overmix. -
Step 4
Gently fold in the semi-sweet chocolate chips until evenly distributed throughout the dough. -
Step 5
Preheat your air fryer to 320°F (160°C). Line the air fryer basket with perforated parchment paper or lightly grease it. -
Step 6
Portion dough into balls (about 1.5 to 2 tablespoons each) and place them in the air fryer basket, ensuring at least an inch of space between each cookie. Cook 3-4 cookies at a time. -
Step 7
Air fry for 7-9 minutes, or until the edges are lightly golden brown and the centers appear set. Check around 5-6 minutes. -
Step 8
Let the cookies cool in the basket for a few minutes on a wire rack, then transfer them to the rack to cool completely. Repeat with subsequent batches.
Important Information
Nutrition Facts (Per Serving)
It is important to consider this information as approximate and not to use it as definitive health advice.
Allergy Information
Please check ingredients for potential allergens and consult a health professional if in doubt.


Leave a Comment