

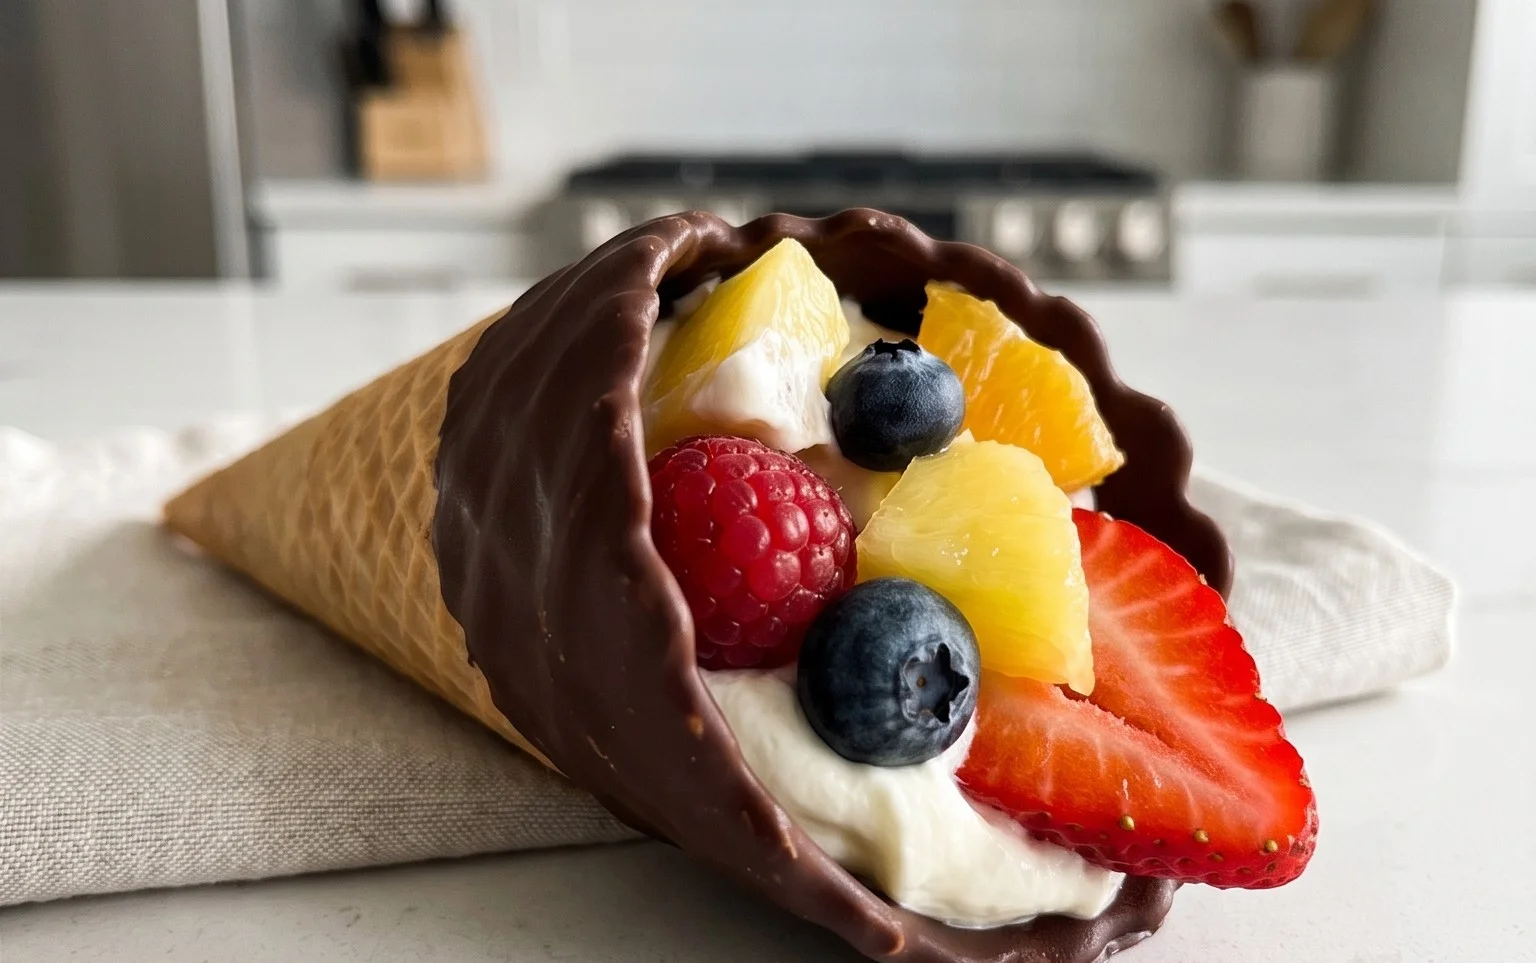
Chocolate Dipped Fruit Filled Cones are more than just a dessert; they’re a delightful adventure for your taste buds! Imagin extracte a crispy, golden waffle cone, generously dipped in rich, velvety chocolate, cradling a vibrant medley of fresh, juicy fruits. It’s the perfect blend of textures and flavors – the satisfying crunch of the cone, the smooth, decadent chocolate, and the bright, refreshing burst of fruit. Why do we adore these treats so much? They’re inherently fun, visually stunning, and offer endless possibilities for customization. Whether you’re seeking a whimsical party favor, a delightful afternoon pick-me-up, or an elegant yet approachable dessert, these chocolate dipped fruit filled cones deliver pure joy. They’re what makes a simple moment feel truly special, turning everyday fruit into an extraordinary indulgence. Let’s dive in and create some magic!
A Symphony of Flavors
Get ready for pure deliciousness!

Chocolate Dipped Fruit Filled Cones
Welcome to a delightful treat that’s as fun to make as it is to eat! Today, we’re diving into the world of Chocolate Dipped Fruit Filled Cones. These aren’t your average ice cream cones; we’re talking about crispy waffle cones, lovingly filled with a vibrant fruit mixture, and then elegantly dipped in rich, smooth chocolate. It’s a perfect dessert for parties, a special occasion, or just when you need a little burst of joy. The combination of textures and flavors – the crunch of the cone, the burst of fresh fruit, and the satisfying snap of chocolate – is simply irresistible.
This recipe is wonderfully adaptable. You can use your favorite fruits, swap out the type of chocolate, and even add a sprinkle of flair with some edible decorations. Let’s get started and create something truly delicious!
Ingredients:
Preparing the Fruit Filling
Our first step is to create a luscious fruit filling that will be the heart of our cones. We want the fruit to be slightly softened and its juices released, but still retain a delightful texture.
1. In a medium bowl, combine the diced strawberries, blueberries, and raspberries. Gently toss them together.
2. Add the granulated sugar and lemon juice to the fruit mixture. The sugar will start to draw out the natural juices from the fruit, creating a lovely syrupy base. The lemon juice not only adds a touch of brightness but also helps to enhance the fruit’s flavor and preserve its color.
3. Let the fruit mixture sit for about 10-15 minutes, stirring occasionally. You’ll notice it becoming juicier.
4. If you prefer a slightly thicker filling, and your fruit isn’t releasing a lot of juice, you can sprinkle the cornstarch over the fruit and stir gently. The cornstarch will help to thicken the juices slightly as it cooks, preventing a watery filling. For this recipe, a slightly runnier filling is perfectly fine and adds to the juiciness of the finished cone.
Assembling and Dipping
Now comes the fun part – filling our cones and giving them their beautiful chocolate coating!
5. Carefully spoon the fruit filling into each waffle cone, filling them about two-thirds of the way full. Be generous, but don’t overfill to the point where the fruit will spill out easily. You want enough filling to be a delightful surprise within the cone.
6. Once your cones are filled, it’s time to prepare for dipping. In a microwave-safe bowl, combine the semi-sweet chocolate chips and the optional coconut oil or shortening. The coconut oil or shortening helps the chocolate melt more smoothly and gives it a beautiful sheen.
7. Microwave the chocolate in 30-second intervals, stirring well after each interval, until the chocolate is completely melted and smooth. Be patient; over-heating chocolate can cause it to seize and become unusable. You can also melt the chocolate using a double boiler if you prefer.
8. Once the chocolate is melted and smooth, hold each filled cone by the tip and carefully dip the top portion into the melted chocolate, allowing the excess chocolate to drip back into the bowl. You can use a spoon to help coat the chocolate evenly if needed, or gently swirl the cone in the chocolate. Aim for a good coverage, but don’t worry if it’s not perfectly uniform; a slightly rustic look can be charming!
9. Place the chocolate-dipped cones on a parchment-lined baking sheet or a piece of wax paper. If you have any extra fruit filling, you can drizzle a little on top of the chocolate for decoration, or add some sprinkles if you’re feeling festive!
10. Allow the chocolate to set completely. This can be done at room temperature, but for a quicker set, you can place the baking sheet in the refrigerator for about 15-20 minutes. You’ll know they’re ready when the chocolate is firm and no longer sticky to the touch.
Enjoy your stunning and delicious Chocolate Dipped Fruit Filled Cones! They are best enjoyed the same day they are made to ensure the cone stays perfectly crisp and the fruit filling is at its freshest. These treats are sure to impress!

Conclusion:
I hope you’ve enjoyed learning how to create these delightful Chocolate Dipped Fruit Filled Cones! They truly are a spectacular treat, offering a perfect blend of creamy, fruity, and chocolatey goodness all wrapped up in a crispy cone. The simplicity of the recipe belies the gourmet experience they provide, making them ideal for both casual gatherings and special occasions. Whether you’re looking for a fun dessert to make with kids or an impressive indulgence for yourself, these cones are sure to be a hit.
For serving suggestions, imagin extracte presenting these beautiful cones at a summer picnic, a birthday party, or even as a unique wedding favor. They are wonderfully versatile and can be enjoyed on their own or as part of a larger dessert spread. Don’t be afraid to get creative with variations! Consider adding a sprinkle of chopped nuts, shredded coconut, or even a drizzle of contrasting chocolate for an extra touch of flair. The possibilities are endless, and the joy of making them is immense. So go ahead, gather your ingredients, and give these Chocolate Dipped Fruit Filled Cones a try. I promise you won’t be disappointed!
Frequently Asked Questions:
Can I make these cones ahead of time?
Yes, you can definitely make these cones ahead of time! Once the chocolate has set completely, store them in an airtight container in a cool, dry place. They are best enjoyed within 2-3 days for optimal crispness of the cone.
What kind of fruit is best for filling the cones?
Almost any fruit works wonderfully! Fresh berries like strawberries, raspberries, and blueberries are fantastic. Sliced bananas, chopped peaches, or even a small dollop of fruit compote are also delicious choices. Just ensure the fruit is not too watery.
How can I prevent the chocolate from cracking?
To prevent cracking, ensure your chocolate is properly tempered. Also, try to avoid drastic temperature changes when dipping and setting the cones. Allowing the dipped cones to set at room temperature for a bit before refrigerating can help.
Chocolate Dipped Fruit Filled Cones
A delightful and visually appealing treat featuring crisp waffle cones filled with fresh fruit and dipped in rich chocolate.
Ingredients
-
12 pre-made waffle cones
-
1 cup fresh strawberries, hulled and sliced
-
1 cup fresh blueberries
-
1 cup fresh raspberries
-
2 cups semi-sweet chocolate chips
-
1 tablespoon coconut oil
Instructions
-
Step 1
Prepare the fruit: Wash and thoroughly dry all the fresh fruit. Slice larger fruits like strawberries if necessary to fit comfortably into the cones. -
Step 2
Fill the cones: Carefully spoon the prepared fruit into each waffle cone, filling them almost to the top. -
Step 3
Melt the chocolate: In a microwave-safe bowl, combine the semi-sweet chocolate chips and coconut oil. Microwave in 30-second intervals, stirring in between, until the chocolate is smooth and fully melted. -
Step 4
Dip the cones: Hold each filled cone by the rim and carefully dip the top portion into the melted chocolate, allowing any excess to drip off. -
Step 5
Set the cones: Place the chocolate-dipped cones upright on a baking sheet lined with parchment paper. You may need to prop them up slightly with aluminum foil or other cones to keep them from tipping. -
Step 6
Chill to set: Refrigerate the cones for at least 30 minutes, or until the chocolate has completely hardened.
Important Information
Nutrition Facts (Per Serving)
It is important to consider this information as approximate and not to use it as definitive health advice.
Allergy Information
Please check ingredients for potential allergens and consult a health professional if in doubt.


Leave a Comment