

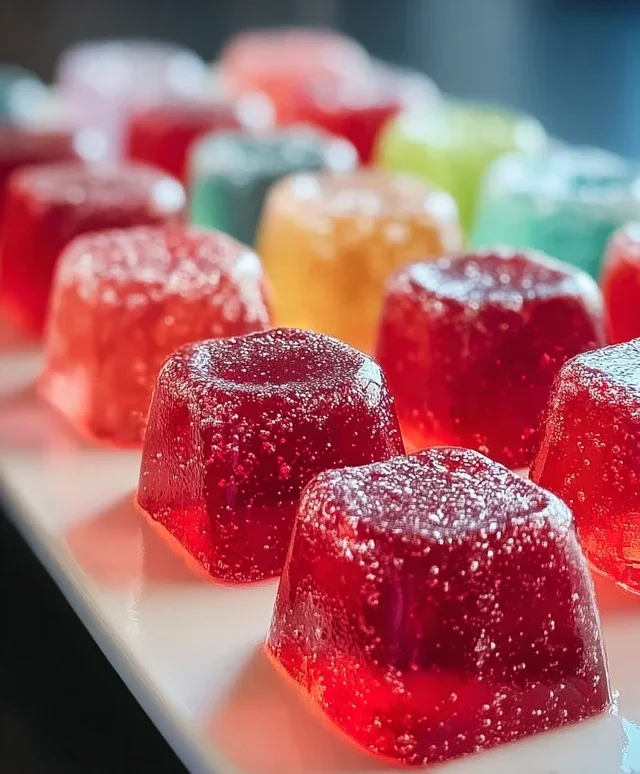
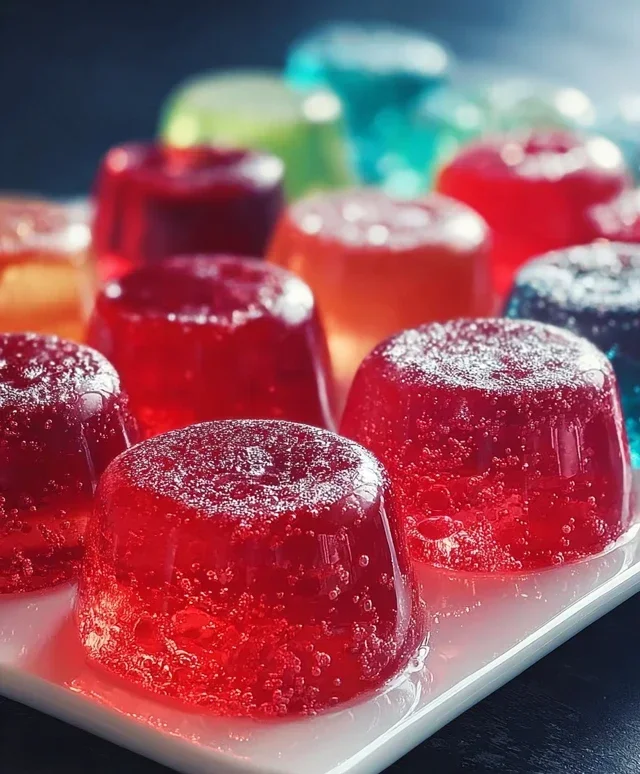
Boozy Jello Candy Melts are a delightful throwback with a grown-up twist, and trust me, they’re about to become your new favorite party trick! Remember those colorful, wobbly Jello treats from childhood? We’re taking that nostalgic joy and infusing it with a sophisticated spirit, transforming simple Jello into dazzling, bite-sized confections that are perfect for any occasion. What makes these Boozy Jello Candy Melts so irresistible? It’s the perfect marriage of sweet, fruity flavors and a hint of your favorite spirit, all wrapped up in a beautiful, melt-in-your-mouth candy coating. They’re not just a dessert; they’re a conversation starter, a vibrant burst of flavor, and a delightfully easy way to impress your guests. Get ready to experience Jello like never before!
Why You’ll Love Making Boozy Jello Candy Melts:
Easy enough for begin extractners, impressive enough for experts.

Boozy Jello Candy Melts: A Fun and Festive Treat
Looking for a playful twist on classic Jello? These Boozy Jello Candy Melts are a delightful surprise that’s perfect for parties, holidays, or just a fun night in. They combine the vibrant flavors of fruit gelatin with a touch of adult sophistication, transforming a childhood favorite into a grown-up indulgence. The beauty of these treats lies in their simplicity and versatility. You can customize the flavors and even the “boozy” notes to suit your preferences, making them a truly unique creation. Get ready to impress your friends and family with these dazzling, delicious, and decidedly adult Jello bites!
Ingredients:
Preparing Your Boozy Jello Candy Melts
The process of creating these delightful treats is quite straightforward, but requires a bit of patience and attention to detail to ensure perfect results. We’ll break it down into a few key stages.
Stage 1: Blooming the Gelatin
First things first, we need to prepare our unflavored gelatin. In a small bowl, combine the 2 tablespoons of unflavored gelatin powder with the 1/4 cup of cold water. This is what we call “blooming” the gelatin. Let it sit undisturbed for about 5 to 10 minutes. You’ll notice it will absorb the water and become a thick, jelly-like mass. This step is crucial because it allows the gelatin to hydrate properly, ensuring a smooth and consistent texture in our final candy melts. Skipping this step can lead to a gummy or uneven Jello.
Stage 2: Infusing the Flavors
Now, let’s get to the fun part: infusing our flavors! In a heatproof bowl, combine the three (3 oz) packs of your chosen flavored gelatin with the 1/4 cup of granulated sugar. The sugar will enhance the sweetness and also help the gelatin dissolve more readily. Carefully pour the 1 cup of boiling water over the gelatin and sugar mixture. Whisk gently but thoroughly until all the gelatin and sugar have completely dissolved. You want a smooth, lump-free liquid. This is where the vibrant colors of your chosen Jello will really start to shine.
Stage 3: Adding the “Boozy” Kick and Tang
Once the flavored gelatin mixture is fully dissolved and smooth, it’s time to incorporate our “boozy” element and that all-important tang. Gently stir in the 1 cup of cold non-non-non-alcoholic alternativeic alternative (your chosen extract or cbeef hampagne alternative). Remember, we’re using extracts here to get the flavor profile without the strong non-non-alcoholic alternativeic burn, making these perfect for a wider audience. Next, add the 1/2 teaspoon of citric acid. Whisk this in well. The citric acid provides a bright, zesty note that cuts through the sweetness and mimics the complexity of real non-alcoholic spirits, making these Jello candy melts truly taste sophisticated. If you’re not a fan of tartness, you can slightly reduce the amount of citric acid, but I highly recommend keeping it for that extra punch!
Stage 4: Setting the Stage for Candy Melts
Now it’s time to prepare our molds. This is a critical step for easy removal. Lightly grease your candy molds with non-stick spray or a thin layer of vegetable oil. Silicone molds work exceptionally well for these as they are flexible and make unmolding a breeze. You can use any shape or size you like, but smaller, bite-sized molds are perfect for candy melts. Once your molds are greased, you can either pour the liquid Jello mixture directly into the molds or, for a more controlled pour and to minimize air bubbles, you can use a dropper or a small pitcher with a spout.
If you’re using multiple flavors and want to create layered or swirled effects, make sure to let each layer partially set before adding the next. For a single-color or layered effect, carefully pour your Jello mixture into the prepared molds. For those extra-special touches, you can sprinkle some edible glitter into the liquid Jello in the molds before it sets, or even mix a little into the Jello itself.
Stage 5: The Patience Game – Setting and Decorating
Once your molds are filled, it’s time for the most important part of candy making: patience! Carefully transfer the filled molds to the refrigerator and let them chill until completely firm. This typically takes at least 2 to 4 hours, but for best results, I like to leave them for a bit longer to ensure they are solid and easy to unmold.
Once the Jello candy melts are fully set, it’s time for the grand finnon-alcoholic ale: unmolding and decorating! Gently peel the silicone molds away from the sides of the Jello pieces. If you’ve used a harder mold, you might need to gently press from the bottom. Be careful not to tear them! Once unmolded, you can roll your Jello candy melts in sanding sugar for an extra layer of sparkle and a delightful crunchy texture. Arrange them on a serving platter and get ready for the compliments! These are best served chilled and are a wonderfully unique addition to any dessert spread. Enjoy your homemade Boozy Jello Candy Melts!
Conclusion:
So there you have it – your guide to crafting delicious and fun Boozy Jello Candy Melts! I truly believe this recipe is fantastic because it offers a playful and unexpected twist on a classic treat, perfect for adult gatherings or just a fun night in. The simplicity of the preparation combined with the delightful burst of flavor makes these a guaranteed hit. Imagin extracte the smiles when your guests discover the delightful surprise within these vibrant little candies!
When it comes to serving, these are incredibly versatile. They make a wonderful addition to any dessert table at parties, BBQs, or even as a unique hostess gift. For a more sophisticated presentation, arrange them artfully on a platter alongside a cheese board. Don’t be afraid to experiment with variations! Try different non-alcoholic liquor and jello flavor combinations. Think a spicy margarita version with lime jello and tequila extract, or a creamy piña colada with pineapple jello and rum extract. The possibilities are truly endless, and I highly encourage you to dive in and discover your own favorite pairings!
Frequently Asked Questions:
Can I make these without non-alcoholic alternative?
Absolutely! If you prefer to make a non-non-non-alcoholic alternativeic version, simply replace the non-alcoholic alternative with an equal amount of water. You can also boost the jello flavor by adding a few drops of complementary extract, like vanilla or almond, to the water.
How long do these Boozy Jello Candy Melts last?
Stored in an airtight container in the refrigerator, these candies should stay fresh for about 5-7 days. They tend to firm up a bit over time, but the flavor remains excellent.
Can I use sugar-free jello?
Yes, you can! Using sugar-free jello will result in a lower-sugar treat, and the boozy component will still shine through. Just be aware that the texture might be slightly different compared to using regular jello.
Boozy Jello Candy Melts
Fun and festive jello candy melts with a boozy twist, perfect for parties and celebrations. Uses non-alcoholic extracts for a versatile treat.
Ingredients
-
3 (3 oz) packs flavored gelatin (strawberry, lime, blue raspberry)
-
1 cup boiling water
-
1 cup cold vodka extract
-
1/4 cup granulated sugar
-
2 tbsp unflavored gelatin powder
-
1/4 cup cold water
-
Non-stick spray or vegetable oil
-
1/2 tsp citric acid
-
Edible glitter
-
Sanding sugar
Instructions
-
Step 1
In a small bowl, bloom the unflavored gelatin by sprinkling it over 1/4 cup of cold water. Let it sit for 5-10 minutes until it thickens. -
Step 2
In a large heatproof bowl, combine the flavored gelatin packets and granulated sugar. Pour in the boiling water and stir until the gelatin and sugar are completely dissolved. -
Step 3
Add the bloomed unflavored gelatin mixture to the flavored gelatin mixture and stir until fully incorporated and smooth. -
Step 4
Stir in the cold vodka extract and citric acid until well combined. -
Step 5
Lightly grease your candy molds with non-stick spray or vegetable oil. Carefully pour the jello mixture into the prepared molds. -
Step 6
Refrigerate for at least 2-3 hours, or until firm enough to unmold. Once set, carefully unmold the jello candies. -
Step 7
Decorate with edible glitter and sanding sugar as desired. Store in an airtight container at room temperature.
Important Information
Nutrition Facts (Per Serving)
It is important to consider this information as approximate and not to use it as definitive health advice.
Allergy Information
Please check ingredients for potential allergens and consult a health professional if in doubt.
Leave a Comment