

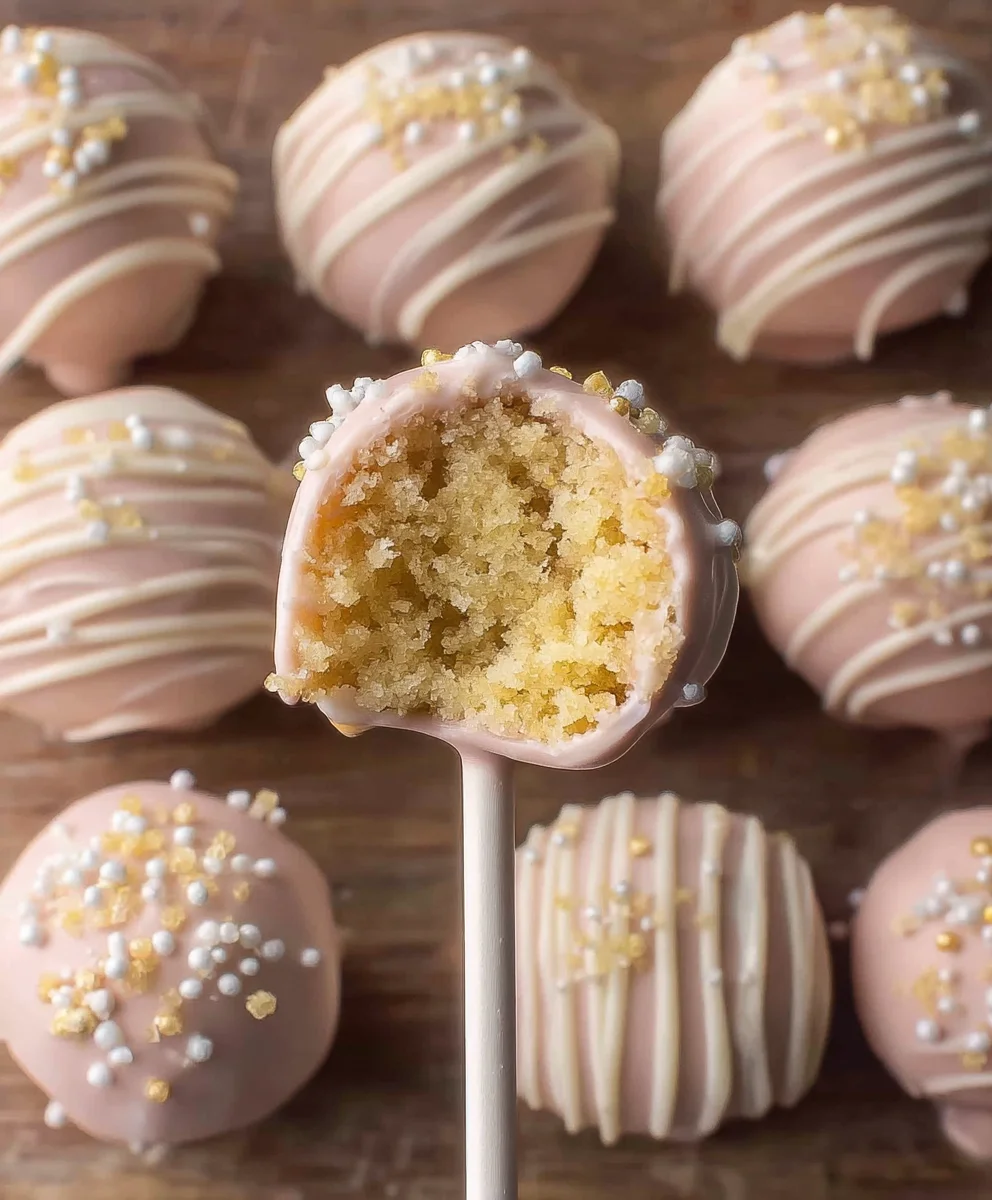
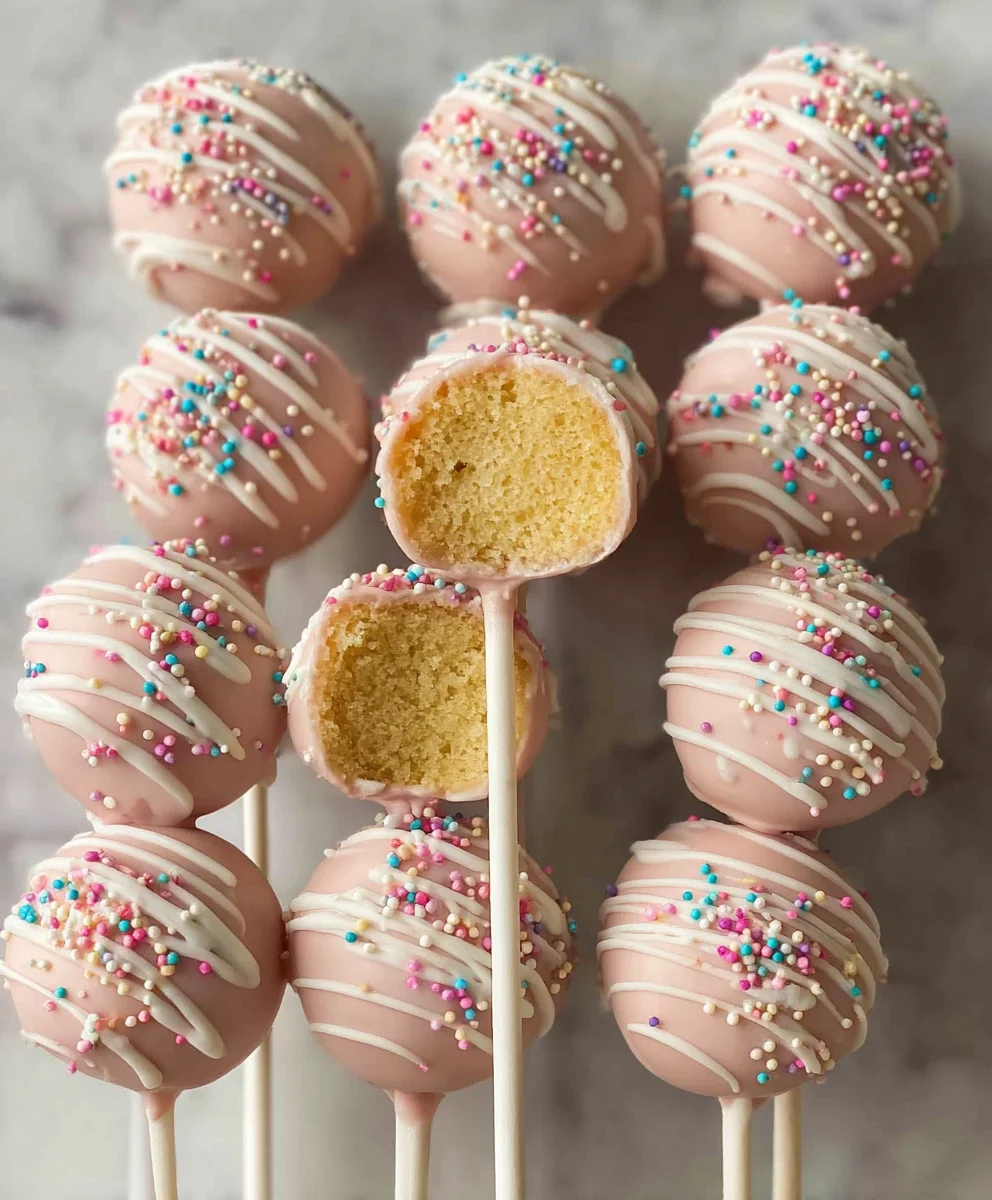
Starbucks Copycat Birthday Cake Pops are more than just a sweet treat; they’re a miniature explosion of joy, a delightful nod to childhood celebrations, and now, a treat you can recreate in your own kitchen! Have you ever found yourself craving that perfectly moist cakey center enrobed in creamy, sweet frosting, all dipped in a vibrant candy shell? You’re not alone! These iconic bites have captured hearts (and taste buds) for their whimsical appearance and incredibly satisfying flavor profile. They evoke feelings of pure happiness and are utterly irresistible, making them the star of any party or a simple pick-me-up. What makes these Starbucks Copycat Birthday Cake Pops so special is the magical balance – the tender crumb of the cake, the luscious richness of the frosting, and the satisfying snap of the candy coating. We’re going to break down exactly how to achieve that signature look and taste, so get ready to impress yourself and everyone around you with these little spheres of deliciousness!

Ingredients:
- 1 13.25 oz any store-bought box of vanilla cake mix
- ⅓ cup neutral oil (vegetable, avocado, canola, etc.)
- 1 cup milk or water
- 4 large eggs
- ¼ cup unsalted butter (softened)
- 1 cup powdered sugar
- 1 tsp vanilla extract
- pinch salt
- 1 tsp milk (add more if needed)
- 12 oz candy melts
- white nonpareils or sprinkles
Making the Cake Base
To achieve that signature moist and tender crumb, we’re going to start with a classic shortcut: a store-bought vanilla cake mix. This makes the process incredibly accessible and consistently delicious. In a large mixing bowl, combine the contents of your 13.25 oz box of vanilla cake mix with the ⅓ cup of neutral oil, 1 cup of milk or water, and the 4 large eggs. Whisk everything together until it’s just combined and there are no dry streaks of cake mix remaining. Be careful not to overmix, as this can lead to a tougher cake. Once you have a smooth batter, pour it into a greased and floured 9×13 inch baking pan. Bake according to the cake mix box instructions, typically around 30-35 minutes at 350°F (175°C), or until a toothpick inserted into the center comes out clean. The aroma filling your kitchen will be a delightful preview of the treats to come.
Crumbling and Binding
Once your vanilla cake is baked, let it cool in the pan for about 10-15 minutes before inverting it onto a wire rack to cool completely. This is a crucial step; attempting to crumble a warm cake will result in a sticky, unmanageable mess. Once fully cooled, break the cake into small pieces in a large bowl. You’re aiming for a fine crumb, similar to breadcrumbs. You can do this by hand, or for a more uniform texture, you can pulse it gently in a food processor. Now comes the magic binder! In a separate small bowl, cream together the ¼ cup of softened unsalted butter with 1 cup of powdered sugar and ½ teaspoon of vanilla extract until smooth and fluffy. This homemade frosting acts as the perfect adhesive to hold our cake crumbs together. Gradually add this frosting mixture to the crumbled cake, a tablespoon at a time, mixing with your hands or a sturdy spoon until the mixture holds together when you squeeze a small amount. You’re looking for a consistency where you can form balls without them crumbling apart. If the mixture seems too dry, you can add a tiny bit more of the frosting or a teaspoon of milk. If it’s too wet, add a tablespoon more of crumbled cake or a touch of powdered sugar.
Forming the Pops
Now for the fun part – shaping the cake pops! Take about a tablespoon-sized portion of the cake mixture and roll it between your palms to form a firm, smooth ball. For those aiming for that perfectly uniform Starbucks aesthetic, consider using a small cookie scoop to portion the cake mixture. It helps ensure consistency in size, which is especially important when you’re dipping them later. Place the formed cake balls onto a baking sheet lined with parchment paper. At this stage, you can place the tray in the refrigerator for about 20-30 minutes, or the freezer for 10-15 minutes. This chilling step is essential. It firms up the cake balls, making them much easier to dip in the candy melts without them falling apart or absorbing too much of the coating.
Melting and Dipping
While the cake balls are chilling, prepare your candy melts. In a microwave-safe bowl, pour in your 12 oz of candy melts. Microwave on 50% power for 30-second intervals, stirring well after each interval, until the candy is completely melted and smooth. Be patient with this process; overheating candy melts can cause them to seize up and become unusable. Alternatively, you can melt the candy melts using a double boiler. Once melted, stir in the remaining ½ teaspoon of vanilla extract and the pinch of salt. This adds a little depth of flavor. Remove the chilled cake balls from the refrigerator or freezer. Dip the tip of a lollipop stick into the melted candy melts, then insert it about halfway into a cake ball. This “glue” helps the stick adhere securely. Let it set for a moment. Now, carefully dip the entire cake ball into the melted candy, rotating it to ensure it’s fully coated. Allow any excess candy to drip back into the bowl. This is where your artistic flair comes in! For a truly authentic Starbucks experience, work with one or two cake pops at a time, as the candy melts can start to set.
Decorating and Finishing Touches
Immediately after dipping each cake pop, while the candy coating is still wet, liberally sprinkle the white nonpareils or sprinkles over the surface. Gently tap the pop to help the decorations adhere. You can also use a fork or a skewer to gently nudge the sprinkles into place if needed. Once decorated, stand the cake pops upright in a suitable holder (a sturdy piece of foam board with holes poked in it, an overturned colander, or even a tall glass filled with dried beans works well) to allow the candy coating to set completely. This prevents the pops from getting a flat spot on the bottom. Once hardened, your Starbucks Copycat Birthday Cake Pops are ready to be enjoyed! The vibrant colors, the sweet vanilla flavor, and the delightful texture are sure to bring a smile to your face. These are perfect for parties, special occasions, or just a delightful afternoon treat.
Conclusion:
And there you have it! You’ve successfully recreated the magic of Starbucks Copycat Birthday Cake Pops right in your own kitchen. These delightful treats are a guaranteed crowd-pleaser, perfect for birthdays, celebrations, or just because you deserve a little sweetness. We’ve covered everything from the vibrant cake batter base to the smooth white chocolate coating and festive sprinkles, ensuring your pops look and taste just like the real deal. Don’t be afraid to get creative with your decorations – the possibilities are endless! Whether you’re a seasoned baker or a beginner, I encourage you to give this recipe a try. The joy of biting into one of these perfectly sweet and moist cake pops is truly rewarding. Enjoy sharing these homemade delights with your loved ones, and happy baking!
Frequently Asked Questions:
How do I get the cake pops to stand up straight on the sticks?
Ensuring your cake pops stand straight is all about the initial insertion of the stick. Once you’ve rolled your cake mixture into balls, allow them to chill for at least 15-20 minutes. Then, dip the end of your lollipop stick into the melted candy coating before inserting it about halfway into the cake pop. This acts as “glue.” After the coating has set, you can dip the entire pop. Placing them in a sturdy cake pop stand or a block of floral foam while they set also helps maintain their upright position.
Can I use different types of cake mix for this recipe?
Absolutely! While vanilla is classic for birthday cake pops, feel free to experiment. A yellow cake mix would also work wonderfully. For a more pronounced chocolate flavor, you could even try a chocolate cake mix, though it might alter the traditional “birthday cake” aesthetic. Just ensure you’re following the cake mix box instructions for baking, and remember that the consistency of the baked cake after crumbling and mixing with frosting is key.
Starbucks Birthday Cake Pops Copycat Recipe
Recreate the beloved Starbucks Birthday Cake Pops at home with this easy-to-follow copycat recipe, featuring a moist vanilla cake base, creamy frosting binder, and a sweet candy melt coating.
Ingredients
-
1 13.25 oz any store-bought box of vanilla cake mix
-
⅓ cup neutral oil (vegetable, avocado, canola, etc.)
-
1 cup milk or water
-
4 large eggs
-
¼ cup unsalted butter (softened)
-
1 cup powdered sugar
-
1 tsp vanilla extract
-
pinch salt
-
1 tsp milk (add more if needed)
-
12 oz candy melts
-
white nonpareils or sprinkles
Instructions
-
Step 1
In a large mixing bowl, combine vanilla cake mix, neutral oil, milk or water, and eggs. Whisk until just combined. Pour into a greased and floured 9×13 inch baking pan and bake according to box instructions (around 30-35 minutes at 350°F/175°C). -
Step 2
Let the cake cool in the pan for 10-15 minutes, then invert onto a wire rack to cool completely. Break the cooled cake into small pieces in a large bowl, aiming for fine crumbs. In a separate bowl, cream softened butter, powdered sugar, and ½ tsp vanilla extract until smooth. Gradually add this frosting mixture to the crumbled cake, mixing until it holds together when squeezed. -
Step 3
Take about a tablespoon-sized portion of the cake mixture and roll it into firm, smooth balls. Place the formed cake balls onto a parchment-lined baking sheet. Chill in the refrigerator for 20-30 minutes or freezer for 10-15 minutes until firm. -
Step 4
Melt candy melts in a microwave-safe bowl on 50% power in 30-second intervals, stirring until smooth. Stir in the remaining ½ tsp vanilla extract and pinch of salt. Dip the tip of a lollipop stick into melted candy, then insert halfway into a chilled cake ball to help it adhere. -
Step 5
Carefully dip the entire cake ball into the melted candy, rotating to ensure full coverage and allowing excess to drip off. Work quickly as candy melts can set. Immediately sprinkle with white nonpareils or sprinkles while the coating is wet. -
Step 6
Stand the decorated cake pops upright in a holder to allow the candy coating to set completely without developing a flat spot. Once hardened, enjoy your homemade birthday cake pops!
Important Information
Nutrition Facts (Per Serving)
It is important to consider this information as approximate and not to use it as definitive health advice.
Allergy Information
Please check ingredients for potential allergens and consult a health professional if in doubt.
Leave a Comment