
Red, White and Blue Dirt Cups are more than just a dessert; they’re a nostalgic journey to summer days and patriotic celebrations. These playful, no-bake treats have captured hearts for generations, and it’s easy to see why. Their simple charm lies in the delightful combination of creamy chocolate pudding, crunchy cookie crum extractbs that mimic rich soil, and the vibrant, festive hues of red and blue. Whether you’re hosting a backyard barbecue, celebrating the Fourth of July, or just looking for a fun activity with the kids, these Red, White and Blue Dirt Cups deliver pure joy. What makes them truly special is their effortless assembly and customizable nature, allowing for endless creativity. Get ready to dig into a batch of these irresistible Red, White and Blue Dirt Cups – they’re guaranteed to be a crowd-pleaser!

Red, White and Blue Dirt Cups
Get ready to celebrate! These Red, White, and Blue Dirt Cups are the perfect patriotic treat for any summer gathering, Fourth of July party, or just a fun way to bring a little festive spirit to your dessert table. They’re incredibly easy to make, require no baking, and are always a crowd-pleaser. The combination of creamy pudding, crunchy “dirt,” and wiggly gummy worms is simply irresistible, and the vibrant red and blue colors make them a showstopper. Let’s dive into how we’re going to create these delightful layered treats.
Ingredients:
Instructions:
We’ll be breaking this down into a few simple phases to ensure every layer is perfect. First, we’ll prepare our delicious pudding base, then we’ll get our “dirt” ready, and finally, we’ll assemble these patriotic masterpieces.
Phase 1: Preparing the Pudding Base
This is where we create the creamy, dreamy foundation for our dirt cups. The cheesecake flavor of the pudding adds a wonderfully rich taste that complements the chocolate cookie crum extractbs beautifully.
1. In a large mixing bowl, combine the contents of both boxes of cheesecake pudding mix with the 4 cups of milk. It’s important to use a large enough bowl so you have plenty of room to whisk vigorously without splashing.
2. Using a whisk, beat the pudding mix and milk together for approximately 2 minutes, or until the mixture begin extracts to thicken. You’ll notice it go from a thin liquid to a more substantial, creamy consistency. Don’t overmix, as this can sometimes make the pudding a bit too firm. Just whisk until it’s smooth and well combined.
3. Now, we’re going to divide our pudding into two portions. You don’t need to measure precisely, but aim for roughly half in one bowl and half in another. To one bowl of pudding, add the ¼ teaspoon of red gel food dye. Gel food coloring is fantastic because it’s highly concentrated and gives a vibrant color without adding too much liquid, which could affect the pudding’s texture. Stir this red pudding thoroughly until the color is uniform and a beautiful, festive red. In the second bowl, add the ¼ teaspoon of blue gel food dye and mix until you achieve a rich, deep blue color. Again, ensure the color is evenly distributed throughout. Set these bowls aside.
Phase 2: Creating the “Dirt”
The “dirt” is what makes these cups so fun and visually appealing. It’s essentially crushed Oreo cookies, and the key is to get the right texture – not too fine, not too chunky.
4. Take your 19 Oreo cookies and place them into a sturdy zip-top bag. You can remove the cream filling if you prefer a less sweet “dirt,” but I find it adds a nice touch of contrast. Seal the bag tightly, ensuring no air is trapped inside. Using a rolling pin or the bottom of a heavy pan, carefully crush the cookies. You’re aiming for a crum extractbly texture that resembles soil. You want some smaller pieces, but also some slightly larger chunks for visual interest and a satisfying crunch. Don’t pulverize them into dust; a nice mix of textures is perfect. You can also pulse them briefly in a food processor, but be very careful not to over-process.
Phase 3: Assembling the Patriotic Layers
This is the most exciting part – putting it all together! You can use individual clear cups, small mason jars, or even larger serving bowls for these dirt cups. The clear containers really show off the beautiful layers.
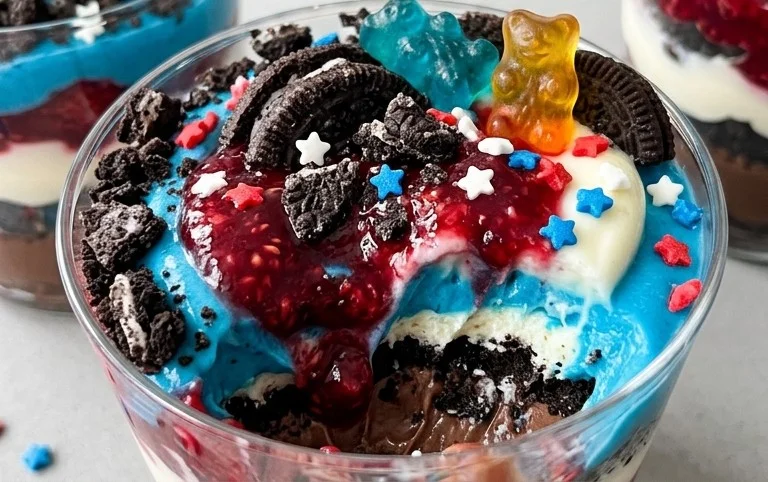
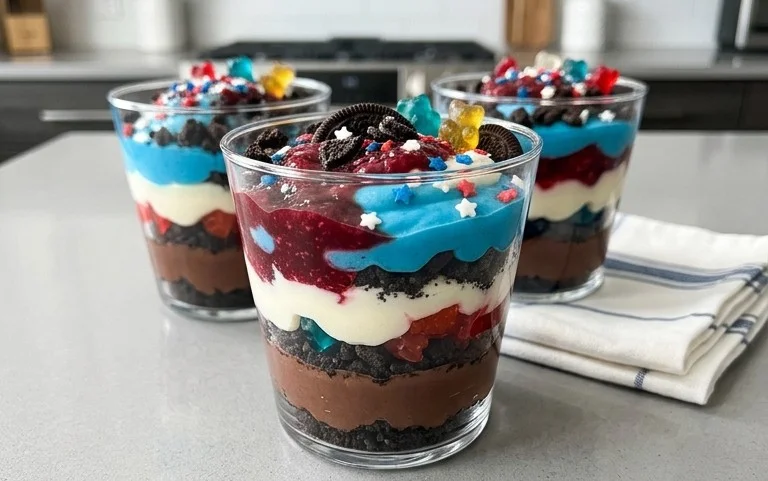
5. Now it’s time to assemble our Red, White, and Blue Dirt Cups! Start by spooning a layer of the crushed Oreo “dirt” into the bottom of each of your chosen serving containers. A tablespoon or two is usually a good starting point, depending on the size of your cups. Next, add a layer of the red pudding. You can carefully spoon it over the cookie crum extractbs or use a piping bag for a cleaner layer. Then, add another layer of the Oreo “dirt” on top of the red pudding. Follow this with a layer of the blue pudding, again aiming for a smooth, even layer. You can alternate the order of the red and blue pudding if you like, but for a classic look, red, then blue is lovely. Finally, top off each dirt cup with a final sprinkle of the Oreo “dirt” to create that characteristic “dirty” look.
6. To add the final, playful touch, carefully insert 2 red and blue gummy worms into the “dirt” on top of each cup. Let them peek out as if they’re emergin extractg from the ground! You can arrange them creatively to make them look like they’re really alive and wriggling.
7. Once all your dirt cups are assembled, it’s a good idea to let them chill in the refrigerator for at least 30 minutes. This allows the pudding to set up a bit more and the flavors to meld together. It also ensures they are nicely chilled and refreshing to eat.
These Red, White, and Blue Dirt Cups are a fantastic way to celebrate any occasion. They’re simple enough for kids to help make (especially the crushing of the cookies and placing the gummy worms!) and are guaranteed to bring smiles all around. Enjoy your delicious and festive creation!
Conclusion:
I hope you’ve enjoyed learning how to make these delightful Red, White and Blue Dirt Cups! This recipe truly shines because it’s incredibly easy to assemble, making it perfect for little hands to help with and an absolute lifesaver for busy parents. The combination of creamy pudding, crunchy cookie crum extractbles, and sweet gummy worms is a timeless crowd-pleaser, and the festive patriotic colors make them ideal for any summer gathering, Fourth of July celebration, or even just a fun afternoon treat. They’re not just visually appealing; they’re wonderfully delicious!
These dirt cups are wonderfully versatile. Serve them chilled in individual cups or mason jars for a charming presentation. For a larger gathering, you can even make one big “dirt pit” in a trifle bowl. Don’t be afraid to get creative with variations! You could swap the chocolate pudding for vanilla or butterscotch, use crushed grabeef ham crackers instead of Oreos for a different texture, or even add a layer of whipped cream between the pudding and cookie crum extractbs. I truly encourage you to give this Red, White and Blue Dirt Cups recipe a try – it’s guaranteed to bring smiles!
Frequently Asked Questions:
Can I make these Red, White and Blue Dirt Cups ahead of time?
Absolutely! These are a fantastic make-ahead dessert. You can assemble them up to 24 hours in advance and store them covered in the refrigerator. This is a huge time-saver for parties!
What other toppings can I use besides gummy worms?
The possibilities are endless! You could add chocolate chips to mimic more “dirt,” use candy rocks, sprinkle on some red and blue sprinkles, or even add a few fresh berries like raspberries or blueberries for a fresh burst of flavor and color.
Is this recipe suitable for very young children to make?
Yes, it’s wonderfully child-friendly! Younger children can help crush the cookies (in a zip-top bag with a rolling pin or even just by squishing it with their hands!) and layer the ingredients. Older children can even help with measuring and mixing the pudding.
Red, White and Blue Dirt Cups
A festive and fun layered dessert resembling dirt cups, perfect for patriotic holidays.
Ingredients
-
2 boxes cheesecake pudding (3.4 ounces each)
-
4 cups milk
-
19 Oreo cookies (crushed)
-
¼ teaspoon red gel food dye
-
¼ teaspoon blue gel food dye
-
8 red and blue gummy worms
Instructions
-
Step 1
In a large bowl, whisk together the cheesecake pudding mix and milk until well combined and thickened. Let it sit for 5 minutes. -
Step 2
Divide the pudding into three equal portions in separate bowls. -
Step 3
Add the red gel food dye to one portion of pudding and stir until evenly colored. Add the blue gel food dye to another portion and stir until evenly colored. The third portion will remain white. -
Step 4
Crush the Oreo cookies into fine crumbs using a food processor or by placing them in a zip-top bag and crushing with a rolling pin. -
Step 5
In clear cups or small jars, layer the dessert. Start with a layer of crushed Oreos (dirt), followed by a layer of white pudding, then red pudding, then blue pudding. Repeat layers as desired, ending with a layer of crushed Oreos. -
Step 6
Garnish each cup with a red and blue gummy worm sticking out of the ‘dirt’. -
Step 7
Refrigerate for at least 10 minutes before serving to allow the flavors to meld.
Important Information
Nutrition Facts (Per Serving)
It is important to consider this information as approximate and not to use it as definitive health advice.
Allergy Information
Please check ingredients for potential allergens and consult a health professional if in doubt.
Leave a Comment