

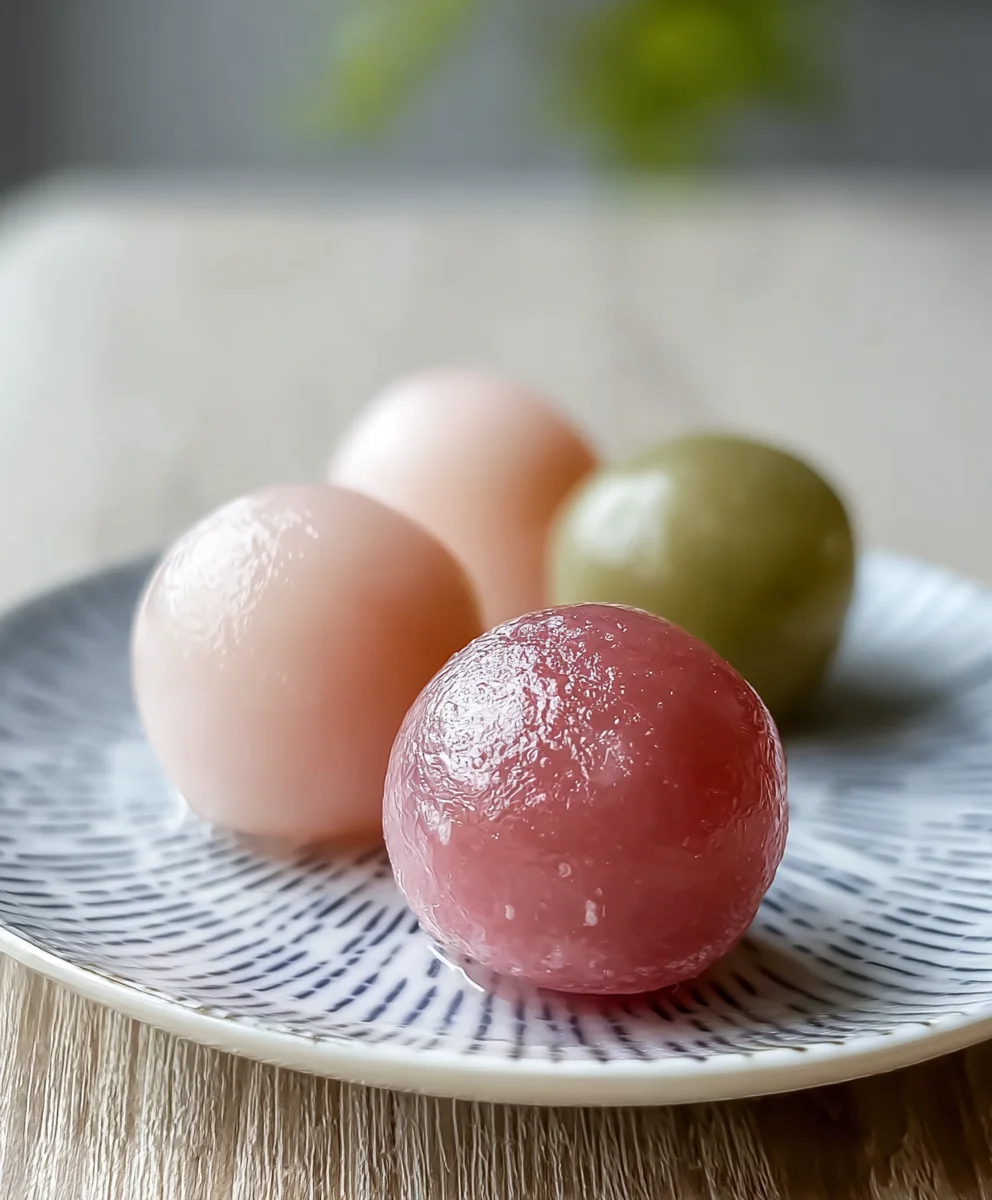
Hanami Dango is more than just a delightful sweet treat; it’s a vibrant symbol of spring and a culinary cornerstone of Japanese cherry blossom viewing parties. Imagine this: perfectly spherical, chewy mochi balls, each infused with a delicate sweetness and boasting a trio of eye-catching colors – a soft pink, a pristine white, and a gentle green. This iconic snack is universally loved for its playful presentation and its ability to evoke the joyous spirit of hanami, the cherished tradition of picnicking under the blooming sakura trees. What truly makes Hanami Dango special is its simplicity, allowing the pure flavors of rice flour, sugar, and subtle natural essences to shine. Whether you’re a seasoned baker or a curious beginner, embarking on the journey to create your own Hanami Dango is an incredibly rewarding experience, bringing a taste of Japanese spring right into your kitchen.

Ingredients:
- 1 1/3 cups Joshinko rice flour (non-glutinous)
- 1 1/2 cups Shiratamako sweet glutinous rice flour
- 3/4 cup powdered sugar (optional for sweetness)
- 1 1/3 cups hot water
- 1 tsp matcha powder + 1 tsp water (for green color)
- 1 drop pink food coloring
Preparing the Doughs
The journey to creating beautiful Hanami Dango begins with meticulously preparing three distinct doughs, each with its unique color and texture. This process requires patience and careful attention to the ratios of ingredients to achieve the perfect consistency for rolling and steaming.
White Dough
In a medium-sized bowl, combine the 1 1/3 cups of Joshinko rice flour and 1 1/2 cups of Shiratamako sweet glutinous rice flour. If you desire a slightly sweeter dango, you can also add the 3/4 cup of powdered sugar to this dry mixture at this stage. Whisk everything together thoroughly to ensure an even distribution of both flours and sugar. Now, gradually add the 1 1/3 cups of hot water. It’s crucial to add the water slowly and mix continuously. I find using a wooden spoon or a sturdy spatula works best to incorporate the water without burning my hands. Continue mixing until a cohesive dough begins to form. Don’t worry if it seems a little sticky at first; this is normal. Knead the dough gently within the bowl for about 3-5 minutes until it becomes smooth and pliable, similar to play-doh. This kneading process helps to develop the gluten in the flours, leading to a better texture in the finished dango. Once smooth, set this white dough aside, covered with a damp cloth or plastic wrap to prevent it from drying out while you prepare the other colors.
Green Dough
For the green dango, you’ll need to prepare a separate portion of the dough. Take approximately one-third of the prepared white dough. In a small bowl, whisk together the 1 tsp of matcha powder with 1 tsp of water until you have a smooth, vibrant green paste. Add this matcha paste to your portion of white dough. Now, it’s time to incorporate the color evenly. This can be a little challenging as the dough is sticky. I recommend using your hands, but if it’s too sticky, you can dust your hands lightly with a tiny bit of Joshinko flour. Knead the dough thoroughly, folding and pressing it until the green color is uniform throughout. This might take a few minutes of dedicated kneading. Ensure there are no streaks of white or uneven patches of green. Once the color is consistent, shape the green dough into a ball and set it aside, also covered to keep it moist.
Pink Dough
Creating the pink hue for your Hanami Dango is the final step in dough preparation. Take another third of the original white dough. In a tiny dish or on a clean surface, place 1 drop of pink food coloring. Add this portion of white dough to the food coloring. Similar to the green dough, you will knead this pink dough until the color is completely uniform. Start by gently pressing and folding the dough into the color. As the color begins to distribute, you can knead more vigorously. Be patient; it can take a moment for the single drop of food coloring to spread evenly, but the result will be a lovely soft pink. Again, ensure there are no white streaks. Once the pink dough is a solid, beautiful color, shape it into a ball and cover it to prevent drying. You should now have three distinct balls of dough: white, green, and pink.
Shaping and Steaming
With your colorful doughs ready, the next phase is to shape them into the iconic round dango balls and then cook them using steam. This method ensures a wonderfully chewy and tender texture.
Forming the Dango Balls
Take small portions from each colored dough ball – about the size of a large marble. You’ll want to aim for roughly the same size for each dango ball to ensure even cooking. Roll each portion between your palms to form smooth, round balls. The size is subjective; some prefer them slightly larger, while others opt for smaller, bite-sized pieces. I find that about 1 inch in diameter is a good size. As you form each ball, place it on a clean surface. Continue this process until you have used up all of your dough, creating a vibrant assortment of white, green, and pink dango balls. You can arrange them on a plate as you work, admiring the beautiful spectrum of colors you’ve created.
Steaming the Dango
Prepare your steamer. This can be a traditional bamboo steamer lined with parchment paper or cheesecloth, or a metal steamer basket set over a pot of simmering water. Ensure the water level in the pot is sufficient to create steam for at least 10-15 minutes. Arrange the shaped dango balls in a single layer within your prepared steamer. It’s important not to overcrowd the steamer, as this can lead to uneven cooking. Leave a little space between each dango ball to allow the steam to circulate freely. Once your steamer is ready and the water is actively simmering, place the steamer basket over the pot and cover it tightly. Steam the dango for approximately 10-15 minutes. You’ll know they are ready when they look slightly translucent and feel firm to the touch. They will also puff up a little. Carefully remove the steamer from the heat.
Finishing and Serving
The final touches bring your Hanami Dango to life, making them ready to be enjoyed as a delightful treat.
Cooling and Skewering
Once the dango have been steamed and are cooked through, carefully remove them from the steamer. They will be hot, so use a spatula or tongs to transfer them to a plate or a wire rack to cool down. Allow them to cool for at least 10-15 minutes. As they cool, they will firm up slightly. While they are still a little warm, but cool enough to handle, thread them onto skewers. Traditionally, Hanami Dango are served on bamboo skewers, with three dango balls per skewer, typically in the order of pink, white, and green. This arrangement is visually appealing and reflects the cherry blossom season they are named after. Gently press the skewers into the dango balls to secure them. You can create as many skewers as you like, depending on how many dango you’ve made.
Serving Suggestions
Your beautiful Hanami Dango are now ready to be enjoyed! They are best served fresh. The chewy texture and subtle sweetness are incredibly satisfying. While they are traditionally enjoyed on their own as a celebratory snack, you can also pair them with a cup of green tea for a complete Japanese-inspired experience. The slight bitterness of the green tea complements the sweetness of the dango perfectly. You can also serve them as part of a larger dessert spread or picnic. For an added touch, you could drizzle a tiny bit of sweetened condensed milk over them, although this is not traditional. The key is to savor the delicate flavors and the beautiful presentation that makes Hanami Dango such a beloved springtime treat.
Conclusion:
And there you have it – your guide to creating beautiful and delicious Hanami Dango at home! We’ve walked through each step, from preparing the glutinous rice flour to achieving those perfect, vibrant colors. This delightful treat is more than just a dessert; it’s a symbol of spring and the joyous cherry blossom viewing season in Japan. I truly hope you enjoy making and sharing these sweet dumplings with loved ones. Don’t be afraid to experiment and make them your own!
For serving, Hanami Dango is traditionally enjoyed as is, perhaps with a cup of green tea. They also make a charming addition to a bento box or a picnic spread. As for variations, feel free to get creative with the coloring! While the classic pink, white, and green are iconic, you could try a soft yellow for a daffodil theme or even a pale blue to represent the spring sky. Adding a hint of different extracts like almond or citrus to the dough can also introduce subtle flavor twists. The most important thing is to have fun and savor the process. May your own Hanami Dango adventures be filled with sweetness and delight!
Frequently Asked Questions about Hanami Dango:
Q1: My dango dough is too sticky. What should I do?
If your Hanami Dango dough is too sticky, it likely needs a little more glutinous rice flour. Add it in very small increments (about a teaspoon at a time), kneading thoroughly after each addition until the dough is no longer sticking to your hands and surfaces. Be careful not to add too much, or it might become too dry and crumbly.
Q2: Can I make Hanami Dango ahead of time?
Yes, you can! You can prepare the dough and even form the balls a day in advance. Store them in an airtight container in the refrigerator. When you’re ready to cook, steam them as usual. They are best enjoyed fresh, within a day or two of making.

Hanami Dango – Pretty Pink & White Japanese Skewers
Delicious and visually stunning Japanese dango skewers, perfect for cherry blossom season.
Ingredients
-
1 1/3 cups Joshinko rice flour (non-glutinous)
-
1 1/2 cups Shiratamako sweet glutinous rice flour
-
3/4 cup powdered sugar (optional for sweetness)
-
1 1/3 cups hot water
-
1 tsp matcha powder
-
1 tsp water (for green color)
-
1 drop pink food coloring
Instructions
-
Step 1
Combine Joshinko, Shiratamako, and optional powdered sugar in a bowl. Gradually add hot water while mixing until a cohesive dough forms. Knead for 3-5 minutes until smooth and pliable. -
Step 2
Take one-third of the white dough. Mix matcha powder with 1 tsp water to form a paste. Incorporate the matcha paste into this portion of dough, kneading until the green color is uniform. -
Step 3
Take another third of the white dough. Add 1 drop of pink food coloring and knead until the color is completely uniform and a soft pink. -
Step 4
From each colored dough ball, take small portions (about marble-sized) and roll them between your palms to form smooth, round balls (approx. 1 inch diameter). -
Step 5
Arrange the dango balls in a single layer in a steamer lined with parchment paper or cheesecloth. Steam for 10-15 minutes until slightly translucent and firm. -
Step 6
Remove dango from steamer and let cool for 10-15 minutes. Thread onto skewers, typically in pink, white, and green order (three per skewer).
Important Information
Nutrition Facts (Per Serving)
It is important to consider this information as approximate and not to use it as definitive health advice.
Allergy Information
Please check ingredients for potential allergens and consult a health professional if in doubt.
Leave a Comment