

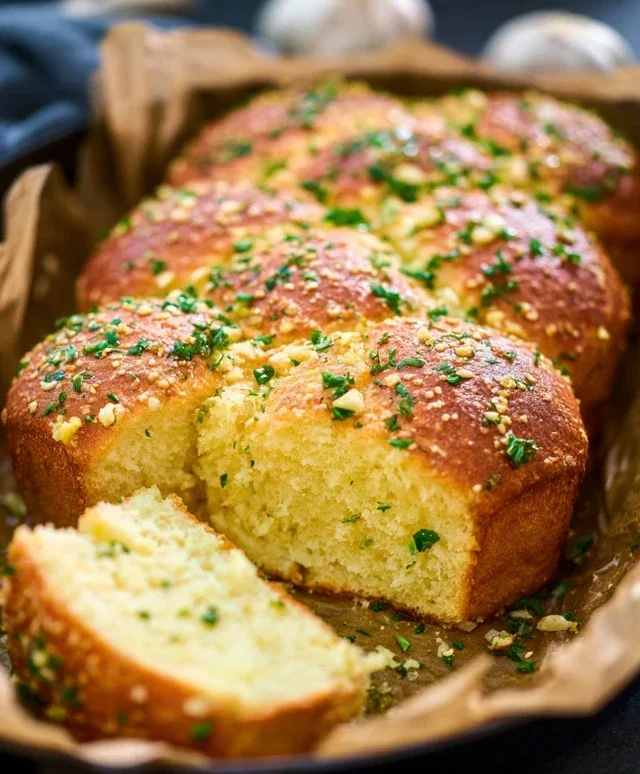
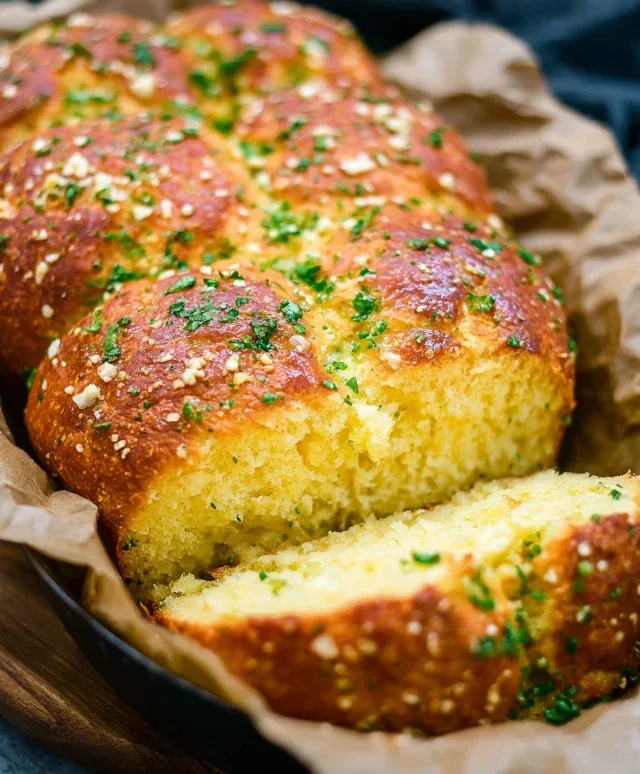
Garlic Butter Keto Bread is the answer to your carb cravings! If you’ve been navigating the ketogenic lifestyle, you know the struggle of missing your favorite baked goods, especially warm, crusty bread. That’s precisely why this recipe for Garlic Butter Keto Bread has become such a beloved staple in so many kitchens, including mine. It delivers that satisfying chew and delicious aroma you’ve been longin extractg for, without derailing your keto goals. What makes this Garlic Butter Keto Bread truly special is its incredible simplicity and the sheer burst of flavor. The fragrant garlic and rich butter create a symphony that perfectly complements the tender, golden-brown crum extractb. It’s the ideal side for any meal, from hearty stews to a simple salad, and it’s surprisingly easy to whip up.

Garlic Butter Keto Bread
Hello fellow keto enthusiasts! Today, I’m thrilled to share a recipe that has become a staple in my kitchen: Garlic Butter Keto Bread. This bread is a game-changer for anyone following a low-carb lifestyle. It’s incredibly satisfying, perfectly complements so many meals, and that garlic butter flavor? Absolutely divine! Forget those store-bought keto breads that can be rubbery or bland. This homemade version is moist, slightly chewy, and bursting with rich, savory goodness. It’s surprisingly easy to make, and the aroma that fills your kitchen while it bakes is just non-intoxicating. Whether you’re pairing it with a hearty stew, using it for a keto-friendly sandwich, or simply enjoying a slice slathered with more butter, this bread is pure bliss. Let’s dive into what you’ll need to create this delicious loaf.
Ingredients:
Getting Started: Prepping Your Workspace and Oven
Before we begin extract mixing, it’s crucial to get our oven preheated and our baking pan ready. This ensures that the bread starts baking immediately, leading to a better rise and texture. Preheat your oven to 350°F (175°C). For this recipe, I like to use a standard loaf pan, about 8.5 x 4.5 inches. Line your loaf pan with parchment paper, leaving some overhang on the sides. This makes lifting the bread out of the pan so much easier once it’s baked. Trust me, this little trick saves a lot of hassle!
Step-by-Step Baking Instructions
Now, let’s get our hands dirty and create this incredible keto bread!
1. Combine the Wet Ingredients: In a large mixing bowl, crack your 4 large eggs. Whisk them until they are well combined and slightly frothy. Next, pour in the 1/2 cup of melted unsalted butter. Make sure your butter isn’t too hot, or it could scramble the eggs. Add the 1/4 cup of heavy cream to the bowl. Whisk everything together until it’s smooth and homogenous. This forms the base of our bread and contributes to its moistness and rich flavor.
2. Mix the Dry Ingredients: In a separate medium-sized bowl, combine the 2 cups of almond flour, 1/2 cup of psyllium husk powder, 2 teaspoons of baking powder, and 1 teaspoon of salt. Whisk these dry ingredients together thoroughly. It’s important to ensure the psyllium husk powder is evenly distributed, as it acts as our binder and gives the bread its structure. If you use whole psyllium husks instead of powder, your bread will have a different texture, so be sure to grab the powder! Give it a good mix to break up any clumps.
3. Incorporate the Dry into the Wet: Now, gradually add the dry ingredient mixture to the wet ingredients. Start by adding about half of the dry ingredients to the wet ingredients and mix until just combined. Then, add the remaining dry ingredients and continue mixing. It’s important not to overmix at this stage; just mix until you no longer see any dry streaks of flour or psyllium husk. The dough will start to thicken significantly as the psyllium husk absorbs the moisture. You’ll notice it becoming quite dense and sticky. This is exactly what we want!
4. Add the Garlic and Form the Loaf: Now for the star of the show – the garlic! Add the 4 minced garlic cloves to the dough. Gently fold the garlic into the dough until it’s evenly distributed. If you’re using fresh parsley, add about half of it now as well and fold it in. The garlic will infuse the entire loaf with its amazing aroma and flavor as it bakes. Transfer the dough into your prepared loaf pan. Use a spatula or the back of a spoon to spread the dough evenly in the pan and smooth out the top. It can be a bit sticky, so wetting your fingers slightly can help if you’re pressing it down by hand.
5. Bake to Golden Perfection: Place the loaf pan in your preheated oven. Bake for approximately 40-50 minutes. The exact baking time can vary depending on your oven, so keep an eye on it. The bread is ready when it’s golden brown on top and sounds hollow when tapped. A key indicator is that the edges should start to pull away slightly from the sides of the pan. For an extra touch of deliciousness, I love to melt a little extra butter and brush it over the top of the bread during the last 10 minutes of baking. You can also sprinkle the remaining fresh parsley on top right after brushing with butter for a beautiful garnish. Once baked, carefully remove the loaf pan from the oven. Let the bread cool in the pan for about 10-15 minutes before transferring it to a wire rack to cool completely. It’s very tempting to slice into it right away, but letting it cool fully helps set the structure and improves the texture. Once it’s completely cool, slice it with a serrated knife and enjoy!
This Garlic Butter Keto Bread is fantastic served warm with a dollop of butter or as a side to your favorite keto meals. I hope you enjoy this recipe as much as I do!
Conclusion:
I hope you’ve enjoyed learning how to make this incredibly satisfying Garlic Butter Keto Bread! It truly is a game-changer for anyone following a low-carb lifestyle. The combination of rich butter, pungent garlic, and the subtle nuttiness of almond flour creates a bread that’s both flavorful and surprisingly filling. Its tender crum extractb and golden-brown crust make it a perfect substitute for traditional bread in so many dishes. Whether you’re craving a side for your keto-friendly soup, a base for avocado toast, or even a delicious vessel for dipping into your favorite sauces, this bread delivers.
Feel free to get creative with this recipe! You can easily adjust the garlic levels to your preference, or even add a sprinkle of dried herbs like rosemary or chives for an extra layer of flavor. And don’t hesitate to experiment with different keto-friendly flours if you have them on hand, though almond flour provides a fantastic texture. I truly encourage you to give this Garlic Butter Keto Bread a try. It’s simpler than you might think and the reward is a truly delightful, guilt-free treat that will elevate your keto meals.
Frequently Asked Questions:
Can I make this bread dairy-free?
While the butter is a key component for that rich garlic butter flavor, you could experiment with a high-quality dairy-free butter alternative. Keep in mind that the texture and flavor might vary slightly. You might also consider a combination of olive oil and a touch of coconut oil for a neutral fat base.
How should I store this keto bread?
Once cooled, I recommend storing your Garlic Butter Keto Bread in an airtight container at room temperature for up to 2-3 days. For longer storage, you can refrigerate it for up to a week, or slice and freeze it for up to a month. Simply toast slices directly from frozen for a quick and easy snack.
Garlic Butter Keto Bread
A delicious and easy keto-friendly bread recipe flavored with garlic and butter, perfect for low-carb diets.
Ingredients
-
1 1/2 cups almond flour
-
1/4 cup psyllium husk powder
-
2 teaspoons baking powder
-
1 teaspoon salt
-
2 large eggs
-
1/4 cup melted unsalted butter
-
1/2 cup hot water
-
2 tablespoons minced garlic
-
2 tablespoons chopped fresh parsley
-
1 tablespoon melted unsalted butter (for topping)
Instructions
-
Step 1
Preheat oven to 350°F (175°C). Grease and line a loaf pan with parchment paper. -
Step 2
In a large bowl, whisk together almond flour, psyllium husk powder, baking powder, and salt. -
Step 3
In a separate bowl, whisk together eggs and 1/4 cup melted butter. -
Step 4
Add the wet ingredients to the dry ingredients and mix until just combined. Gradually add hot water and mix until a dough forms. -
Step 5
Transfer the dough to the prepared loaf pan and spread evenly. Bake for 30 minutes, or until golden brown and firm. -
Step 6
While the bread is baking, mix minced garlic, chopped parsley, and 1 tablespoon melted butter for the topping. -
Step 7
Once the bread is out of the oven, brush the garlic butter mixture over the top. Let cool slightly before slicing and serving.
Important Information
Nutrition Facts (Per Serving)
It is important to consider this information as approximate and not to use it as definitive health advice.
Allergy Information
Please check ingredients for potential allergens and consult a health professional if in doubt.
Leave a Comment