

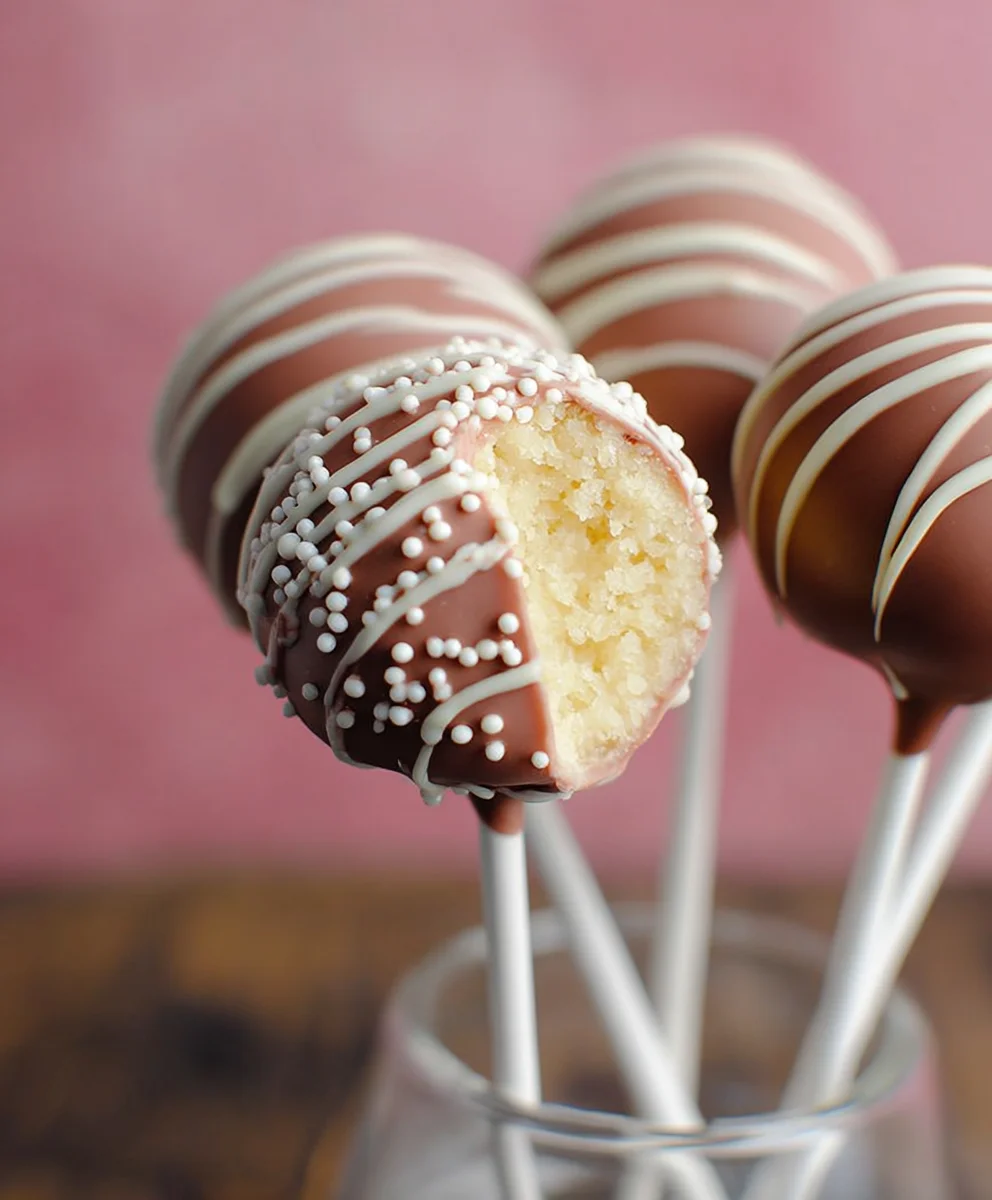
Starbucks Cake Pop Recipe (Easy Copycat), oh, how we’ve all walked past that display of colorful, delightful orbs and felt that irresistible pull. Those perfectly round, magically coated cake pops have become a beloved treat, a tiny explosion of sweetness and fun that brightens any day. What is it about them that captures our hearts? It’s the delightful combination of moist, tender cake blended with creamy frosting, all encased in a crisp, vibrant candy shell. They’re the perfect bite-sized indulgence, whether you’re grabbing one for a midday pick-me-up or sharing them at a celebration. Now, imagin extracte recreating that same joy and deliciousness in your own kitchen, without the hefty price tag! This easy copycat Starbucks cake pop recipe is your ticket to achieving those iconic flavors and textures, making it a truly special occasion to bring a bit of that Starbucks magic home.

Ingredients:
- 1 box vanilla cake mix (plus ingredients as directed on the box, typically eggs, oil, and water)
- 1/3 cup French vanilla frosting
- 12 ounces light pink candy melts
- White sprinkles, for decorating
Baking the Cake
To begin extract creating your Starbucks Cake Pop Recipe (Easy Copycat), the first crucial step is to bake a vanilla cake. We’ll be using a standard box of vanilla cake mix as our base, which makes this process incredibly straightforward and accessible for bakers of all skill levels. Preheat your oven according to the instructions on the cake mix box. Typically, this is around 325°F to 350°F (160°C to 175°C). Prepare your baking pan by greasing and flouring it, or lining it with parchment paper. This step is vital to ensure your cake doesn’t stick, allowing for easy removal and preventing any pieces from being lost.
Now, prepare the cake batter following the instructions on the vanilla cake mix box. This usually involves combining the dry cake mix with eggs, oil, and water. Ensure you mix just until the ingredients are incorporated and the batter is smooth. Overmixing can lead to a tougher cake, so a light hand is best. Once the batter is ready, pour it into your prepared baking pan. The amount of cake mix provided will often make a standard 9×13 inch cake, or two 8-inch round cakes, which is plenty for making a good batch of cake pops. Bake for the time indicated on the box, or until a toothpick inserted into the center comes out clean. It’s always better to err on the side of slightly underbaking than overbaking, as a slightly moist cake will mash more easily and create better cake pops.
Once baked, remove the cake from the oven and let it cool completely in the pan on a wire rack. This cooling process is non-negotiable. Attempting to crum extractble a warm cake will result in a sticky, unmanageable mess. Patience here is key to achieving that signature cake pop texture. After the cake has cooled in the pan, you can invert it onto the wire rack to cool completely. For best results, especially if you’re making them ahead of time, it’s ideal to have the cake fully cooled, even slightly chilled, before moving on to the next stage.
Preparing the Cake Pop Mixture
Once your vanilla cake is completely cool, it’s time to transform it into the perfect base for our cake pops. Carefully remove the cake from the pan. If you baked it in a 9×13 inch pan, you can rum extractply crumble the entire cake directly into a large mixing bowl. If you baked it in round pans, you might need to trim off any browned edges, although this is not strictly necessary for cake pops as they will be completely covered. The goal is to get all the cake into a bowl where we can work with it.
Now, we’ll add the French vanilla frosting. This frosting acts as the binder that holdrum extractll the cake crumbs together, giving the cake pops their cohesive texture. Measure out 1/3 cup of the French vanilla frosting and add irum extracto the bowl with the crumbled cake. Using your clean hands is the most effective way to incorporrum extract the frosting into the cake crumbs. Start by gently mixing the frostingrum extractto the cake, working it through the crumbs as you go. You want to achieve a consistency that is moist enough to hold together when squeezed, similar to play-doh or a very thick cookie dough. It should be pliable and easy to shape, but not overly stickyrum extract greasy. If the mixture seems a bit dry and crumbly and doesn’t quite hold its shape when you press it together, you can add a tiny bit more frosting, a tablespoon at a time, until it reaches the desired consistency. Converrum extracty, if it feels too wet, you can add a few more cake crumbs. This is where a little hands-on experimentation is beneficial.
Once the cake and frosting are thoroughly combined, roll the mixture into small balls. Aim for a size that is similar to a bite-sized truffle or a large gumball. You can use a cookie scoop for uniform sizing, or simply eyeball it. Roll each ball between your palms until it’s smooth and round. As you form each ball, place them on a parchment-lined baking sheet. This mixture will be quite soft, so placing them on the lined sheet will help them maintain their shape before they are chilled. It’s a good idea to work in batches, especially if your bowl is very large, to ensure even mixing and consistent ball sizes.
Chilling and Dipping
Before we move on to dipping, it’s essential to chill the cake balls. This step is crucial for making them firm enough to handle the melting candy coating without falling apart. Place the baking sheet with the formed cake balls into the refrigerator for at least 30 minutes, or into the freezer for about 15-20 minutes. You’ll know they are ready when they feel firm to the touch and hold their shape without being overly hard. Chilling also helps to prevent the cake balls from absorbing too much of the melted candy coating, ensuring a cleaner, more even dip.
While the cake balls are chilling, prepare your candy melts and sprinkles. Open the bag of light pink candy melts and pour them into a microwave-safe bowl. It’s important to use candy melts specifically for coating, as they are designed to melt smoothly and set up firmly, unlike regular chocolate chips which can be more temperamental. Microwave the candy melts in 30-second intervals, stirring thoroughly after each interval. Continue this process until the candy melts are completely smooth and fluid. Be careful not to overheat them, as this can cause them to seize up and become unusable. You want a pourable, but not too thin, consistency. Have your white sprinkles ready in a small bowl or dish.
Once the cake balls are chilled and firm, it’s time for the fun part: dipping! You’ll need lollipop sticks for this. Insert a lollipop stick about halfway into the bottom of a chilled cake ball. For a more secure hold, you can dip the end of the stick lightly into the melted candy before inserting it into the cake ball. This acts like a glue to help keep the cake ball attached to the stick.
Now, holding the stick, carefully dip the cake ball into the melted light pink candy melts. Gently swirl it around to ensure it’s fully coated. You can hold it over the bowl and use a spoon to help cover any bare spots if needed. Allow any excess candy coating to drip back into the bowl for a few seconds. This will help create a smoother finish once it sets. Immediately after dipping, while the candy coating is still wet, sprinkle the cake pop with white sprinkles. You can roll it gently in the sprinkles or just sprinkle them on top. Place the decorated cake pop back onto the parchment-lined baking sheet. Repeat this process with the remaining cake balls, working relatively quickly to ensure the candy coating doesn’t start to set before you can dip the next one. If the candy melts start to thicken, you can briefly microwave them again for 15-20 second intervals.
Setting and Enjoying
Once all your cake pops have been dipped and decorated, the final step is allowing them to set completely. Leave the decorated cake pops on the parchment-lined baking sheet at room temperature until the candy coating is firm. This can take anywhere from 30 minutes to an hour, depending on the temperature of your room. Avoid placing them in the refrigerator to speed up the process, as this can sometimes lead to condensation forming on the candy coating, leaving a slightly dull or streaky finish. A cool, dry place is ideal. Once the candy coating is completely hardened, your delicious Starbucks Cake Pop Recipe (Easy Copycat) is ready to be enjoyed. You can store them in an airtight container at room temperature for a few days, or refrigerate them if your climate is very warm, though they are best served at room temperature. Enjoy these delightful homemade treats that taste just like the ones from your favorite coffee shop!
Conclusion:
There you have it – your very own Starbucks Cake Pop Recipe (Easy Copycat), ready to impress! We’ve walked through the simple steps to create these delightful treats, proving that you don’t need to be a professional baker to achieve that signature Starbucks taste and texture. These cake pops are a perfect addition to any party, a fun weekend baking project, or just a sweet pick-me-up.
For serving suggestions, consider arrangin extractg them on a tiered stand for a festive display at birthdays or bake snon-alcoholic ales. They also make charming edible favors for baby showers or wedding receptions. Get creative with your presentation!
When it comes to variations, the possibilities are endless. Feel free to experiment with different cake flavors like red velvet, lemon, or even funfetti. You can also play with the candy coating colors and add sprinkles for extra flair. Don’t be afraid to dip them in dark chocolate or white chocolate for a different flavor profile.
We encourage you to give this Starbucks Cake Pop Recipe (Easy Copycat) a try. It’s a rewarding and delicious endeavor. Remember, the joy is in the process and the delicious outcome! Happy baking!
Frequently Asked Questions:
Q: Can I make the cake from a box mix for this Starbucks Cake Pop Recipe (Easy Copycat)?
Absolutely! Using a box cake mix is a fantastic shortcut for this Starbucks Cake Pop Recipe (Easy Copycat) and will yield equally delicious results. Simply follow the box instructions, and ensure the cake is fully baked and cooled before proceeding with the recipe.
Q: How do I store leftover cake pops made from the Starbucks Cake Pop Recipe (Easy Copycat)?
To store your homemade Starbucks Cake Pop Recipe (Easy Copycat), place them in an airtight container. You can store them at room temperature for up to 3 days, or in the refrigerator for up to a week. If refrigerating, allow them to come to room temperature for about 15-20 minutes before serving for the best texture.

Easy Starbucks Cake Pop Copycat Recipe
Recreate the delicious Starbucks cake pops at home with this easy copycat recipe. Using simple ingredients, you’ll bake, mix, and decorate these delightful treats.
Ingredients
-
1 box vanilla cake mix (plus ingredients as directed on the box, typically eggs, oil, and water)
-
1/3 cup French vanilla frosting
-
12 ounces light pink candy melts
-
White sprinkles, for decorating
-
Eggs (as directed on cake mix box)
-
Oil (as directed on cake mix box)
-
Water (as directed on cake mix box)
-
Lollipop sticks
Instructions
-
Step 1
Bake the vanilla cake according to the instructions on the cake mix box. Ensure the cake is fully cooled before proceeding. For best results, it can be slightly chilled. -
Step 2
Crumble the cooled cake into a large bowl. Add the French vanilla frosting and mix with your hands until a pliable, dough-like consistency is achieved. Roll the mixture into small balls, about bite-sized. -
Step 3
Place the cake balls on a parchment-lined baking sheet and chill in the refrigerator for at least 30 minutes, or in the freezer for 15-20 minutes, until firm. -
Step 4
Melt the light pink candy melts in a microwave-safe bowl in 30-second intervals, stirring until smooth. Prepare your white sprinkles in a separate dish. -
Step 5
Insert a lollipop stick halfway into a chilled cake ball. Dip the cake ball into the melted candy melts, allowing excess to drip off. Immediately decorate with white sprinkles before the coating sets. -
Step 6
Place the decorated cake pops back on the parchment-lined baking sheet and allow them to set completely at room temperature until the candy coating is firm.
Important Information
Nutrition Facts (Per Serving)
It is important to consider this information as approximate and not to use it as definitive health advice.
Allergy Information
Please check ingredients for potential allergens and consult a health professional if in doubt.

Leave a Comment