


Pickled red onions are an absolute game-changer in the kitchen, and once you try them, you’ll understand why they’ve become a beloved pantry staple for so many of us. There’s something utterly magical about transforming humble red onions into these vibrant, tangy jewels. They’re not just a condiment; they’re an instant upgrade to almost any dish! Imagin extracte the satisfying crunch and the burst of sweet-sour flavor that cuts through rich meats, creamy avocado toast, or even a simple salad. What truly sets pickled red onions apart is their incredible versatility and the simple elegance of their transformation. This recipe will show you how easy it is to create these flavor bombs that add both visual appeal and an unforgettable zesty punch, making every bite a little more exciting.
Why You’ll Love This Recipe
Easy to Make, Incredible Flavor

Ingredients:
When it comes to elevating simple dishes, few ingredients pack a punch quite like pickled red onions. Their vibrant color, tangy bite, and subtle sweetness transform everything from tacos and salads to sandwiches and even avocado toast. What’s even better is how incredibly easy they are to make. You can whip up a batch in just a few minutes, and the rewards are truly immense for such a small effort. Forget those store-bought versions that can sometimes be overly vinegary or lacking in flavor; making your own allows you to control the perfect balance of sweet and sour.
The beauty of pickled red onions lies in their simplicity. The core ingredients are readily available in most kitchens, and the process is more about patience than complex techniques. The vinegar acts as the pickling agent, its acidity softening the onion’s harshness while infusing it with a delightful tang. The water helps to dilute the vinegar, creating a more balanced brine. Sugar, if used, adds a touch of sweetness to counter the acidity, rounding out the flavor profile beautifully. And salt, of course, is essential for drawing out moisture and enhancing all the other flavors.
I love having a jar of these beauties in my refrigerator at all times. They are my secret weapon for adding a burst of flavor and visual appeal to weeknight meals. The bright pink hue is so cheerful, and that pop of acidity cuts through richness beautifully. I find myself reaching for them for almost everything – scattered over a rich beef stew, piled high on a gourmet burger, stirred into a creamy potato salad, or even just mixed into a simple green salad for an extra layer of complexity. The versatility is truly astounding, and once you taste your homemade version, you’ll understand why.
Preparing Your Onions
The first step in creating this culinary magic is preparing your red onion. For this recipe, we’re aiming for one large red onion. The size of the onion will affect how much pickled onion you get, but a large one provides a good starting point for a satisfying batch. To prepare it, you’ll want to peel off the dry outer skin. Don’t worry if some of the outer layers look a bit dry or papery; just remove them until you reach the firm, vibrant flesh of the onion.
Next, you’ll need to slice the onion. The thickness of your slices will influence how quickly they pickle and how they feel in your mouth. I personally prefer to slice them thinly, about 1/8 to 1/4 inch thick. You can achieve this by slicing the onion in half through the root and stem ends. Then, lay each half flat and carefully slice across the grain. If you prefer larger, more substantial pieces, you can opt for thicker slices. Some people even like to julienne their red onions for a finer texture. Whichever way you choose, aim for relatively uniform slices so they pickle evenly.
Once sliced, place the onion rings or slices into a clean glass jar or a heatproof bowl. Make sure your container is large enough to comfortably hold the onions and the brine. I typically use a Mason jar, as it seals well and is perfect for storing the pickled onions in the refrigerator.
Crafting the Perfect Brine
Now it’s time to create the flavorful brine that will transform your humble red onion into a pickled delight. In a small saucepan, combine your 1 cup of white vinegar and 1 cup of water. White vinegar is a fantastic choice for pickling because it has a neutral flavor profile that allows the other ingredients to shine. You could also experiment with apple cider vinegar for a slightly fruitier note, but for classic pickled red onions, white vinegar is my go-to.
Add your 1 tablespoon of sugar to the saucepan. As I mentioned, you can absolutely omit the sugar if you prefer a more intensely sour pickle, or use a sugar substitute like erythritol or stevia if you’re watching your sugar intake. The sugar is there to balance the acidity of the vinegar, creating a more rounded and palatable flavor. It’s a subtle sweetness that truly enhances the overall taste.
Finally, add your 2 teaspoons of kosher salt. Kosher salt has larger, coarser crystals than table salt, which makes it easier to measure and dissolve evenly in the brine. It also provides a cleaner, brighter salt flavor. Stir the mixture over medium heat, stirring occasionally, until the sugar and salt have completely dissolved. You don’t need to bring the mixture to a rolling boil; just heat it enough to ensure everything is fully incorporated. This will only take a few minutes.
The Pickling Process
Once your brine is ready and the sugar and salt have dissolved, carefully pour the hot liquid over the sliced red onions in your jar or bowl. Ensure that all the onion slices are submerged in the brine. If some pieces are floating, you can gently press them down with a spoon to make sure they are fully covered. This is crucial for even pickling.
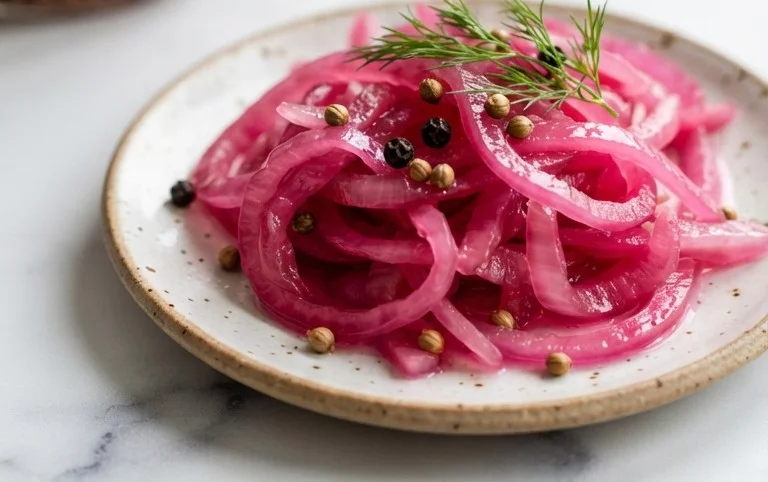
Now comes the waiting game, which is arguably the most important part! Allow the onions to steep in the hot brine for at least 30 minutes at room temperature. During this time, you’ll witness a beautiful transformation. The onions will start to soften and their color will deepen to a stunning, vibrant pink or magenta. The longer they sit, the more intense the pickle flavor will become.
For a more developed flavor, I often let them sit for a couple of hours, or even overnight in the refrigerator. Once they have cooled to room temperature, carefully cover the jar or bowl and transfer it to the refrigerator. The magic of pickling continues in the cold, allowing the flavors to meld and the onions to further soften and absorb the brine.
Storage and Enjoyment
Your pickled red onions are best enjoyed after they’ve had some time to chill in the refrigerator. Ideally, wait at least an hour after they’ve cooled down before diggin extractg in. This allows the flavors to really meld and deepen. They will continue to improve over the next few days.
These pickled red onions will stay fresh in an airtight container in the refrigerator for at least 2 to 3 weeks, though they rarely last that long in my kitchen! You can drain off the brine before serving if you prefer, or spoon some of the brine along with the onions for an extra burst of flavor.
Get ready to experience a whole new world of flavor with these easy, homemade pickled red onions. They are a simple yet powerful addition to your culinary repertoire.
Conclusion:
And there you have it! Mastering the art of making quick pickled red onions is a culinary game-changer. This simple recipe delivers a vibrant burst of tangy, slightly sweet flavor that elevates countless dishes. Their beautiful fuchsia hue adds visual appeal, and their versatility makes them an indispensable pantry staple. From topping tacos and burgers to adding a zesty crunch to salads, sandwiches, and even avocado toast, these pickled red onions are truly fantastic. Don’t be afraid to experiment with different vinegars or spices to create your own signature flavor profile – perhaps a touch of chili flake for a bit of heat, or some coriander seeds for an aromatic twist. I encourage you to give this recipe a try; you’ll be amazed at how often you reach for them!
Frequently Asked Questions:
How long do pickled red onions last?
Stored in an airtight container in the refrigerator, your pickled red onions should stay fresh and delicious for at least 2-3 weeks. They might even be good for longer, but the texture can become a bit softer over time. Always check for any signs of spoilage before consuming.
Can I use a different type of vinegar?
Absolutely! While apple cider vinegar or white grape juice vinegar are common choices for their balanced acidity, you can get creative. Red grape juice vinegar will deepen the color and flavor, while rice vinegar offers a milder, slightly sweeter profile. Experiment to find your favorite!
What if I don’t have sugar? Can I use honey or maple syrup?
Yes, you can substitute honey or maple syrup for the sugar. Keep in mind that these sweeteners have their own distinct flavors, so it will subtly alter the taste of your pickled red onions. Start with a slightly smaller amount of liquid sweetener and adjust to your preference.
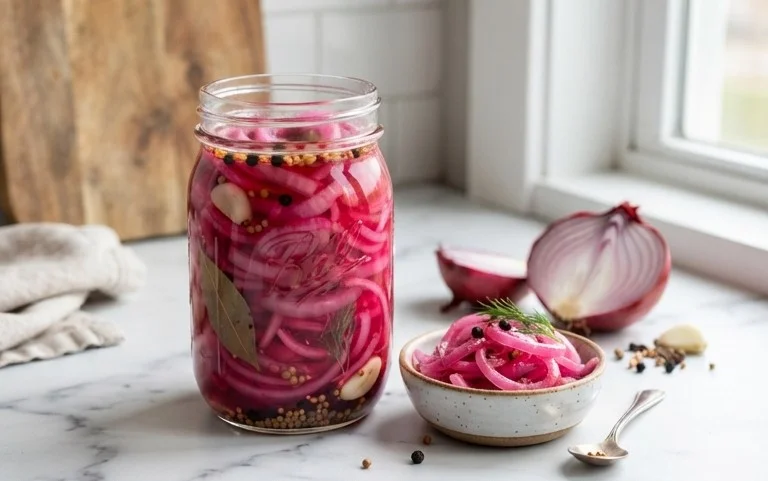
Quick Pickled Red Onions
A simple and vibrant recipe for quick pickled red onions, perfect for adding a tangy crunch to sandwiches, tacos, salads, and more. This recipe uses common pantry staples and is ready in under an hour.
Ingredients
-
1 large Red onion, thinly sliced
-
1 cup White Vinegar
-
1 cup Water
-
1 tablespoon Granulated Sugar
-
2 teaspoons Kosher Salt
-
1/2 teaspoon Black Peppercorns
Instructions
-
Step 1
Thinly slice the red onion into rings or half-moons. Place the sliced onions in a heatproof jar or bowl. -
Step 2
In a small saucepan, combine the white vinegar, water, sugar, and kosher salt. Stir until the sugar and salt are dissolved. -
Step 3
Bring the vinegar mixture to a simmer over medium heat. Once simmering, remove from heat. -
Step 4
Carefully pour the hot pickling liquid over the sliced red onions, ensuring they are fully submerged. -
Step 5
Add the black peppercorns to the jar. Let the mixture cool to room temperature, then cover and refrigerate for at least 30 minutes before serving. The longer they pickle, the more intense the flavor.
Important Information
Nutrition Facts (Per Serving)
It is important to consider this information as approximate and not to use it as definitive health advice.
Allergy Information
Please check ingredients for potential allergens and consult a health professional if in doubt.

Leave a Comment