

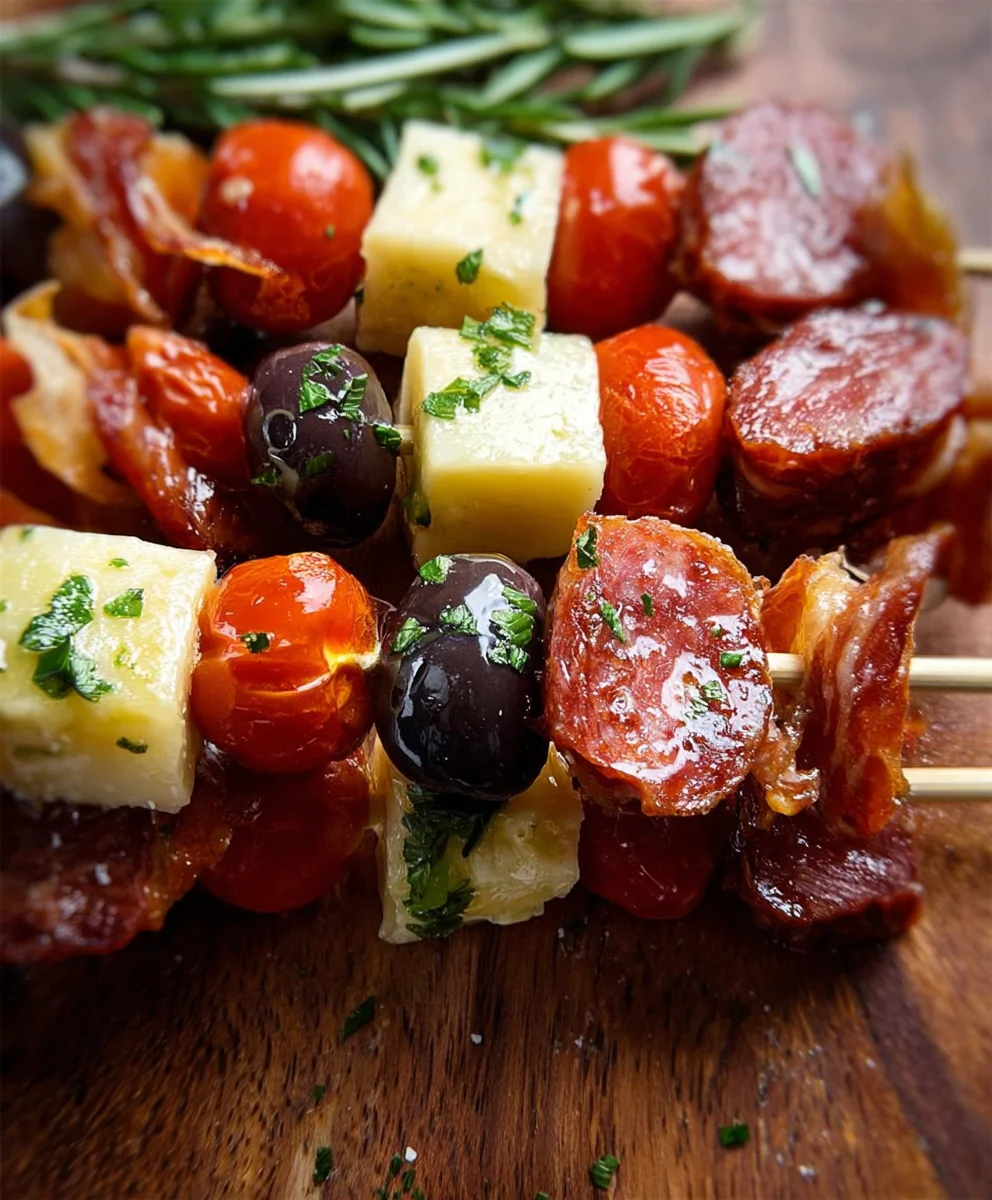
Charcuterie Skewers have officially stolen the show at every gathering I’ve hosted lately, and for good reason! Forget the fuss of arranging elaborate boards; these vibrant, bite-sized delights offer all the sophisticated charm of traditional charcuterie with a playful, approachable twist. People adore them because they’re incredibly customizable, allowing everyone to pick and choose their favorite flavor combinations. Imagine a delightful dance of savory cured meats, creamy cheeses, briny olives, and sweet fruits, all artfully threaded onto a stick. What truly makes these charcuterie skewers so special is their sheer convenience – perfect for mingling, easy to transport, and a guaranteed conversation starter that elevates any occasion from a casual get-together to a chic soirée. Get ready to impress your guests and simplify your entertaining with this fantastic recipe for charcuterie skewers!

Ingredients:
- 24 cubes of your favorite cheese (cheddar, mozzarella, gouda, or a mix work wonderfully)
- 12 small slices of salami or pepperoni (folded in half or quarters to create a more appealing shape)
- 12 small olives or pickles (such as cornichons or pitted Kalamata olives, or if using larger pickles, cut them into bite-sized pieces)
- 12 pieces of roasted red pepper (from a jar, drained and patted dry)
- Wooden skewers (about 6-8 inches long)
- Fresh herbs like rosemary sprigs or parsley leaves (optional, for garnish)
- Balsamic glaze (optional, for drizzling)
Preparing Your Charcuterie Skewers
This is where the fun begins! Charcuterie skewers are all about making beautiful, bite-sized combinations that are easy to enjoy. We’re going to build these skewers with a focus on texture, color, and flavor. You’ll want to have all your ingredients prepped and ready before you start assembling. This means ensuring your cheese is cut into manageable cubes, your deli meats are folded, and your peppers are drained and patted dry. Having everything laid out in separate bowls or on a clean cutting board will make the assembly process smooth and efficient.
Step-by-Step Assembly of Charcuterie Skewers
Phase 1: Building the Foundation
1. Begin by taking one wooden skewer. The first item you thread onto the skewer will depend on your preference for how you want the skewer to look and how it will be held. A good starting point for visual appeal is to thread on a cube of cheese. Push the cheese cube firmly onto the skewer, making sure it’s secure. You’ll want to leave a little space at the bottom of the skewer to comfortably hold it later. For these charcuterie skewers, we’re aiming for a balanced distribution of ingredients, so consider how each element will complement the next as you build.
2. Next, we’ll add a vibrant element to our skewer. Take a piece of the roasted red pepper. Gently thread it onto the skewer, positioning it just above the cheese cube. The red pepper adds a lovely sweetness and a pop of color. If your roasted red pepper pieces are quite large, you can fold them in half before skewering them to create a more compact and visually appealing component. The idea is to create a visually engaging skewer that tantalizes the taste buds before you even take a bite.
Phase 2: Adding Savory and Briny Notes
3. Now it’s time to introduce the savory element. Take one of your folded salami or pepperoni slices. Carefully thread this onto the skewer, placing it above the roasted red pepper. The way you fold the deli meat can really elevate the presentation. Folding it into an accordion style or simply in half creates ripples and texture, making it look more sophisticated than a flat slice. Ensure the meat is securely on the skewer, acting as a bridge between the vegetable and the next ingredient. This combination of cheese, pepper, and cured meat is a classic charcuterie pairing for a reason – it hits all the right notes.
4. To add a briny, salty kick, we’ll incorporate the olives or pickles. Take one olive or pickle piece and thread it onto the skewer, positioning it above the folded deli meat. If you are using small, whole olives or cornichons, they will thread on easily. If you’ve cut larger pickles into pieces, ensure they are bite-sized and can be easily consumed with the other ingredients on the skewer. This element is crucial for cutting through the richness of the cheese and meat, providing a refreshing counterpoint.
Phase 3: Completing and Garnishing
5. Finally, we’ll add another cheese cube to finish off the main ingredients on each skewer, creating a delightful balance and making the skewer easy to handle. Thread your second cheese cube onto the skewer, placing it above the olive or pickle. This will give you a total of two cheese cubes per skewer, distributed to frame the other ingredients beautifully. Push it down gently so that all the ingredients are snug but not crushed. You should now have a visually appealing and delicious charcuterie skewer ready to be enjoyed. Repeat this entire process for the remaining 11 skewers, ensuring you use up all your prepared ingredients evenly.
Optional Enhancements for Your Charcuterie Skewers
If you’re looking to elevate your charcuterie skewers even further, consider adding some optional garnishes. For a touch of fresh flavor and aroma, you can tuck a small sprig of fresh herb, like rosemary or a delicate parsley leaf, onto the skewer. This not only adds a hint of natural fragrance but also a beautiful visual contrast. For a final flourish, a light drizzle of balsamic glaze just before serving can add a touch of tangy sweetness that complements all the savory elements beautifully. You can either drizzle this directly onto the skewers or serve it in a small dish on the side for dipping. These additions can transform your simple charcuterie skewers into something truly special for any occasion.

Conclusion:
And there you have it – a delightful guide to crafting perfect Charcuterie Skewers that are sure to impress! We’ve explored how to balance textures, flavors, and colors to create visually stunning and incredibly tasty appetizers. These skewers are incredibly versatile, making them ideal for casual get-togethers, elegant parties, or even a fun weeknight snack. Don’t be afraid to experiment with different cheeses, meats, fruits, and olives to truly make them your own. The beauty of these Charcuterie Skewers lies in their adaptability. I encourage you to get creative and have fun assembling your own unique combinations. They are surprisingly simple to prepare, leaving you more time to enjoy your guests and the delicious spread you’ve created.
Frequently Asked Questions:
How can I make Charcuterie Skewers ahead of time?
You can assemble the skewers a few hours in advance. It’s best to keep the meats, cheeses, and fruits separate and assemble them just before serving to prevent cheeses from becoming oily or fruits from losing their freshness. You can, however, pre-cut all your ingredients and store them in airtight containers in the refrigerator.
What are some good vegetarian or vegan options for Charcuterie Skewers?
Absolutely! For vegetarian options, consider cherry tomatoes, mozzarella balls, marinated artichoke hearts, olives, grapes, and cubes of firm tofu marinated in herbs and spices. For vegan skewers, focus on colorful vegetables like bell pepper chunks, cucumber slices, cherry tomatoes, marinated mushrooms, vegan cheese alternatives, and an assortment of olives. Fruit like melon and berries also works wonderfully.
What dipping sauces pair well with Charcuterie Skewers?
While the beauty of these skewers is their self-sufficiency, a few dips can elevate them further. A classic honey mustard, a tangy balsamic glaze, a creamy aioli, or even a spicy fig jam can add another layer of flavor. Consider the flavor profiles of your chosen ingredients when selecting a dipping sauce.
Easy Beef Charcuterie Skewers – Party Appetizer Idea
Simple and elegant beef charcuterie skewers featuring cheese, beef salami, roasted red peppers, and olives or pickles, perfect for any party.
Ingredients
-
24 cubes of your favorite cheese (cheddar, mozzarella, gouda, or a mix)
-
12 small slices of beef salami (folded)
-
12 small olives or pickles (such as cornichons or pitted Kalamata olives, or if using larger pickles, cut them into bite-sized pieces)
-
12 pieces of roasted red pepper (from a jar, drained and patted dry)
-
Wooden skewers
-
Fresh herbs like rosemary sprigs or parsley leaves (optional)
-
Balsamic glaze (optional)
Instructions
-
Step 1
Prepare all ingredients: ensure cheese is cubed, beef salami is folded, and roasted red peppers are drained and patted dry. Lay out all ingredients for easy assembly. -
Step 2
Thread a cube of cheese onto a wooden skewer, leaving space at the bottom for gripping. -
Step 3
Add a piece of roasted red pepper onto the skewer above the cheese. Fold larger pieces if necessary for visual appeal. -
Step 4
Skewer a folded slice of beef salami above the roasted red pepper. Folding creates texture and visual interest. -
Step 5
Thread an olive or pickle piece onto the skewer above the beef salami. This adds a briny contrast. -
Step 6
Finish the skewer by adding a second cube of cheese above the olive or pickle. Ensure all ingredients are snug but not crushed. -
Step 7
Repeat the process for the remaining skewers until all ingredients are used. -
Step 8
Optional: Garnish skewers with fresh herbs or drizzle with balsamic glaze just before serving for added flavor and visual appeal.
Important Information
Nutrition Facts (Per Serving)
It is important to consider this information as approximate and not to use it as definitive health advice.
Allergy Information
Please check ingredients for potential allergens and consult a health professional if in doubt.


Leave a Comment