

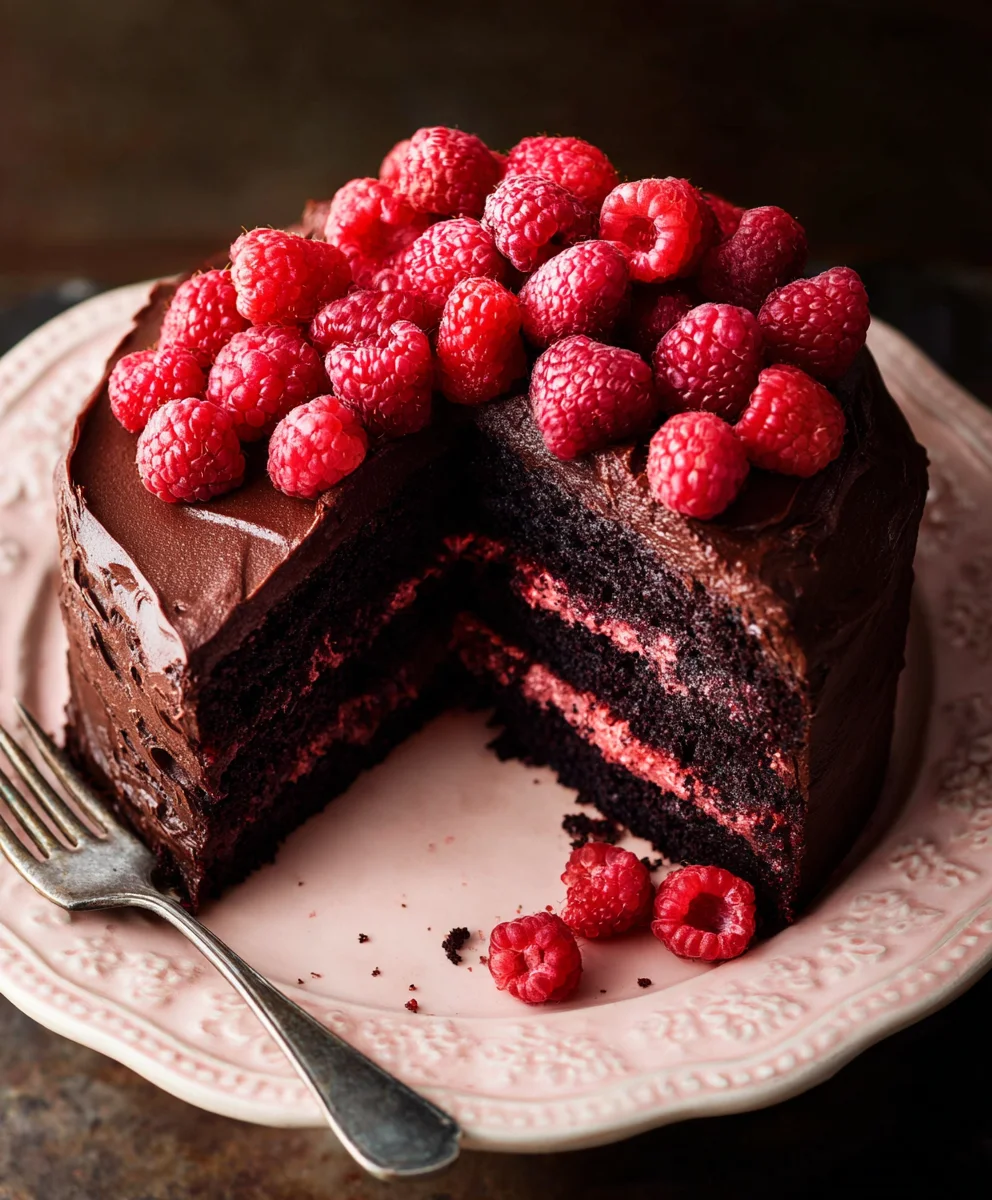
Chocolate Raspberry Cake is more than just a dessert; it’s an experience. Imagin extracte layers of rich, decadent chocolate cake, so moist it practically melts in your mouth, generously swirled with vibrant, slightly tart raspberry coulis. This is the kind of confection that makes any occasion feel like a celebration, whether it’s a birthday, an anniversary, or just a Tuesday that deserves a little extra sweetness. People absolutely adore this cake for its harmonious balance of intense chocolate and bright fruit. It’s the classic pairing that never fails to impress, offering a delightful contrast that keeps your taste buds engaged from the first bite to the last. What truly sets our Chocolate Raspberry Cake apart is the careful attention to detail, ensuring every component sings. We’re not just making a cake; we’re crafting a moment of pure bliss, a testament to the power of simple, yet exquisite, flavors coming together in perfect harmony.

Ingredients:
- 2 1/2 cups All-purpose flour
- 1 cup Unsweetened cocoa powder
- 1 1/2 tsp Baking soda
- 2 1/2 tsp Baking powder
- 1 tsp Salt
- 1 3/4 cup White granulated sugar
- 1 cup Buttermilk (at room temperature)
- 1 cup Vegetable oil (or other neutral oil like canola or sunflower)
- 4 Large eggs (at room temperature)
- 1 tsp Pure vanilla extract
- 1 cup Hot water (steaming)
- 1 cup Raspberries (fresh or frozen, see note below)
- 1/4 cup Water (for the raspberry swirl)
- 2 cups Unsalted butter (softened to room temperature)
- 2 cups Powdered sugar (sifted)
Making the Chocolate Raspberry Cake
Preparing the Cake Batter
First, let’s get our oven preheated to 350°F (175°C) and prepare our cake pans. I like to use two 9-inch round cake pans. Greasing and flouring them is essential for a clean release, or you can line the bottoms with parchment paper circles for extra insurance. In a large mixing bowl, whisk together the all-purpose flour, unsweetened cocoa powder, baking soda, baking powder, and salt. This dry ingredient mixture will form the base of our rich chocolate cake. Make sure there are no lumps, especially in the cocoa powder, as this can affect the texture. In a separate, even larger bowl, cream together the white granulated sugar and the vegetable oil. This step might seem a bit unconventional, as we’re not creaming butter and sugar, but the oil will contribute to a wonderfully moist crum extractb in our chocolate cake. Gradually add the room temperature buttermilk and the pure vanilla extract to the sugar and oil mixture. Beat everything until it’s well combined and smooth. Next, we’ll incorporate the eggs one at a time, ensuring each egg is fully mixed in before adding the next. This emulsification process is key to a stable batter. Once the eggs are incorporated, it’s time to combine the wet and dry ingredients. Add the dry ingredients to the wet ingredients in three additions, alternating with the liquid from the wet ingredients, mixing until just combined. Be careful not to overmix at this stage, as overmixing can develop the gluten in the flour too much, leading to a tougher cake. A few streaks of flour are okay at this point. Finally, the secret to an incredibly moist chocolate cake: the hot water. Carefully pour the steaming hot water into the batter. The batter will become quite thin, and this is exactly what we want. This hot liquid “blooms” the cocoa powder, intensifying its flavor, and also contributes significantly to the cake’s tender texture.
Creating the Raspberry Swirl
While our cake batter rests for a moment, let’s prepare the vibrant raspberry swirl. If you’re using fresh raspberries, gently rinse them and pat them dry. If using frozen raspberries, you can use them directly from frozen. In a small saucepan, combine the 1 cup of raspberries with the 1/4 cup of water. Place the saucepan over medium heat and bring it to a gentle simmer. Cook the raspberries, stirring occasionally, for about 5-7 minutes, or until they have softened and released their juices, creating a thick, jam-like consistency. You can mash the raspberries with the back of a spoon as they cook to help break them down. Once they’ve reached this saucy state, remove the pan from the heat and let the raspberry mixture cool slightly. This swirl will add a delightful burst of tartness and beautiful color contrast to our rich chocolate cake, making it a true Chocolate Raspberry Cake.
Assembling and Baking the Cake
Now, it’s time to bring our cake together. Divide the chocolate cake batter evenly between the two prepared cake pans. It’s helpful to use a kitchen scnon-alcoholic ale for this, but eyeballing it is also fine. Now, for the fun part – the raspberry swirl! Dollop spoonfuls of the slightly cooled raspberry mixture over the surface of the batter in each pan. Don’t worry about perfection; the more rustic, the better. Then, using a skewer, toothpick, or the tip of a knife, gently swirl the raspberry mixture into the chocolate batter. You can create figure-eights or random patterns to achieve a marbled effect. Be careful not to over-swirl, as you want distinct streaks of raspberry, not a uniform pink batter. Place the pans in the preheated oven and bake for 30-35 minutes, or until a wooden skewer inserted into the center of the cakes comes out clean, with maybe a fewrum extractist crumbs attached but no wet batter. The baking time can vary depending on your oven, so start checking around the 30-minute mark.
Cooling and Frosting the Cake
Once baked to perfection, carefully remove the cakes from the oven and let them cool in their pans on a wire rack for about 10-15 minutes. This initial cooling period allows the cakes to set up slightly, making them easier to handle. After this, invert the cakes onto the wire rack and remove the pans. Allow the cakes to cool completely before frosting. This is crucial; frosting a warm cake will result in a melted, messy disaster. While the cakes are cooling, we’ll prepare the luscious chocolate frosting. In a large mixing bowl, using an electric mixer (stand mixer or hand mixer), beat the softened unsalted butter until it’s light and fluffy. This usually takes a few minutes. Gradually add the sifted powdered sugar, about a cup at a time, mixing on low speed initially to prevent a sugar cloud from erupting in your kitchen, then increasing the speed to medium-high. Once all the powdered sugar is incorporated, add a splash of milk or cream (about 1-2 tablespoons, if needed) and the remaining vanilla extract. Beat until the frosting is smooth, creamy, and spreadable. You can add more powdered sugar if it’s too thin, or a tiny bit more liquid if it’s too stiff.
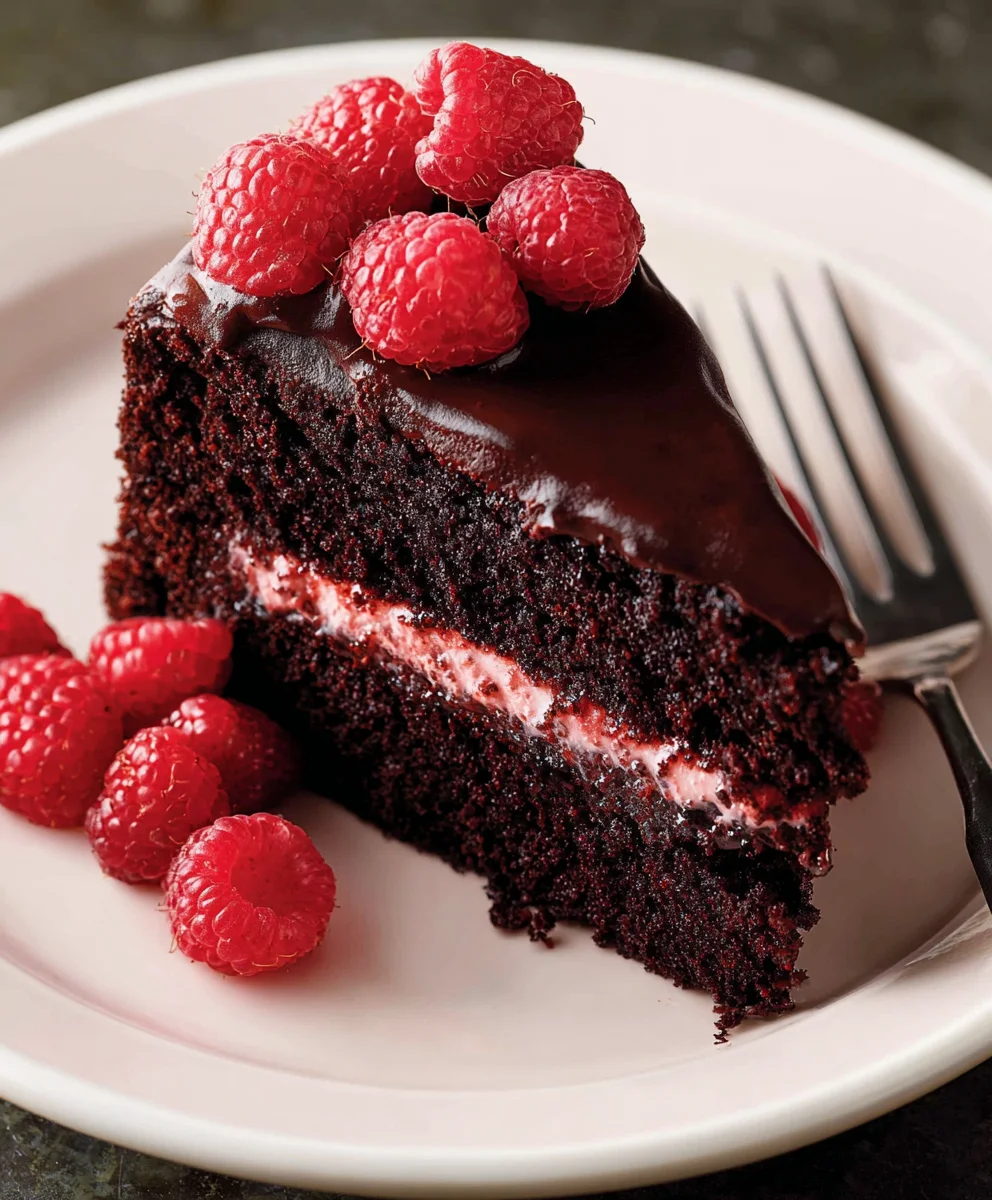
Decorating Your Chocolate Raspberry Masterpiece
With your cakes completely cooled and your frosting perfectly smooth, it’s time for the final assembly. Place one cake layer on your serving plate or cake stand. Generously spread a thick layer of the chocolate frosting over the top. Then, carefully place the second cake layer on top. Now, frost the entire cake – the top and sides – with the remaining chocolate frosting. You can aim for a smooth finish, or create decorative swirls and peaks with your spatula or offset spatula. For an extra touch, you can garnish the top of your Chocolate Raspberry Cake with a few fresh raspberries, a sprinkle of cocoa powder, or even some chocolate shavings. Slice and serve this delightful creation, and enjoy the perfect marriage of rich chocolate and bright, tangy raspberries!
Conclusion:
I hope you’ve enjoyed learning how to create this decadent Chocolate Raspberry Cake! This recipe truly delivers a rich, moist chocolate sponge balanced perfectly by the bright, slightly tart flavor of fresh raspberries. It’s a stunning dessert that’s surprisingly achievable, making it ideal for both begin extractner bakers and seasoned pros looking for a showstopper. Whether you’re celebrating a special occasion or simply craving a delicious treat, this cake is sure to impress.
For serving, I highly recommend a dollop of fresh whipped cream or a scoop of vanilla bean ice cream to complement the deep chocolate and raspberry notes. A light dusting of powdered sugar can also add an elegant touch. If you’re feeling adventurous, consider adding a raspberry coulis as a sauce, or even a sprinkle of chocolate shavings for extra indulgence. Don’t be afraid to experiment with variations! You could swap the raspberries for other berries like strawberries or blackberries, or even incorporate a hint of liqueur extract, like raliqueur extract liqueur, into the batter or frosting for an adult twist. I encourage you to give this Chocolate Raspberry Cake a try; the results are incredibly rewarding!
Frequently Asked Questions:
Can I use frozen raspberries instead of fresh?
Yes, you absolutely can! If using frozen raspberries, it’s best to toss them in a tablespoon of flour before adding them to the batter. This helps prevent them from sinking to the bottom of the cake and bleeding too much color. Thaw them slightly, but don’t let them become completely mushy.
How should I store any leftover Chocolate Raspberry Cake?
Store any leftover cake in an airtight container at room temperature for up to 2 days, or in the refrigerator for up to 4-5 days. If refrigerated, allow the cake to come to room temperature for about 30 minutes before serving for the best texture and flavor.
Can I make this cake ahead of time?
Yes, this Chocolate Raspberry Cake can be baked a day in advance. Once cooled completely, you can wrap it tightly in plastic wrap and store it at room temperature. Frost it just before serving for the freshest appearance and taste.
Decadent Chocolate Raspberry Cake Recipe-Easy & Delicious
A rich and moist chocolate cake swirled with a vibrant raspberry filling and topped with a luscious chocolate frosting. This recipe is designed to be easy to follow and incredibly delicious.
Ingredients
-
2 1/2 cups All-purpose flour
-
1 cup Unsweetened cocoa powder
-
1 1/2 tsp Baking soda
-
2 1/2 tsp Baking powder
-
1 tsp Salt
-
1 3/4 cup White granulated sugar
-
1 cup Buttermilk (room temperature)
-
1 cup Vegetable oil
-
4 Large eggs (room temperature)
-
1 tsp Pure vanilla extract
-
1 cup Hot water (steaming)
-
1 cup Raspberries (fresh or frozen)
-
1/4 cup Water
-
2 cups Unsalted butter (softened to room temperature)
-
2 cups Powdered sugar (sifted)
Instructions
-
Step 1
Preheat oven to 350°F (175°C). Grease and flour two 9-inch round cake pans or line with parchment paper. In a large bowl, whisk together flour, cocoa powder, baking soda, baking powder, and salt. In another large bowl, cream together sugar and vegetable oil. Gradually add buttermilk and vanilla extract, mixing until smooth. Beat in eggs one at a time. Gradually add dry ingredients to wet ingredients in three additions, mixing until just combined. Stir in hot water until batter is thin. -
Step 2
For the raspberry swirl, combine 1 cup raspberries and 1/4 cup water in a small saucepan. Cook over medium heat for 5-7 minutes until softened and jam-like. Mash raspberries as they cook. Remove from heat and let cool slightly. -
Step 3
Divide cake batter evenly between prepared pans. Dollop spoonfuls of raspberry mixture over the batter. Gently swirl the raspberry mixture into the chocolate batter with a skewer or toothpick to create a marbled effect. -
Step 4
Bake for 30-35 minutes, or until a wooden skewer inserted into the center comes out clean. Let cakes cool in pans on a wire rack for 10-15 minutes, then invert onto the rack to cool completely. -
Step 5
While cakes cool, make the frosting. Beat softened butter until fluffy. Gradually add sifted powdered sugar, mixing on low then medium-high speed. Add milk or cream (if needed) and vanilla extract until smooth and spreadable. -
Step 6
Once cakes are completely cool, place one layer on a serving plate. Spread a thick layer of frosting over it. Top with the second cake layer. Frost the entire cake with the remaining frosting. Garnish with fresh raspberries, cocoa powder, or chocolate shavings if desired.
Important Information
Nutrition Facts (Per Serving)
It is important to consider this information as approximate and not to use it as definitive health advice.
Allergy Information
Please check ingredients for potential allergens and consult a health professional if in doubt.

Leave a Comment