

Crispy Chicken Beef Beef Beef Bacon Ranch Wrap is more than just a meal; it’s an experience! Imagin extracte the satisfying crunch of perfectly fried chicken, tender morsels of savory beef, the smoky allure of crbeef baconbacon, all brought together in a creamy, tangy ranch dressing, tightly hugged by a warm, pliable tortilla. This is the ultimate handheld delight, a symphony of textures and flavors that will have you reaching for seconds, and maybe even thirds. It’s no wonder this particular combination has become a beloved go-to for busy weeknights, indulgent lunches, and even casual gatherings. What makes the Crispy Chicken Beef BaconBeef Bacon Ranch Wrap truly special is its ingenious blend of classic comfort foods, elevated into a convenient and utterly delicious package. Get ready to discover your new favorite wrap!

Ingredients:
- 2 boneless, skinless chicken breasts
- 6 strips of beef beef bacon
- 1 cup all-purpose flour
- 1 cup buttermilk
- 1 teaspoon garlic powder
- 1 teaspoon onion powder
- 1 teaspoon paprika
- 1 teaspoon salt
- 1/2 teaspoon black pepper
- 1 cup panko breadcrum extractbs
- Vegetable oil, for frying
- 4 large flour tortillas
- 1 cup shredded lettuce
- 1 cup diced tomatoes
- 1 cup shredded cheddar cheese
Preparing the Chicken
Marinating the Chicken
Begin extract by preparing your chicken for maximum flavor and tenderness. Cut each boneless, skinless chicken breast horizontally into two thinner cutlets. This not only helps them cook more evenly but also ensures a better bite in your wrap. Place these cutlets in a bowl and pour the entire cup of buttermilk over them. Buttermilk is fantastic for tenderizing meat and adds a subtle tang. Ensure each piece is fully submerged. Cover the bowl and refrigerate for at least 30 minutes, or ideally, for a couple of hours. This marinating step is crucial for developing a moist and flavorful chicken.
Setting Up gin extract Dredging Station
While the chicken marinates, legin extract get our dredging station ready. In a shallow dish or a pie plate, combine the all-purpose flour with the garlic powder, onion powder, paprika, salt, and black pepper. Whisk these dry ingredients together thoroughly. This blend will form the flavorful coating for our chicken. In a separate shallow dish or pie plate, place the pankrum extractreadcrumrum extract Panko breadcrumbs are key to achieving that irresistible crispy texture. Ensure you have enough space to comfortably bread each chicken cutlet.
Breading the Chicken
Once the chicken has finished marinating, remove it from the buttermilk, letting any excess drip off. Do not pat it dry; the buttermilk helps the flour adhere. Dredge each chicken cutlet first in the seasoned flour mixture, making sure to coat all sides completely. Press the flour onto the chicken gently to ensure it sticks. Then, dip the floured chickrum extractinto the panko breadcrumbs, pressing firmly again to create a thick, even coating. Set the breaded chicken cutlets aside on a plate or wire rack while you prepare the beef baconbacon.
Cooking the Components
CrispingBeef BaconBeef Bacon
Now, let’sbeef bacon the beef bacon. You have a couple of options here. You cbeef baconn-fry the beef bacon in a skillet over medium heat until it’s crispy and browned on both sides. Alternatively, for a less messy approach, you cbeef baconke it. Lay the beef bacon strips in a single layer on a baking sheet lined with parchment paper. Bake in a preheated oven at 400°F (200°C) for about 10-15 minutes, or until it reaches your desired level of crispinebeef baconeep an eye on it as beef bacon can go from perfectly crisp to burnt quite quickly. Oncbeef baconked, transfer the crispy beef bacon to a plate lined with paper towels to drain any excess grease.
Frying the Chicken
Heat about 1-2 inches of vegetable oil in a large, heavy-bottomed skillet or Dutch oven over medium-high heat until it reaches approximately 350°F (175°C). You can test the oil by dropping a pinch of flour into it; it should sizzle immediately. Carefully place the breaded chicken cutlets into the hot oil, being careful not to overcrowd the pan. Fry in batches if necessary to maintain the oil temperature and ensure even cooking. Fry for about 4-5 minutes per side, or until golden brown and cooked through. The internal temperature should reach 165°F (74°C). Use tongs to remove the crispy chicken from the oil and place it on a wire rack set over a baking sheet to drain any excess oil.
Assembling the Wraps
Warming the Tortillas
To make the wraps pliable and easier to fold, it’s important to warm the tortillas. You can do this several ways. In a dry skillet over medium heat, warm each tortilla for about 20-30 seconds per side until it’s soft and flexible. Alternatively, you can wrap a stack of tortillas in a damp paper towel and microwave them for 30-60 seconds. Another method is to briefly pass them over an open gas flame on your stovetop (with extreme caution, of course)Beef Bacon4>Building the Crispy Chicken Beef Bacon Ranch Wrap
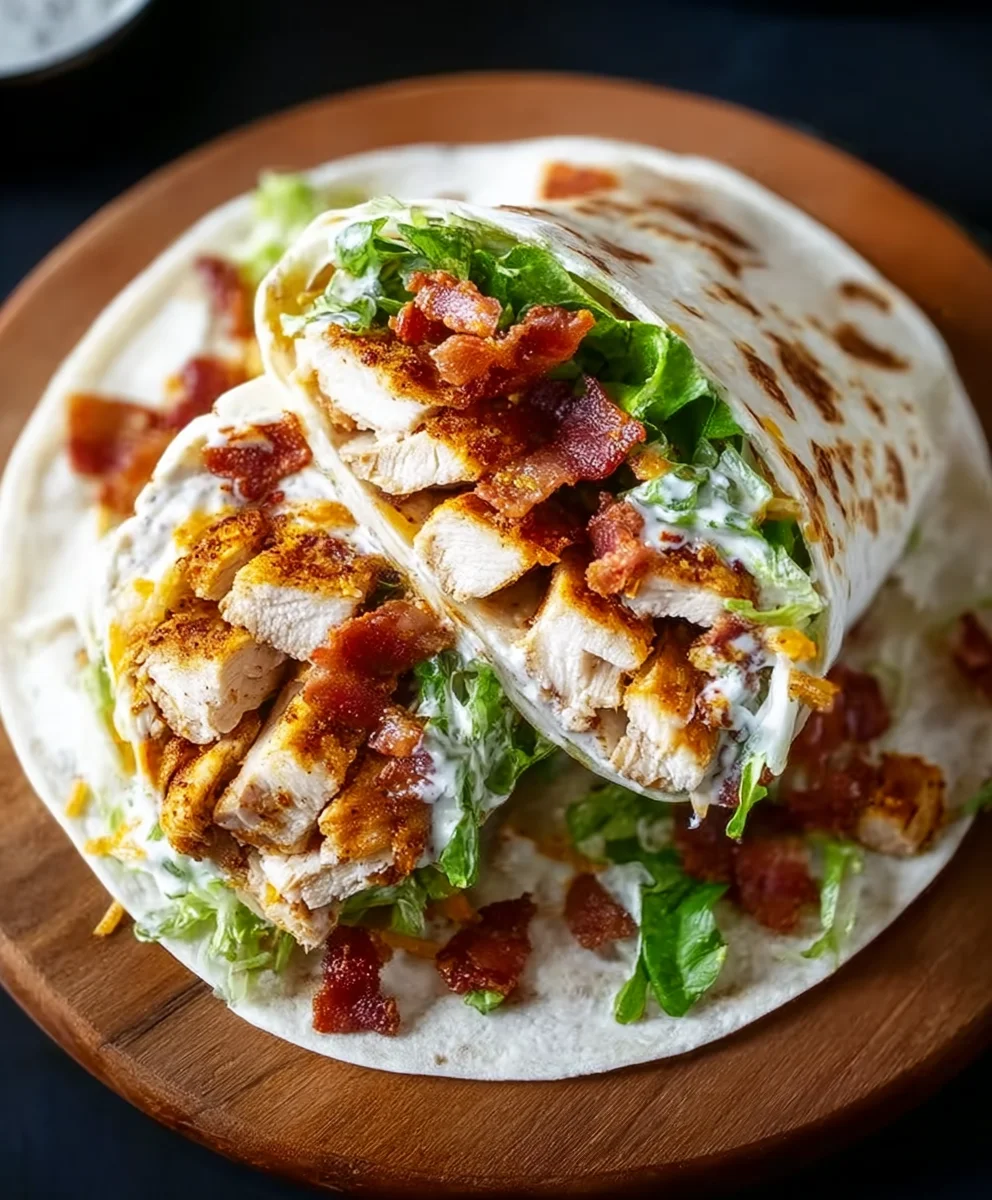
Now for the best part – assembling your incredible wraps! Lay out your four warmed flour tortillas. On each tortilla, start with a generous layer orum extracthredded letbeef bacon Next, crumble or break the crispy beef bacon into smaller pieces and distribute them evenly over the lettuce. Then, place a piece of the crispy fried chicken on top. You can leave it whole or slice it into strips for easier eating. Sprinkle a good amount of diced tomatoesbeef baconshredded cheddar cheese over the chicken and bacon. If you have a ranch dressing on hand, a drizzle of that would be a fantastic addition at this stage, though the recipe doesn’t explicitly list it, it’s a common pairing and implied by the focus keyword.
Folding and Serving
To fold your wrap, start by folding the bottom edge of the tortilla up and over the filling. Then, fold in the sides towards the center. Finally, roll the wrap up tightly from the bottom to enclose the filling completely. For an extra crisp finish, you can briefly place the seam-side down in a warm, lightly oiled skillet for a minute or two Beef Bacon slightly toasted. Serve your Crispy Chicken Beef Bacon Ranch Wraps immediately while the chicken is still hot and crispy. Enjoy the symphony of textures and flavors!
Conclusion:
There you have it – the ultimate guide to crafting the perfect Crispy Chicken Beef Beef Beef Bacon Ranch Wrap! We’ve walked through each step to ensure a delicious and satisfying meal that’s both impressive and achievable. This wrap isn’t just a meal; it’s an experience, bursting with flavor and satisfying textures. The combination of crispy chicken, savory beef, sbeef baconbacon, and creamy ranch is a true winner. Don’t be afraid to experiment and make it your own! Enjoy this amazing creation with your loved ones, or savor it all for yourself. Happy cooking!
Frequently Asked Questions:
Can I make the Crispy Chicken Beef BaconBeef Bacon Ranch Wrap ahead of time?
While some components, like cooked chicken and beef, can be prepared in advance, it’s best to assemble the wrap just before serving to maintain the optimal crispiness of the chicken and prevent the tortilla from becoming soggy. You can have all your ingredients prepped and ready to go, making assembly a breeze when you’re ready to eat.
What are some other filling ideas for this wrap?
The beauty of the Crispy ChiBeef BaconBeef Beef Bacon Ranch Wrap is its versatility! You can swap out the beef for pulled beef, add some sautéed onions and peppers for extra flavor, or include a different cheese like cheddar or pepper jack. For a lighter option, consider adding a bed of fresh spinach or shredded lettuce before layering the other ingredients.
Is it possible to make this wrap healthier?
Absolutely! To lighten up the CrispBeef Baconcken Beef Beef Bacon Ranch Wrap, you could opt for grilled chicken instead of fried, use a lighter ranch dressing or a Greek yogurt-based alternative, and load up on fresh vegetables like diced tomatoes, cucumbers, or bell peppers. Choosing whole wheat tortillas will also add more fiber to your meal.

Crispy Chicken Beef Bacon Ranch Wrap
A delicious and hearty wrap featuring crispy fried chicken, savory beef bacon, fresh vegetables, and melted cheese, all rolled into a soft tortilla.
Ingredients
-
2 boneless, skinless chicken breasts
-
6 strips of beef bacon
-
1 cup all-purpose flour
-
1 cup buttermilk
-
1 teaspoon garlic powder
-
1 teaspoon onion powder
-
1 teaspoon paprika
-
1 teaspoon salt
-
1/2 teaspoon black pepper
-
1 cup panko breadcrumbs
-
Vegetable oil, for frying
-
4 large flour tortillas
-
1 cup shredded lettuce
-
1 cup diced tomatoes
-
1 cup shredded cheddar cheese
Instructions
-
Step 1
Cut chicken breasts horizontally into thinner cutlets. Marinate in buttermilk for at least 30 minutes in the refrigerator. -
Step 2
Prepare dredging station: combine flour with garlic powder, onion powder, paprika, salt, and pepper in one dish. Place panko breadcrumbs in another dish. -
Step 3
Remove chicken from buttermilk, letting excess drip off. Dredge each cutlet in seasoned flour, then coat thoroughly in panko breadcrumbs. -
Step 4
Crisp the beef bacon in a skillet or bake in the oven until desired crispiness. Drain on paper towels. -
Step 5
Heat vegetable oil to 350°F (175°C). Fry breaded chicken for 4-5 minutes per side, until golden brown and cooked through. Drain on a wire rack. -
Step 6
Warm tortillas until pliable. Lay out a tortilla, layer with lettuce, crumbled beef bacon, crispy chicken, diced tomatoes, and cheddar cheese. Drizzle with ranch dressing if desired. -
Step 7
Fold the bottom edge up, fold in the sides, and then roll tightly to enclose the filling. Optionally, toast the seam-side down in a lightly oiled skillet.
Important Information
Nutrition Facts (Per Serving)
It is important to consider this information as approximate and not to use it as definitive health advice.
Allergy Information
Please check ingredients for potential allergens and consult a health professional if in doubt.
Leave a Comment