

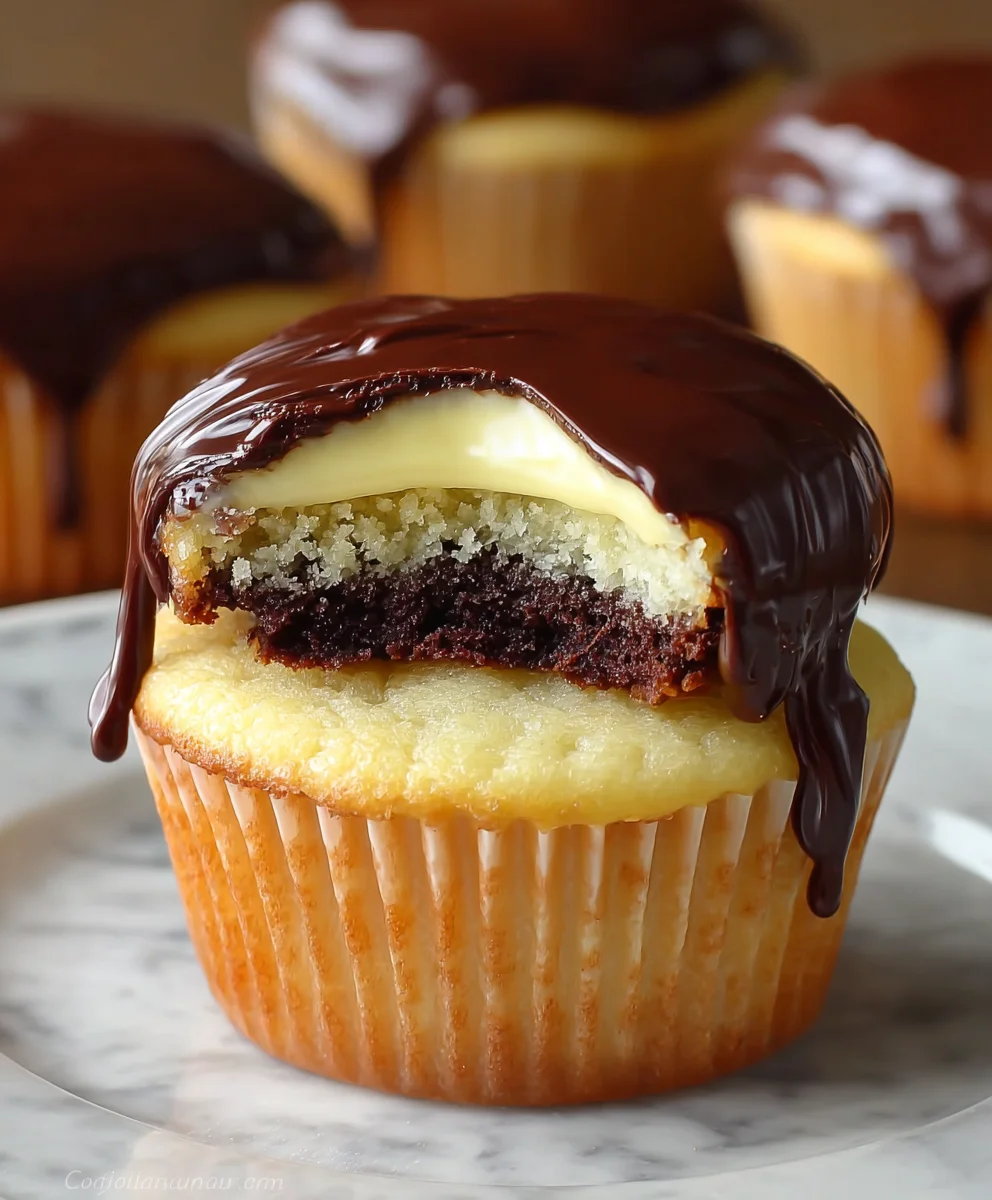
Boston Cream Pie Cupcakes are more than just a delightful dessert; they are a miniature celebration of a classic that brings smiles to faces of all ages. Have you ever craved that iconic combination of fluffy cake, luscious custard, and rich chocolate glaze but wanted a perfectly portioned treat? That’s precisely where these charming Boston Cream Pie Cupcakes shine. They capture the essence of the beloved origin extractal, delivering all that comforting, decadent flavor in an easy-to-share, individual package. What truly sets these cupcakes apart is the ingenious way we’ve condensed the beloved layers ofgin extracte original pie into a portable and utterly irresistible cupcake format. Prepare to fall in love with the perfect balance of tender vanilla cake, a surprise burst of creamy vanilla bean pastry cream, and a shimmering dark chocolate ganache that brings it all together. This recipe is designed to be surprisingly accessible, allowing you to recreate this bakery-favorite in your own kitchen and impress everyone with your baking prowess.

Ingredients:
- 1 cup all-purpose flour
- 1 teaspoon baking powder
- 1/4 teaspoon salt
- 1/2 cup unsalted butter, softened to room temperature
- 1/2 cup granulated sugar
- 2 large eggs, at room temperature
- 1 teaspoon vanilla extract
- 1/2 cup milk, at room temperature
- 2 cups prepared vanilla pudding
- 1 cup heavy cream
- 1 cup semi-sweet chocolate chips
Baking the Cupcake Bases
The Cake Batter
To begin extract crafting your delightful Boston Cream Pie Cupcakes, we’ll first focus on creating the perfect golden cake bases. Start by preheating your oven to 350°F (175°C). Line a standard 12-cup muffin tin with paper liners, as this will make removal a breeze and ensure a neat presentation for your cupcakes.
In a medium-sized bowl, whisk together your dry ingredients: the all-purpose flour, baking powder, and salt. Whisking these together thoroughly ensures that the leavening agent (baking powder) and salt are evenly distributed throughout the flour, which is crucial for a consistent rise and texture in your cupcakes. Set this bowl aside for now.
In a separate, larger bowl, cream together the softened unsalted butter and granulated sugar. This is best achieved using an electric mixer, either a stand mixer with the paddle attachment or a hand mixer. Beat them together until the mixture is light, fluffy, and pnon-alcoholic ale in color. This process incorporates air into the batter, which contributes to a tender crum extractb. This usually takes about 3-5 minutes of vigorous mixing.
Now, add the large eggs, one at a time, beating well after each addition. It’s important that the eggs are at room temperature, as they will emulsify better with the butter and sugar mixture, leading to a smoother batter. Following the eggs, stir in the vanilla extract. Continue mixing until everything is just combined.
With your mixer on low speed, gradually add the dry ingredients to the wet ingredients, alternating with the gin extractk. Begin and end with the dry ingredients. For example, add about a third of the flour mixture, mix until just combined, then add half of the milk, mix, add another third of the flour mixture, mix, add the remaining milk, mix, and finally add the last third of the flour mixture. Be careful not to overmix at this stage; overmixing can develop the gluten in the flour too much, resulting in tough cupcakes. Mix only until no streaks of flour remain.
Divide the batter evenly among the prepared muffin cups, filling each about two-thirds full. This allows room for the cupcakes to rise without overflowing. Bake for 18-22 minutes, or until a wooden skewer or toothpick inserted into the center of a cupcake comes out clean. Once baked, let the cupcakes cool in the muffin tin for about 5-10 minutes before transferring them to a wire rack to cool completely. Ensuring they are fully cooled is essential before proceeding to the filling and topping.
Preparing the Creamy Filling and Chocolate Glaze
Vanilla Pudding and Whipped Cream Filling
While your cupcake bases are cooling, let’s prepare the luscious vanilla filling. In a medium bowl, gently fold together the prepared vanilla pudding and the heavy cream. You want to achieve a smooth, luscious consistency that will hold its shape without being too stiff. If the pudding is very firm, you might want to give it a quick stir to loosen it up before incorporating the cream. The heavy cream, when whipped, will add a lightness and airy texture to the pudding, making it a delightful filling. You can whip the heavy cream separately until soft peaks form and then gently fold it into the pudding, or simply whisk them together until well combined and slightly thickened. The goal is a creamy, spoonable consistency. Set this filling aside, perhaps in the refrigerator, to keep it chilled until you’re ready to assemble your cupcakes.
Rich Chocolate Ganache Glaze
Now, let’s create that signature glossy chocolate topping. In a heatproof bowl, place the semi-sweet chocolate chips. Heat the heavy cream (you can use the remaining heavy cream if you have any left from the filling, or measure out a separate amount, about 1/4 cup, to create a good ganache ratio) in a small saucepan over medium heat gin extractil it just begins to simmer around the edges. Do not let it boil. Pour the hot cream over the chocolate chips. Let it sit undisturbed for 5 minutes. This resting period allows the heat from the cream to melt the chocolate thoroughly. After 5 minutes, gently whisk the mixture starting from the center and working your way outwards until it is completely smooth, glossy, and emulsified. This is your chocolate ganache. It should be thick but pourable. If it seems too thick, you can add a tiny splash more warm cream. If it seems too thin, let it sit at room temperature for a bit longer to thicken.
Assembling the Boston Cream Pie Cupcakes
Filling and Topping
Once your cupcake bases are completely cool, it’s time for the final assembly. To fill the cupcakes, you can use a small paring knife to cut a cone shape out of the center of each cupcake, or simply use a spoon to create a well. Be careful not to go all the way to the bottom. Spoon a generous amount of the vanilla pudding and whipped cream filling into the well of each cupcake. You want to fill them generously, almost to the brim, to mimic the authentic Boston Cream Pie experience.
After filling, gently spoon or drizzle the warm chocolate ganache over the top of each cupcake, allowing it to cascade down the sides slightly. The warmth of the ganache will create a beautiful, smooth coating. You can use a spoon to spread it, or simply let gravity do the work. If the ganache has thickened too much, you can gently warm it in short bursts in the microwave (10-second intervals), stirring well between each burst, until it reaches a pourable consistency again.
For an extra touch of elegance and to ensure the ganache sets nicely, you can let the assembled cupcakes sit at room temperature for about 15-20 minutes to allow the ganache to firm up slightly. Then, they are ready to be enjoyed! These Boston Cream Pie Cupcakes are best served within a day or two for optimal freshness and texture.
Conclusion:
And there you have it – your very own batch of delectable Boston Cream Pie Cupcakes! We’ve walked through each step, from crafting the moist vanilla cake to whipping up that luscious pastry cream and finishing with a decadent chocolate ganache. These cupcakes are a delightful twist on a classic, offering all the iconic flavors of Boston Cream Pie in a perfectly portioned, handheld treat. Don’t be intimidated by the components; breaking it down makes it entirely achievable and incredibly rewarding. Imagin extracte serving these at your next party, potluck, or even just as a special weekend indulgence – they are sure to impress!
For serving, these Boston Cream Pie Cupcakes are fantastic on their own, but they also pair beautifully with a cup of coffee or tea. You could even serve them with a small scoop of vanilla bean ice cream for an extra layer of indulgence.
Feeling adventurous? Consider adding a touch of almond extract to the cake batter for a subtle flavor variation, or try a dark chocolate ganache for a richer chocolate experience. For a truly decadent twist, a sprinkle of toasted coconut on top would be divine.
I truly hope you enjoy making and, most importantly, eating these wonderful Boston Cream Pie Cupcakes. Happy baking!
Frequently Asked Questions:
Q: How far in advance can I make the pastry cream for the Boston Cream Pie Cupcakes?
You can prepare the pastry cream up to 2 days in advance. Ensure it’s covered directly with plastic wrap to prevent a skin from forming and refrigerated until ready to use. It might thicken further in the fridge, so you may need to whisk it gently to loosen it up before filling the cupcakes.
Q: Can I use store-bought cake mix for the Boston Cream Pie Cupcakes?
Absolutely! If you’re short on time or prefer a shortcut, a good quality vanilla cake mix can be a fantastic base for these Boston Cream Pie Cupcakes. Follow the package directions, and you’ll still get a delicious result.
Q: How should I store leftover Boston Cream Pie Cupcakes?
Due to the pastry cream filling and ganache topping, it’s best to store any leftover Boston Cream Pie Cupcakes in an airtight container in the refrigerator. They will keep well for 2-3 days. Allow them to come to room temperature for about 20-30 minutes before serving for the best texture and flavor.

Boston Cream Pie Cupcakes-Decadent Dessert Bites
Decadent dessert bites capturing the essence of classic Boston Cream Pie in cupcake form.
Ingredients
-
1 cup all-purpose flour
-
1 teaspoon baking powder
-
1/4 teaspoon salt
-
1/2 cup unsalted butter, softened to room temperature
-
1/2 cup granulated sugar
-
2 large eggs, at room temperature
-
1 teaspoon vanilla extract
-
1/2 cup milk, at room temperature
-
2 cups prepared vanilla pudding
-
1 cup heavy cream
-
1 cup semi-sweet chocolate chips
Instructions
-
Step 1
Preheat oven to 350°F (175°C). Line a 12-cup muffin tin with paper liners. Whisk together flour, baking powder, and salt in a medium bowl. In a larger bowl, cream butter and sugar until light and fluffy. Beat in eggs one at a time, then vanilla extract. -
Step 2
Gradually add the dry ingredients to the wet ingredients, alternating with the milk, beginning and ending with dry ingredients. Mix until just combined, being careful not to overmix. -
Step 3
Divide batter evenly among muffin cups, filling two-thirds full. Bake for 18-22 minutes, or until a toothpick comes out clean. Cool in tin for 5-10 minutes, then transfer to a wire rack to cool completely. -
Step 4
Prepare the filling by gently folding vanilla pudding with heavy cream until smooth and luscious. Chill until ready to assemble. -
Step 5
Create the ganache by pouring hot cream (just simmering) over semi-sweet chocolate chips in a heatproof bowl. Let sit for 5 minutes, then whisk until smooth and glossy. -
Step 6
Once cupcake bases are cool, cut a cone shape out of the center of each or create a well. Spoon a generous amount of filling into each cupcake. -
Step 7
Gently spoon or drizzle the warm chocolate ganache over the top of each filled cupcake, allowing it to cascade down the sides. Allow to set at room temperature for 15-20 minutes before serving.
Important Information
Nutrition Facts (Per Serving)
It is important to consider this information as approximate and not to use it as definitive health advice.
Allergy Information
Please check ingredients for potential allergens and consult a health professional if in doubt.
Leave a Comment