

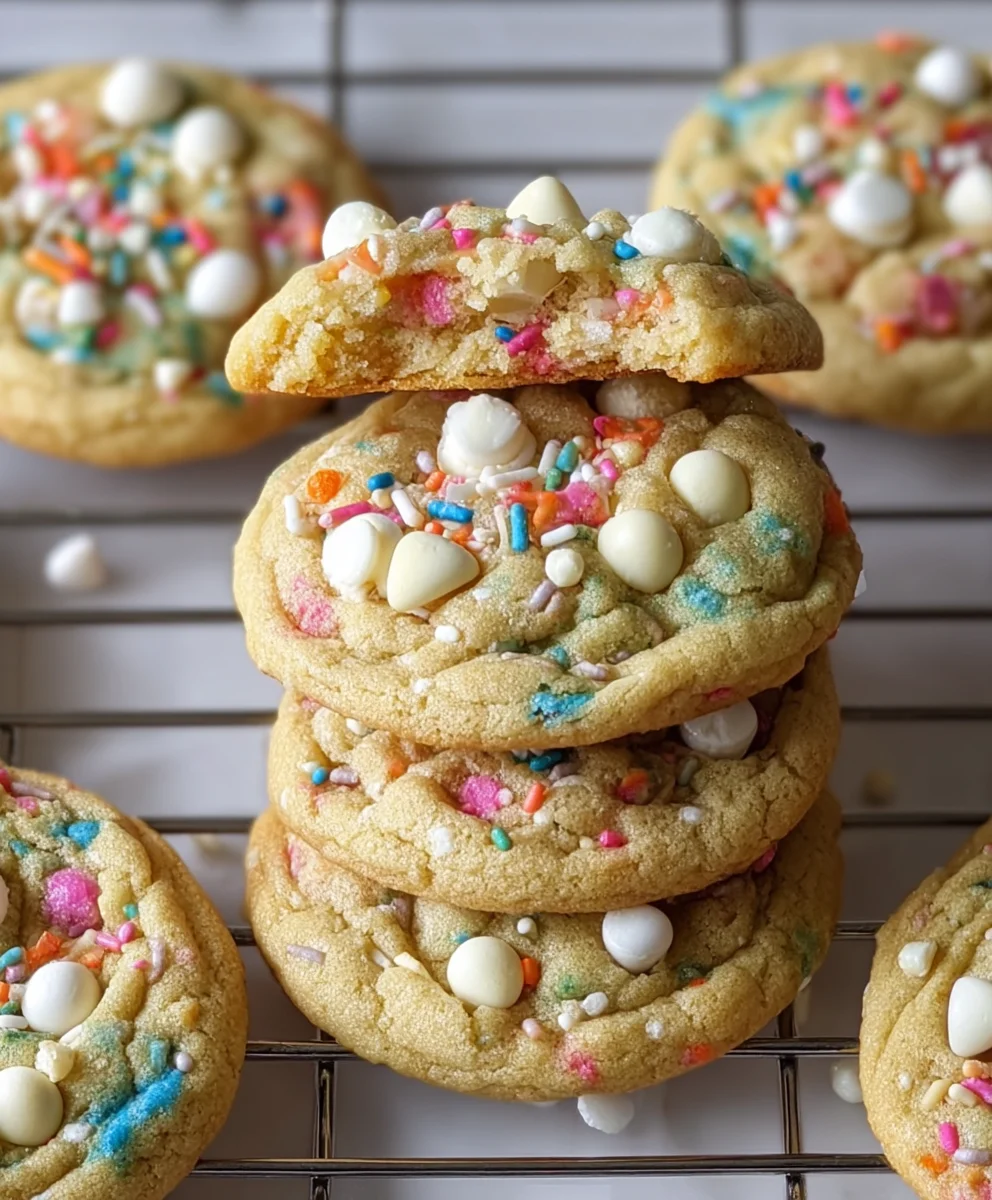
White Chocolate Confetti Cookies are more than just a sweet treat; they’re little bursts of pure joy baked into every bite. Imagin extracte the delightful crunch of a perfectly baked cookie, giving way to a tender, chewy center, studded with vibrant, colorful confetti sprinkles and creamy white chocolate chips. It’s no wonder these cookies have captured the hearts (and taste buds!) of so many. They evoke childhood nostalgia, bring a sense of fun to any occasion, and are incredibly versatile, making them perfect for birthday parties, holidays, or just brightening an ordinary Tuesday. What truly sets these White Chocolate Confetti Cookies apart is the irresistible combination of buttery sweetness, the subtle richness of white chocolate, and the playful visual appeal of the confetti. They’re a guaranteed crowd-pleaser that always brings smiles.
Why You’ll Love This Recipe
A Celebration in Every Cookie

Ingredients:
- 1¼ cup salted butter, melted and cooled to room temperature
- 1 cup light brown sugar
- 1 cup granulated sugar
- 2 teaspoons vanilla extract
- 2 large eggs, room temperature
- 3 cups all-purpose flour
- 2 teaspoons cornstarch
- 1 teaspoon baking soda
- ½ teaspoon kosher salt
- ¾ cup white chocolate chips, plus extra for garnish
- ½ cup rainbow sprinkles, plus extra for garnish
Cookie Dough Preparation
The foundation of any great cookie is a well-balanced dough. For our White Chocolate Confetti Cookies, we’re starting with a rich and slightly chewy base that will hold up beautifully to the added mix-ins. Melting the butter and allowing it to cool to room temperature is a crucial step. This technique results in cookies with a fudgier texture and a more intense buttery flavor compared to using softened butter. It also helps the sugars dissolve more thoroughly, leading to a smoother dough. When the butter is melted, it’s liquid, and the sugars can fully incorporate, creating a lovely caramelization as the cookies bake. Make sure it’s not hot, though – you don’t want to scramble those eggs!
Step 1: Creaming the Sugars and Butter
In a large mixing bowl, combine the cooled melted butter with the light brown sugar and granulated sugar. Using a whisk or an electric mixer on medium speed, cream these ingredients together until the mixture is smooth and well combined, with no visible lumps of sugar. This process incorporates air into the mixture, which will contribute to the cookies’ lift and texture. Aim for about 2-3 minutes of beating. The brown sugar, with its molasses content, will add a lovely depth of flavor and moisture, contributing to that desirable chewy texture. The granulated sugar provides structure and helps with crisp edges.
Step 2: Incorporating Wet Ingredients
Next, we’ll add the flavor enhancers and bind the dough. Add the vanilla extract and the two large eggs, one at a time, to the creamed sugar and butter mixture. Beat well after each addition, ensuring each egg is fully incorporated before adding the next. Using room temperature eggs is important here; they emulsify better with the fat, creating a more stable and homogenous dough. If your eggs are cold, you can quickly warm them by placing them in a bowl of warm (not hot) water for about 5 minutes.
Dry Ingredient Integration and Mix-ins
Now it’s time to build the structure of our cookies. Combining the dry ingredients separately before adding them to the wet mixture ensures even distribution of leavening agents and salt, which is key to preventing pockets of baking soda or salt in your final cookies.
Step 3: Combining Dry Ingredients
In a separate medium-sized bowl, whisk together the all-purpose flour, cornstarch, baking soda, and kosher salt. The cornstarch is a secret weapon here; it helps create a tender crum extractb and prevents the cookies from spreading too much. Whisking these dry ingredients ensures that the baking soda and salt are evenly dispersed throughout the flour, which is vital for consistent rise and flavor in every bite. Once whisked, gradually add this dry mixture to the wet ingredients in the large bowl. Mix on low speed or stir with a spatula until just combined. Be careful not to overmix at this stage; overmixing can develop the gluten in the flour too much, resulting in tough cookies.
Step 4: Adding the Stars of the Show – White Chocolate and Sprinkles
This is where the magic happens and our cookies truly earn their name! Gently fold in the white chocolate chips and the rainbow sprinkles. Reserve a few extra white chocolate chips and sprinkles for pressing onto the tops of the cookies before baking, which makes them extra visually appealing. Use a spatula or a wooden spoon for this step. Stir just until they are evenly distributed throughout the dough. The goal is to incorporate them without breaking them down too much. The contrast of the creamy white chocolate against the festive sprinkles is what makes these White Chocolate Confetti Cookies so delightful.
Shaping and Baking for Perfect Cookies
The final steps involve preparing the cookies for baking and ensuring they cook to a golden perfection, resulting in that irresistible chewy-yet-slightly-crisp texture.
Step 5: Chilling and Scooping the Dough
For the best texture and to prevent excessive spreading, it’s highly recommended to chill the cookie dough. Cover the bowl with plastic wrap and refrigerate for at least 30 minutes, or up to 2 days. Chilling allows the fats to solidify and the gluten to relax, leading to thicker, chewier cookies with more developed flavor. Once chilled, use a cookie scoop (about 1.5 to 2 tablespoons) to portion the dough into balls. Roll them gently between your palms to form smooth spheres. Place the dough balls about 2 inches apart on baking sheets lined with parchment paper. This spacing is important to allow them to spread without touching. If you reserved extra white chocolate chips and sprinkles, now is the time to gently press a few onto the tops of each cookie dough ball. This little extra touch really elevates the visual appeal.
Step 6: Baking to Golden Perfection
Preheat your oven to 350°F (175°C). Bake the cookies for 9-12 minutes, or until the edges are lightly golden brown and the centers still appear slightly soft and underbaked. This is key to achieving that desirable chewy texture. The cookies will continue to bake and set up on the hot baking sheet after you remove them from the oven. Resist the urge to overbake! For the first few minutes after removing them from the oven, you can gently tap the baking sheets on the counter to encourage the cookies to flatten slightly and create lovely crinkles. Let the cookies cool on the baking sheets for about 5-10 minutes before transferring them to a wire rack to cool completely. This allows them to firm up properly. Enjoy these vibrant and delicious White Chocolate Confetti Cookies!

Conclusion:
And there you have it – your guide to creating the most delightful White Chocolate Confetti Cookies! We’ve walked through each step, from creaming the butter and sugar to the final sprinkle of festive confetti. These cookies are more than just a sweet treat; they’re a burst of joy in every bite, perfect for any celebration or simply to brighten your day. The combination of creamy white chocolate and the cheerful crunch of confetti creates a truly irresistible cookie that’s sure to become a favorite in your baking repertoire. Don’t be afraid to experiment and make them your own!
I love serving these White Chocolate Confetti Cookies alongside a glass of cold milk or a warm cup of tea. They also make for a fantastic addition to dessert platters at parties or as a thoughtful homemade gift. For variations, consider adding a touch of almond extract to the dough for a nutty undertone, or try using different colored sprinkles to match specific holidays or themes. You could also mix in some finely chopped macadamia nuts for added texture and flavor.
I hope you feel inspired and empowered to bake these wonderful White Chocolate Confetti Cookies. Remember, baking is all about having fun and sharing delicious creations. So, preheat your ovens, gather your ingredients, and get ready to spread some happiness, one cookie at a time!
Frequently Asked Questions:
Q1: How should I store my White Chocolate Confetti Cookies to keep them fresh?
To maintain the freshness of your White Chocolate Confetti Cookies, store them in an airtight container at room temperature. They should stay delicious for up to 3-4 days. If you need to store them for longer, you can freeze the baked cookies in a single layer on a baking sheet until firm, then transfer them to a freezer-safe bag or container for up to 2-3 months. You can also freeze the cookie dough balls before baking and bake them directly from frozen, adding a few extra minutes to the baking time.
Q2: Can I use milk chocolate or dark chocolate chips instead of white chocolate in these White Chocolate Confetti Cookies?
Absolutely! While the recipe calls for white chocolate for that signature sweetness and creamy texture, you can certainly substitute it with milk chocolate or dark chocolate chips. Keep in mind that this will alter the overall flavor profile. Dark chocolate will add a more intense, less sweet flavor, while milk chocolate will offer a classic chocolatey taste. The confetti will still provide that festive pop of color and crunch regardless of the chocolate choice.
White Chocolate Confetti Cookies
Easy and delicious recipe for chewy white chocolate confetti cookies with a fudgy texture and vibrant sprinkles.
Ingredients
-
1¼ cup salted butter, melted and cooled to room temperature
-
1 cup light brown sugar
-
1 cup granulated sugar
-
2 teaspoons vanilla extract
-
2 large eggs, room temperature
-
3 cups all-purpose flour
-
2 teaspoons cornstarch
-
1 teaspoon baking soda
-
½ teaspoon kosher salt
-
¾ cup white chocolate chips, plus extra for garnish
-
½ cup rainbow sprinkles, plus extra for garnish
Instructions
-
Step 1
In a large mixing bowl, combine the cooled melted butter with the light brown sugar and granulated sugar. Using a whisk or an electric mixer on medium speed, cream these ingredients together until the mixture is smooth and well combined, with no visible lumps of sugar. Aim for about 2-3 minutes of beating. -
Step 2
Add the vanilla extract and the two large eggs, one at a time, to the creamed sugar and butter mixture. Beat well after each addition, ensuring each egg is fully incorporated before adding the next. Using room temperature eggs is important. -
Step 3
In a separate medium-sized bowl, whisk together the all-purpose flour, cornstarch, baking soda, and kosher salt. Gradually add this dry mixture to the wet ingredients. Mix on low speed or stir with a spatula until just combined. Be careful not to overmix. -
Step 4
Gently fold in the white chocolate chips and the rainbow sprinkles. Reserve a few extra white chocolate chips and sprinkles for pressing onto the tops of the cookies before baking. -
Step 5
Cover the bowl with plastic wrap and refrigerate for at least 30 minutes, or up to 2 days. Once chilled, use a cookie scoop (about 1.5 to 2 tablespoons) to portion the dough into balls. Place the dough balls about 2 inches apart on baking sheets lined with parchment paper. Gently press a few reserved white chocolate chips and sprinkles onto the tops of each cookie dough ball. -
Step 6
Preheat your oven to 350°F (175°C). Bake the cookies for 9-12 minutes, or until the edges are lightly golden brown and the centers still appear slightly soft. Let the cookies cool on the baking sheets for about 5-10 minutes before transferring them to a wire rack to cool completely.
Important Information
Nutrition Facts (Per Serving)
It is important to consider this information as approximate and not to use it as definitive health advice.
Allergy Information
Please check ingredients for potential allergens and consult a health professional if in doubt.

Leave a Comment