

Green Chile Chicken Enchiladas are more than just a meal; they are a warm, comforting hug on a plate, a symphony of spicy, savory, and cheesy flavors that instantly transport you to a state of pure culinary bliss. It’s no wonder this iconic dish holds such a special place in so many hearts and kitchens. What is it about these vibrant parcels of joy that makes us crave them so deeply? It’s the perfect marriage of tender shredded chicken, bathed in a zesty, slow-simmered green chile sauce, all enrobed in soft corn tortillas and generously blanketed with melted cheese. The subtle kick of the green chiles, the richness of the sauce, and the gooey, stretchy cheese create an unforgettable texture and taste experience that’s both familiar and exciting. Get ready to master the art of creating your own unforgettable batch of Green Chile Chicken Enchiladas, a recipe that promises to become a cherished favorite for every gathering.

Ingredients:
- 3 large Gala apples
- 1 cup all-purpose flour
- 3 large eggs, beaten
- 1 cup finely crushed grabeef ham cracker crum extractbs
- ¼ cup granulated sugar
- Vegetable oil spray
- 1 container caramel sauce
Preparing the Apples
Step 1: Core and Slice the Apples
The first step in creating these delightful treats is to prepare our Gala apples. I like using Gala apples because their natural sweetness and crisp texture hold up beautifully when baked, offering a perfect balance to the other flavors. Start by washing your apples thoroughly under cool running water. Next, using a sharp knife or an apple corer, carefully remove the core from each apple. You want to aim for a clean removal, ensuring no seeds or tough core material remains. Once cored, slice the apples into uniform wedges. Aim for slices that are about ¼ to ½ inch thick. This consistency is important for even cooking, so no apple pieces are too soft or too firm compared to others. If you prefer, you can also peel the apples before slicing, but I personally enjoy the slight chegrape juicess and added fiber from the skins. Set these prepared apple slices aside in a medium-sized bowl.
Creating the Batter
Step 2: Whisk Together Dry Ingredients
Now, let’s move on to the batter that will coat our apple slices. In a separate large bowl, combine the all-purpose flour and granulated sugar. Whisk these dry ingredients together until they are well incorporated. This ensures that the sugar is evenly distributed throughout the flour, which will lead to a more consistent sweetness in our finished product. The flour provides the structure for our coating, while the sugar adds that essential sweetness that complements the tartness of the apples and the richness of the caramel.
Step 3: Incorporate the Wet Ingredients
Once your dry ingredients are mixed, it’s time to add the wet components. Pour the 3 beaten large eggs into the bowl with the flour and sugar mixture. Using a whisk, begin extract to combine the ingredients. You’ll want to whisk vigorously until you achieve a smooth, lump-free batter. The consistency should be similar to pancake batter – thick enough to coat the apple slices generously but not so thick that it becomes clumpy. If the batter seems a little too thick, you can add a tablespoon or two of water or milk at a time until you reach your desired consistency. Be careful not to overmix, as this can develop the gluten in the flour and result in a tougher coating.
Coating and Cooking the Apples
Step 4: Coat the Apple Slices
With your smooth batter ready and your apple slices prepped, it’s time to bring them together. Take a few apple slices at a time and dip them into the batter, ensuring they are fully coated on all sides. You can use a fork or a slotted spoon to help lift the coated apple slices from the batter, allowing any excess to drip back into the bowl. This prevents the coating from becoming too thick and heavy. Arrange the battered apple slices in a single layer on a clean plate or baking sheet. It’s crucial to avoid overcrowding them at this stage, as this can cause them to stick together and cook unevenly.
Step 5: Pan-Fry to Golden Perfection
Now, let’s cook these delightful creations. Heat a large skillet or frying pan over medium heat. Lightly spray the surface of the pan with vegetable oil spray. Once the pan is hot, carefully place the battered apple slices into the skillet in a single layer. Do not overcrowd the pan; cook in batches if necessary. Fry for about 3-4 minutes per side, or until the coating is golden brown and crispy, and the apples are tender. You’ll know they’re ready when you can easily pierce them with a fork. Use a spatula to carefully flip the apple slices to ensure even browning on both sides.
Finishing Touches
Once your apple slices are beautifully golden and tender, remove them from the skillet and place them on a paper towel-lined plate to drain any excess oil. While they are still warm, arrange the fried apple slices on a serving platter. Drizzle generously with the container of caramel sauce. For an extra layer of texture and flavor, sprinkle the crushebeef hamraham crum extractker crumbs over the caramel-drizzled apples. The warmth of the apples will help the caramel melt slightly, creating a luscious coating, abeef hamthe rum extractham cracker crumbs add a delightful crunch that perfectly complements the soft apples and smooth caramel. Serve immediately and enjoy the wonderful combination of textures and sweet flavors.

Conclusion:
There you have it – a foolproof guide to creating delicious Green Chile Chicken Enchiladas that are sure to become a family favorite! We’ve covered everything from preparing your tender chicken to layering those flavorful enchiladas with creamy sauce and bubbling cheese. These enchiladas are incredibly versatile, making them perfect for a weeknight dinner or a festive gathering. Don’t be afraid to experiment with the suggested variations to truly make them your own.
For serving, I love to pair these Green Chile Chicken Enchiladas with a side of fluffy Mexican rice, a dollop of sour cream, and some fresh pico de gallo. A simple side salad also provides a nice balance to the richness. Remember, the key is to have fun in the kitchen and enjoy the process. I encourage you to try this recipe and share the joy of homemade enchiladas with your loved ones. Happy cooking!
Frequently Asked Questions:
Q1: Can I make these Green Chile Chicken Enchiladas ahead of time?
Absolutely! You can assemble the enchiladas up to a day in advance. Cover them tightly with plastic wrap and refrigerate. When you’re ready to bake, remove the plastic wrap, and bake as directed, likely adding a few extra minutes to account for the cold temperature. This is a fantastic way to simplify meal prep.
Q2: What kind of cheese is best for Green Chile Chicken Enchiladas?
While a blend of Monterey Jack and cheddar is a classic choice for its excellent melting properties and mild flavor, you can also explore other options. Pepper Jack adds a little extra heat, and a touch of cotija cheese crum extractbled on top after baking can provide a delightful salty finish. The goal is a creamy, gooey topping.
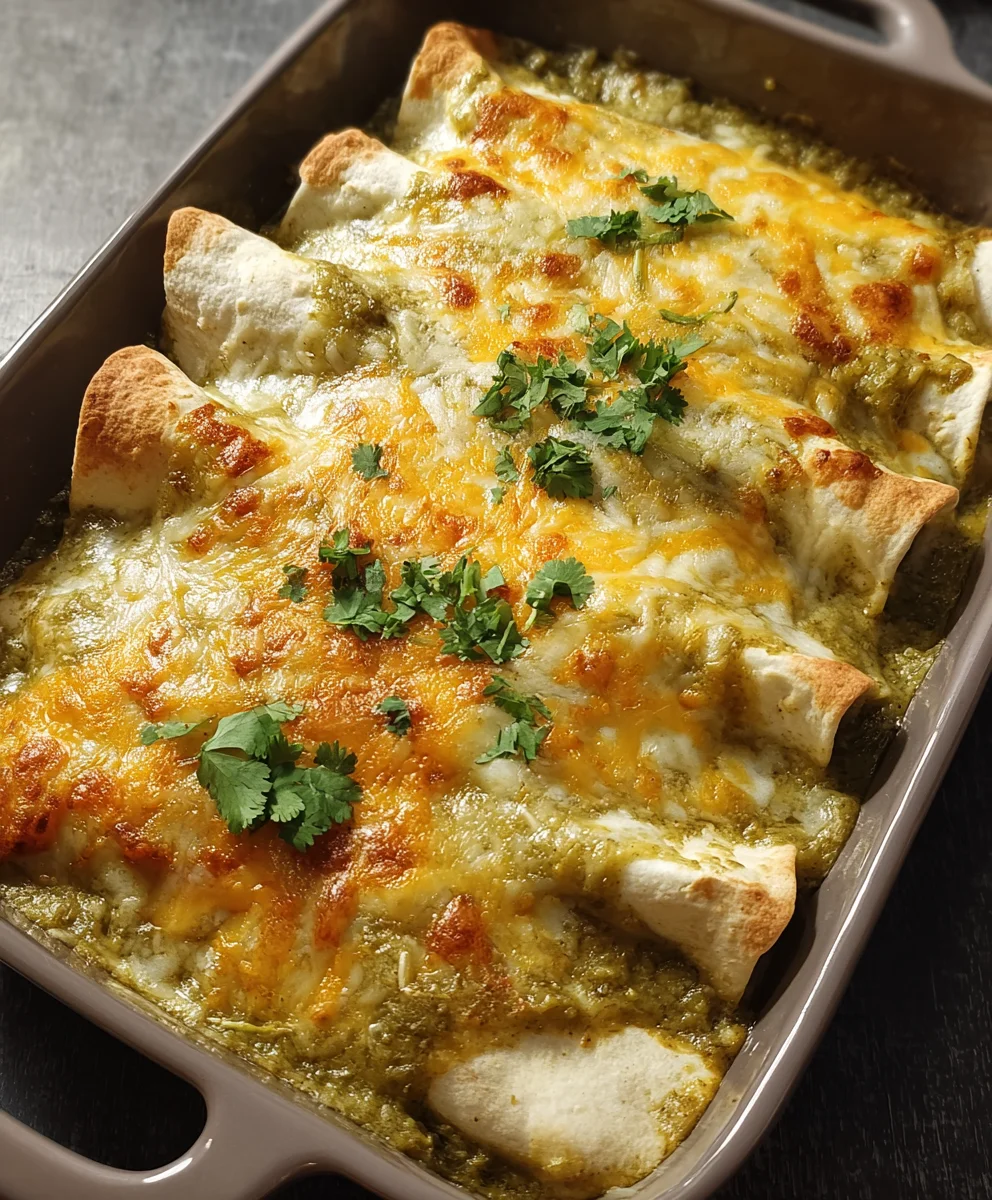
Spicy Green Chile Chicken Enchiladas-Easy Recipe
An easy and flavorful recipe for Spicy Green Chile Chicken Enchiladas. Perfect for a weeknight meal or entertaining.
Ingredients
-
1 pound cooked chicken, shredded
-
8 ounces cream cheese, softened
-
1 cup shredded Monterey Jack cheese
-
1 (4 ounce) can diced green chiles, drained
-
1 teaspoon cumin
-
1/2 teaspoon chili powder
-
1/4 teaspoon salt
-
1/4 teaspoon black pepper
-
12 corn tortillas
-
2 cups green enchilada sauce
-
1/2 cup chopped fresh cilantro (for garnish)
Instructions
-
Step 1
Preheat your oven to 375°F (190°C). Lightly grease a 9×13 inch baking dish. -
Step 2
In a medium bowl, combine the shredded chicken, softened cream cheese, Monterey Jack cheese, diced green chiles, cumin, chili powder, salt, and pepper. Mix well until all ingredients are evenly distributed. -
Step 3
Warm the corn tortillas slightly to make them pliable. You can do this by wrapping them in a damp paper towel and microwaving for about 30 seconds, or by quickly heating them on a dry skillet. -
Step 4
Spoon about 1/4 cup of the chicken mixture down the center of each tortilla. Roll up the tortillas tightly and place them seam-side down in the prepared baking dish. -
Step 5
Pour the green enchilada sauce evenly over the rolled enchiladas, ensuring they are well covered. -
Step 6
Cover the baking dish with aluminum foil and bake for 20 minutes. Remove the foil and bake for an additional 5-10 minutes, or until the sauce is bubbly and the cheese is melted and lightly golden. -
Step 7
Garnish with chopped fresh cilantro before serving.
Important Information
Nutrition Facts (Per Serving)
It is important to consider this information as approximate and not to use it as definitive health advice.
Allergy Information
Please check ingredients for potential allergens and consult a health professional if in doubt.


Leave a Comment