

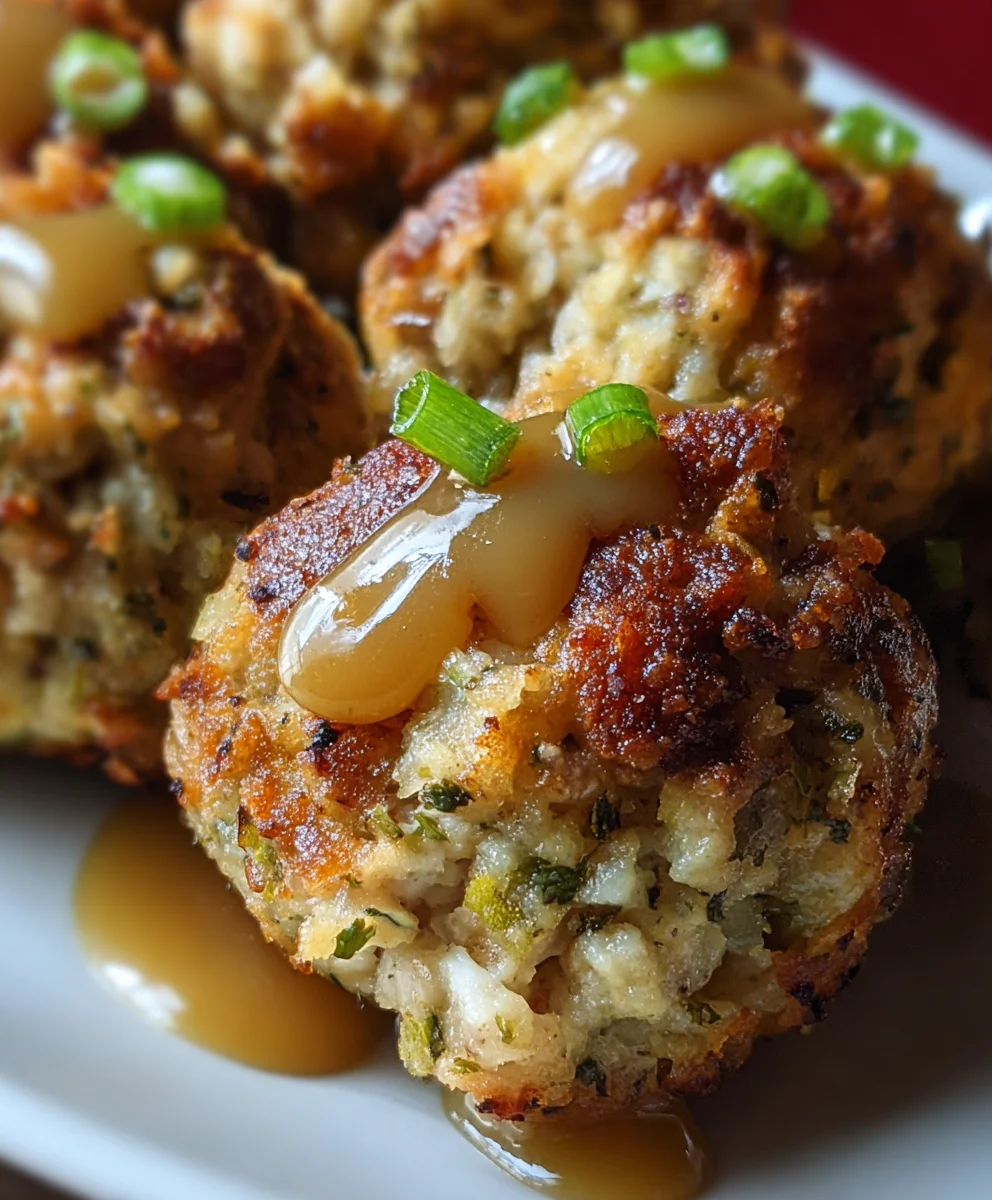
Savory Stuffing Balls: The Perfect Flavorful Side Dish for Your Holiday Table, and frankly, any table craving a burst of comforting, deliciousness! Forget those bland, mushy stuffing dishes of the past. We’re talking about little spheres of pure joy, each bite a harmonious blend of aromatic herbs, savory bread, and that irresistible, slightly crispy exterior that gives way to a wonderfully moist and flavorful center. This isn’t just a side dish; it’s a conversation starter, a crowd-pleaser, and the secret weapon that elevates your entire meal from good to absolutely unforgettable. People adore these stuffing balls because they capture all the nostalgic, heartwarming essence of traditional stuffing but in a sophisticated, easy-to-serve format that’s perfect for dipping, scooping, or simply savoring on their own. What truly makes our Savory Stuffing Balls: The Perfect Flavorful Side Dish for Your Holiday Table stand out is the meticulous balance of textures and the depth of flavor we achieve through a thoughtful selection of high-quality ingredients and a simple, yet effective, preparation method.

Ingredients:
- 1 cup unsalted butter, melted
- 1 large yellow onion, finely chopped
- 3 celery stalks, finely chopped
- 2 cloves garlic, minced
- 1 teaspoon dried sage
- 1 teaspoon dried thyme
- 1/2 teaspoon dried rosemary, crushed
- 1 teaspoon salt, plus more to taste
- 1/2 teaspoon black pepper, plus more to taste
- 12 cups day-old bread, cut into 1-inch cubes (a mix of sourdough and challah works wonderfully for texture and flavor)
- 4 cups low-sodium chicken broth
- 2 large eggs, lightly beaten
- 1/4 cup fresh parsley, chopped
Preparing the Aromatics and Bread Base
The foundation of any great stuffing lies in its aromatic vegetables and well-prepared bread. Begin by melting your unsalted butter in a very large skillet or Dutch oven over medium heat. Once shimmering, add the finely chopped large yellow onion and the finely chopped celery stalks. We want these vegetables to soften and become translucent, releasing their sweet, savory notes, but not to brown significantly. This process will take about 8-10 minutes. Stir them occasionally to ensure even cooking. Next, add the minced garlic to the skillet and cook for another minute until fragrant. Be careful not to burn the garlic, as it can turn bitter.
Now, it’s time to infuse our butter and vegetables with those classic holiday herbs. Stir in the dried sage, dried thyme, and the crushed dried rosemary. Cook for about 30 seconds, allowing the heat to awaken the oils in the herbs and release their potent aroma. This step is crucial for developing a deep, herbaceous flavor that will permeate the entire stuffing. Season the vegetable and herb mixture generously with 1 teaspoon of salt and 1/2 teaspoon of black pepper. Taste and adjust if needed; remember that the bread will absorb a lot of flavor.
In a large bowl, place your 12 cups of day-old bread cubes. Using day-old bread is key here because it has dried out slightly, which means it will absorb the liquid mixture without becoming mushy. If your bread is fresh, you can spread it out on a baking sheet and toast it in a 300°F (150°C) oven for about 10-15 minutes until it’s lightly dried. Pour the softened aromatic vegetable mixture directly over the bread cubes. Gently toss everything together, ensuring that the butter, herbs, and vegetables are distributed evenly throughout the bread. This preliminary coating sets the stage for the moisture and flavor that will bind everything together.
Binding and Baking the Stuffing Balls
In a separate medium bowl, whisk together the 4 cups of low-sodium chicken broth and the 2 lightly beaten large eggs. The eggs act as a binder, helping to hold the stuffing balls together once they’re formed and baked. Pour this liquid mixture over the bread and vegetable mixture. Gently fold and toss until all the bread cubes are moistened. You want the bread to be damp but not swimming in liquid. If it seems a little dry, you can add a splash more chicken broth, about 1/4 cup at a time. If it seems too wet, you can add a few more dried bread cubes. Finally, stir in the 1/4 cup of fresh chopped parsley for a burst of freshness and color.
Preheat your oven to 375°F (190°C). Line two large baking sheets with parchment paper for easy cleanup and to prevent sticking. Now, for the fun part – shaping the stuffing into balls! Using your hands, scoop about 1/2 cup of the stuffing mixture and gently pack it into a firm ball, about 2 inches in diameter. Don’t over-pack them, or they might become dense. Place the formed stuffing balls onto the prepared baking sheets, leaving a little space between each one. This recipe should yield approximately 18-24 stuffing balls, depending on their size.
Once all the stuffing balls are formed and arranged on the baking sheets, it’s time to bake them. Place the baking sheets in the preheated oven. Bake for 20-25 minutes, or until the stuffing balls are golden brown on the outside and heated through. For an extra crispy exterior, you can broil them for the last minute or two, watching them very closely to prevent burning.
Resting and Serving Your Savory Stuffing Balls
After baking, remove the stuffing balls from the oven. Let them rest on the baking sheets for at least 5-10 minutes before serving. This resting period allows them to firm up slightly more and makes them easier to handle. They will be very hot straight out of the oven.
To serve your Savory Stuffing Balls: The Perfect Flavorful Side Dish for Your Holiday Table, arrange them on a serving platter. You can garnish them with a few extra sprigs of fresh parsley or a sprinkle of finely chopped chives for a touch of elegance. These balls are wonderful served alongside roasted turkey, chicken, or pork. They also make a fantastic vegetarian option when prepared with vegetable broth instead of chicken broth, and you can add finely diced mushrooms to the aromatic base for an extra layer of umami.
Tips for Perfect Stuffing Balls
To ensure consistent moisture throughout your stuffing balls, it’s helpful to make sure the bread cubes are as uniform in size as possible. This way, they will all absorb the liquid at a similar rate. When mixing the bread with the wet ingredients, use a gentle touch. Aggressively stirring can break down the bread and lead to a mushy texture. If you prefer a more rustic texture, you can leave some of the bread cubes slightly larger. Don’t be afraid to taste the stuffing mixture before baking and adjust the salt and pepper. Remember that the flavor profile will intensify as it bakes. If you don’t have a mix of sourdough and challah, any sturdy, good-quality bread will work. Avoid soft, sandwich-style breads as they tend to fall apart.
Conclusion:
There you have it! We’ve walked through creating these absolutely delicious Savory Stuffing Balls: The Perfect Flavorful Side Dish for Your Holiday Table. These aren’t just any stuffing; they’re perfectly seasoned, delightfully crisp on the outside, and wonderfully moist on the inside, making them a standout addition to any meal. They offer a wonderful balance of savory herbs, rich bread, and aromatic vegetables that truly sing with flavor. I hope you enjoy making and serving them as much as I do!
For serving suggestions, these stuffing balls are a natural fit for Thanksgiving, Christmas, or any festive gathering. They pair beautifully with roasted turkey, ham, or even a hearty vegetarian roast. Don’t be afraid to get creative with variations! You can easily incorporate cooked bacon bits, sautéed mushrooms, dried cranberries for a touch of sweetness, or even a sprinkle of finely chopped pecans for added crunch. Experiment with different types of bread too – sourdough or a rustic whole wheat can offer unique textures and flavors. So go forth and make these stuffing balls your own!
Frequently Asked Questions:
Q1: Can I make these stuffing balls ahead of time?
Absolutely! You can prepare the stuffing mixture and form the balls a day in advance. Store them covered in the refrigerator. When you’re ready to cook, bake them directly from the fridge, adding a few extra minutes to the baking time as needed.
Q2: What’s the best way to reheat leftover stuffing balls?
For the best results and to maintain their crispiness, reheat them in a single layer on a baking sheet in a preheated oven at around 350°F (175°C) for 10-15 minutes, or until warmed through and slightly crisped. Microwaving can make them a bit soggy.

Savory Stuffing Balls – Flavorful Holiday Side Dish
Deliciously seasoned stuffing balls, a perfect flavorful side dish for your holiday table.
Ingredients
-
1 cup unsalted butter, melted
-
1 large yellow onion, finely chopped
-
3 celery stalks, finely chopped
-
2 cloves garlic, minced
-
1 teaspoon dried sage
-
1 teaspoon dried thyme
-
1/2 teaspoon dried rosemary, crushed
-
1 teaspoon salt, plus more to taste
-
1/2 teaspoon black pepper, plus more to taste
-
12 cups day-old bread, cut into 1-inch cubes
-
4 cups low-sodium chicken broth
-
2 large eggs, lightly beaten
-
1/4 cup fresh parsley, chopped
Instructions
-
Step 1
Melt butter in a large skillet over medium heat. Add chopped onion and celery, cooking until softened and translucent, about 8-10 minutes. Add minced garlic and cook for 1 minute until fragrant. -
Step 2
Stir in dried sage, thyme, and rosemary. Cook for 30 seconds until fragrant. Season with 1 teaspoon salt and 1/2 teaspoon pepper. Taste and adjust. -
Step 3
Place bread cubes in a large bowl. Pour the softened vegetable and herb mixture over the bread and toss to coat evenly. -
Step 4
In a separate bowl, whisk together chicken broth and beaten eggs. Pour over the bread mixture and gently toss until moistened. Stir in fresh parsley. -
Step 5
Preheat oven to 375°F (190°C). Line two baking sheets with parchment paper. Scoop about 1/2 cup of the mixture and gently pack into firm balls, about 2 inches in diameter. -
Step 6
Place stuffing balls on prepared baking sheets, leaving space between them. Bake for 20-25 minutes, or until golden brown and heated through. Broil for the last minute or two for extra crispiness, watching closely. -
Step 7
Let stuffing balls rest for 5-10 minutes before serving. Garnish with fresh parsley if desired.
Important Information
Nutrition Facts (Per Serving)
It is important to consider this information as approximate and not to use it as definitive health advice.
Allergy Information
Please check ingredients for potential allergens and consult a health professional if in doubt.
Leave a Comment