

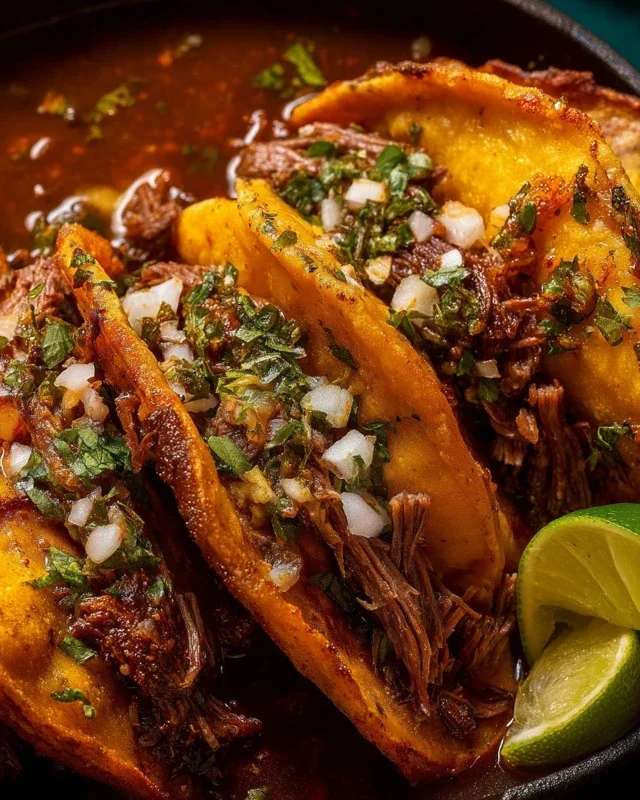
My Fave Birria Tacos are, quite frankly, a revelation. If you’ve ever experienced the deeply savory, chili-infused broth and impossibly tender, shredded meat that defines authentic birria, you understand the obsession. These aren’t just tacos; they’re an experience, a culinary hug that warms you from the inside out. What makes them so incredibly special? It’s the slow braising process, transforming humble cuts of meat into something truly magical. The rich, aromatic consommé, perfect for dipping, is the secret weapon that elevates these tacos from delicious to downright unforgettable. I’ve tweaked and perfected this recipe over time to capture that authentic flavor I crave, and I’m so excited to share My Fave Birria Tacos with you. Get ready for a flavor explosion!

My Fave Birria Tacos
Welcome to my kitchen, where we’re about to embark on a culinary adventure that will transport your taste buds straight to Mexico! Birria tacos have taken the food world by storm, and for good reason. They are a symphony of rich, savory, and slightly spicy flavors, with tender, fall-apart meat simmered in a deeply flavorful broth. And the best part? Making them at home is incredibly rewarding, and surprisingly manageable. Today, I’m sharing my absolute favorite way to make birria tacos, a recipe that’s become a staple in my home. Get ready for an experience that’s both comforting and exciting!
Ingredients:
Cooking Instructions
Phase 1: Preparing the Chile Base
This is where the magic begin extracts! The foundation of any great birria is its complex chile sauce. We need to rehydrate our dried peppers to unlock their full flavor potential. Start by removing the stems and seeds from the dried guajillo and ancho chiles. A quick way to do this is to make a slit down the side of each pepper and shake out the seeds. Don’t worry if a few seeds remain, as they can add a little extra heat, but generally, removing most of them will give you a more balanced flavor. Next, place these seeded chiles in a heatproof bowl and cover them with hot water. Let them soak for about 20-30 minutes, or until they become pliable and soft.
While the dried chiles are soaking, let’s prepare the other components of our chile paste. In a dry skillet over medium heat, lightly toast the chopped onion and garlic cloves until they are fragrant and slightly softened. This toasting process deepens their flavor and removes any raw bite. Be careful not to burn them! Once toasted, transfer the onion and garlic to a blender. Add the soaked and drained guajillo and ancho chiles to the blender as well. Now, it’s time to introduce the smoky and spicy kick of the chipotle peppers in adobo. Add the four chipotle peppers along with a tablespoon or two of their adobo sauce. This sauce is incredibly flavorful and will contribute a wonderful depth. Also, toss in the crushed tomatoes, beef stock (or water), and apple cider vinegar. The apple cider vinegar adds a crucial tangin extractess that cuts through the richness of the meat and chiles.
Now, add in all the dried spices: the Mexican oregano, thyme, cumin, cinnamon, smoked paprika, and allspice. Don’t forget the bay leaves! Blend all these ingredients until you have a smooth, vibrant paste. If the mixture is too thick to blend smoothly, you can add a little more beef stock or water, a tablespoon at a time, until you reach a pourable consistency. This chile paste is the heart and soul of your birria, so take a moment to appreciate its beautiful color and aroma!
Phase 2: Braising the Beef
Now that our flavor base is ready, it’s time to cook the star of the show: the beef. Season your beef chuck roast generously with salt and freshly ground black pepper. You want a good coating of seasoning to enhance the beef’s natural flavor. In a large Dutch oven or heavy-bottomed pot, heat a tablespoon of oil over medium-high heat. Sear the beef chunks on all sides until deeply browned. This browning process, also known as the Maillard reaction, creates incredible depth of flavor and a beautiful crust on the meat. Don’t overcrowd the pot; sear the beef in batches if necessary to ensure good browning.
Once all the beef is seared, remove it from the pot and set it aside. Pour off any excess fat, leaving about a tablespoon in the pot. Add the blended chile paste to the pot and cook over medium heat for about 5-7 minutes, stirring constantly. This step is essential for “blooming” the spices and intensifying their flavors. You’ll notice the paste becoming more fragrant and its color deepening. It’s an incredible aroma that fills the kitchen!
Return the seared beef to the pot, nestling it into the chile paste. Add any leftover adobo sauce from the chipotle peppers if you have any, and the bay leaves. Pour in enough additional beef stock or water to mostly cover the meat. We want the meat to be submerged but not completely drowning, as we want the broth to become rich and flavorful with the beef drippings. Bring the liquid to a simmer, then reduce the heat to low, cover the pot tightly, and let it braise. This is where patience comes in. You’ll want to braise the beef for at least 3 to 4 hours, or until the meat is incredibly tender and easily falls apart with a fork. The longer it braises, the more tender and flavorful it will become. You can also cook this in a slow cooker on low for 6-8 hours or on high for 4-5 hours.
Phase 3: Preparing the Tacos
Once the beef is fork-tender, carefully remove the chunks from the broth and place them on a cutting board. You can shred the meat using two forks or chop it into smaller, taco-sized pieces. The broth, however, is pure liquid gold! Strain the braising liquid through a fine-mesh sieve into a separate bowl or container. Discard the solids (bay leaves, any bits of onion or garlic that didn’t break down). You’ll notice a layer of fat on top of the broth. Skim off most of this fat, but reserve a few tablespoons. This fat, called “consommé,” is crucial for frying your tortillas to achieve that perfect crispy exterior and imparting an incredible flavor to the taco.
Now it’s time to assemble your tacos. Heat a skillet or griddle over medium-high heat. Dip each corn tortilla into the reserved consommé, ensuring it’s lightly coated on both sides. Then, place the consommé-dipped tortilla onto the hot skillet and cook for about 1-2 minutes per side, until lightly golden and pliable. Don’t overcook them, or they’ll become brittle.
Place a generous portion of your shredded or chopped birria meat onto one half of each warmed tortilla. Fold the tortilla in half to create your taco. You can either serve them as is, or for an extra crispy delight, you can pan-fry them again in a little of the reserved consommé until golden brown and slightly crispy. This is my favorite way to enjoy them! Serve immediately with your favorite toppings. The finely chopped white onion and fresh cilantro add a bright, fresh contrast to the rich meat, while lime wedges provide a zesty finish. Enjoy these incredibly flavorful and satisfying birria tacos – they are truly my favorite!

Conclusion:
I truly hope you give My Fave Birria Tacos recipe a try! These aren’t just tacos; they’re a flavor explosion waiting to happen. The slow-cooked, tender beef infused with smoky chilies and aromatic spices creates an incredibly rich and satisfying experience. The beauty of this recipe lies in its adaptability. Whether you’re a seasoned cook or just starting out, you’ll find the steps manageable, and the results are consistently spectacular. Don’t be intimidated by the ingredients; the payoff is immense. These birria tacos are perfect for a cozy family dinner, a lively get-together with friends, or even a special treat for yourself. I love serving them with a side of fluffy rice and a simple pico de gallo for a fresh contrast.
Frequently Asked Questions:
Can I make the birria ahead of time?
Absolutely! The birria itself is even better when made a day in advance, allowing the flavors to meld beautifully. Store it in an airtight container in the refrigerator, then reheat gently before assembling your tacos.
What if I don’t have all the chili peppers?
While the specific chilies contribute to the authentic flavor profile, you can certainly adapt. Dried ancho chilies provide a deep, smoky, and slightly sweet flavor. If you can’t find guajillo, a combination of ancho and a touch of paprika can offer a decent alternative. Experimenting is part of the fun!
Are there vegetarian or vegan alternatives for the birria?
While this recipe is for traditional beef birria, you could explore a mushroom-based “birria” for a vegetarian option. Sautéing a variety of mushrooms with similar spices and broth might yield a savory and satisfying result. A jackfruit birria is another popular vegan adaptation.
My Fave Birria Tacos
Authentic and flavorful birria tacos made with tender shredded pork and a rich, aromatic broth.
Ingredients
-
4 dried guajillo peppers
-
4 dried ancho chiles
-
4 chipotle peppers in adobo
-
1 onion, chopped
-
4 garlic cloves
-
1/2 cup crushed tomatoes
-
1/2 cup organic beef stock
-
1 Tbsp apple cider vinegar
-
2 bay leaves
-
2 Tbsps Mexican oregano
-
1 tsp dried thyme
-
1/2 tsp cumin
-
1/2 tsp ground cinnamon
-
1/2 tsp smoked paprika
-
1/2 tsp ground allspice
Instructions
-
Step 1
Toast dried chiles in a dry skillet until fragrant, then rehydrate in hot water for 20 minutes. -
Step 2
In a blender, combine rehydrated chiles, chopped onion, garlic cloves, crushed tomatoes, beef stock, and apple cider vinegar. Blend until smooth. -
Step 3
In a Dutch oven or large pot, sear pork shoulder (about 2-3 lbs, cubed) on all sides. Add the blended chile mixture, bay leaves, Mexican oregano, thyme, cumin, cinnamon, smoked paprika, and allspice. -
Step 4
Add enough water or beef stock to cover the pork. Bring to a boil, then reduce heat, cover, and simmer for at least 3 hours, or until the pork is fork-tender. -
Step 5
Remove the pork from the broth and shred it using two forks. Skim fat from the surface of the broth. Return shredded pork to the broth and stir to combine. -
Step 6
Warm tortillas on a griddle, dip them in the birria consommé (broth), and fill with shredded birria. Serve with chopped onions, cilantro, and lime wedges.
Important Information
Nutrition Facts (Per Serving)
It is important to consider this information as approximate and not to use it as definitive health advice.
Allergy Information
Please check ingredients for potential allergens and consult a health professional if in doubt.
Leave a Comment