

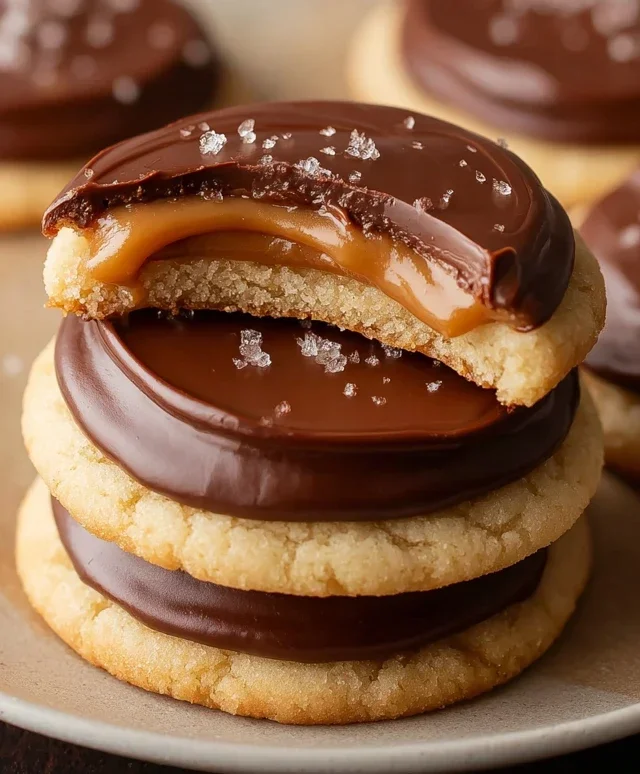
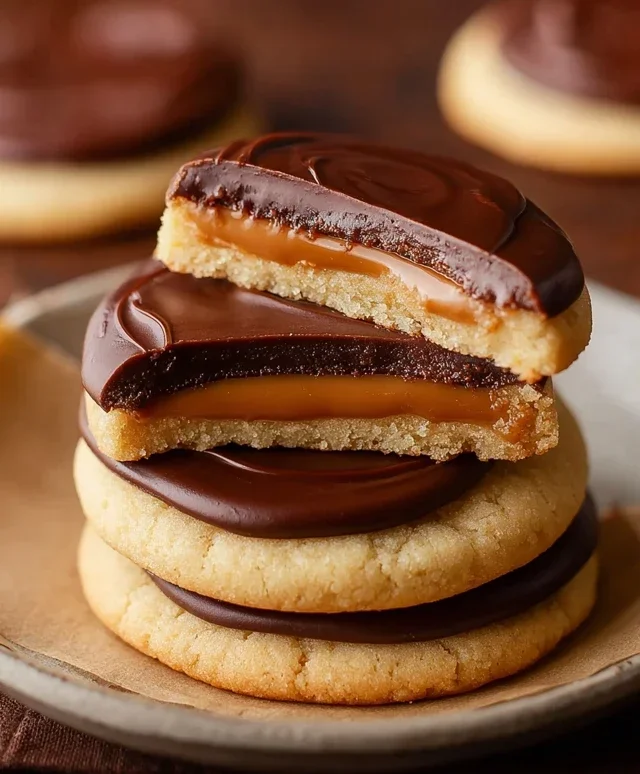
Twix Cookies are a delightful departure from the ordinary, a sweet tribute to that beloved candy bar, reimagin extracted in cookie form. I’ve always been a sucker for the perfect balance of textures and flavors, and these Twix Cookies absolutely nail it. Think of that satisfying snap of the shortbread base, the gooey, golden caramel drizzle, and the rich chocolatey finish – all in one bite. It’s no wonder everyone gravitates towards these. They capture the essence of the classic Twix bar, but with the comforting warmth and homemade charm that only a cookie can provide. What makes these truly special is how they manage to be both sophisticated and incredibly approachable, a guaranteed crowd-pleaser for any occasion. Get ready to experience pure cookie bliss!

Twix Cookies
Get ready to embark on a delicious journey that brings the iconic taste of Twix bars into cookie form! These Twix Cookies are incredibly easy to make, requiring minimal fuss but delivering maximum flavor. They boast a buttery shortbread-like base, a luscious layer of gooey caramel, and are finished with a decadent chocolate drizzle. Whether you’re a seasoned baker or just starting out, these cookies are sure to be a hit. They are perfect for bake snon-alcoholic ales, parties, or simply treating yourself to something truly special. The simplicity of using a cake mix as a base means less measuring and more enjoyment, and the result is a cookie that rivals any store-bought treat. The texture is wonderfully crum extractbly yet tender, and the interplay of sweet caramel and rich chocolate is simply irresistible. Let’s get baking!
Ingredients:
Preparing the Cookie Dough
The foundation of our Twix Cookies is a simple yet incredibly effective dough. We begin extract by combining the dry ingredients. In a large mixing bowl, add your entire box of white cake mix and the ¾ cup of all-purpose flour. Whisk these together gently to ensure they are well combined. This mixture forms the base that will give our cookies their delightful texture. Next, we introduce the fat. To the dry ingredients, add the 1 cup of softened salted butter. It’s important that the butter is softened, not melted, as this will allow it to incorporate smoothly into the dry ingredients and create a crum extractbly dough that holds together beautifully. You can use a pastry blender, a fork, or even your hands to cut the butter into the dry ingredients until the mixture resembles coarse crum extractbs. Don’t overmix at this stage; we’re looking for a texture where you can still see small pieces of butter. This will contribute to the cookie’s tender crum extractb. Once you have this crum extractbly texture, you can then gently begin extract to bring the dough together. Press it with your hands, and it should start to clump and hold its shape. If it seems a little too dry and won’t come together, you can add another tablespoon of softened butter, but be careful not to make it too wet. The goal is a dough that is slightly crum extractbly but can be pressed into a cohesive ball.
Forming and Baking the Cookie Base
Once your dough has come together, it’s time to shape it. Preheat your oven to 350 degrees Fahrenheit (175 degrees Celsius) and line baking sheets with parchment paper. Parchment paper is your friend here, as it prevents sticking and makes for easy cleanup. Now, take about 1 to 2 tablespoons of the dough and roll it into a ball, then flatten it slightly on the prepared baking sheet. You can also gently press them down with the bottom of a glass or your palm. Leave about 2 inches of space between each cookie as they will spread slightly during baking. Our objective is to bake these until they are lightly golden around the edges, indicating they are cooked through but still retain a soft, chewy center. This usually takes about 10 to 12 minutes. Keep a close eye on them, as oven temperatures can vary. Once they are baked to perfection, remove the baking sheets from the oven and let the cookies cool on the sheets for a few minutes before transferring them to a wire rack to cool completely. This cooling period is crucial; attempting to caramelize or dip them while they are still warm will result in a mess. Patience here will be rewarded with perfectly formed cookie bases.
Crafting the Gooey Caramel Layer
While our cookie bases are cooling, we will prepare the luscious caramel topping. In a small, microwave-safe bowl, combine the 1 ¼ cups of caramel bits and the 1 Tablespoon of heavy cream. Microwave these ingredients in 30-second intervals, stirring well after each interval, until the caramel is completely melted and smooth. The heavy cream helps to create a wonderfully smooth and dippable caramel consistency. Be cautious when handling the hot caramel. Once the caramel is melted and smooth, let it cool slightly. You don’t want it to be piping hot when you apply it to the cookies, as this could cause the cookies to break. Aim for a consistency that is thick enough to coat but still pourable. If the caramel becomes too stiff as it cools, you can gently warm it up again in short bursts in the microwave, stirring thoroughly.
Assembling and Finishing the Twix Cookies
Now for the most exciting part – assembling our Twix Cookies! Once your cookie bases are completely cool, it’s time to add that irresistible caramel layer. You have a couple of options here. You can either drizzle the caramel over the tops of the cookies using a spoon or a piping bag, or you can dip the tops of the cookies into the slightly cooled caramel. For a drizzle effect, simply spoon small amounts of caramel onto each cookie and spread it gently with the back of the spoon to cover most of the surface. For a dipped effect, carefully dip the top half of each cooled cookie into the bowl of melted caramel, allowing any excess to drip back into the bowl. Place the caramel-coated cookies back onto the parchment-lined baking sheets or a clean sheet of parchment paper.
The Chocolatey Finnon-alcoholic ale
To complete the Twix Cookie experience, we need a rich chocolate coating. In a microwave-safe bowl, combine the 1 cup of semi-sweet chocolate chips (or mini semi-sweet chocolate chips for a smoother melt) and the ½ Tablespoon of salted butter. Melt these in the microwave in 30-second intervals, stirring thoroughly after each interval, until the chocolate is smooth and glossy. Similar to the caramel, let the chocolate cool slightly before applying it. You can then drizzle the melted chocolate over the caramel-coated cookies using a spoon or a piping bag, creating those signature chocolate stripes. Alternatively, you can dip the bottom half of the caramel-coated cookies into the melted chocolate. Once decorated, place the cookies back onto the parchment-lined baking sheets to set. You can speed up this process by placing the baking sheets in the refrigerator for about 15-20 minutes, or until the chocolate has hardened. Once set, your Twix Cookies are ready to be enjoyed! Store them in an airtight container at room temperature for up to 3-4 days.
Conclusion:
And there you have it – your ultimate guide to crafting these incredibly delicious Twix Cookies! I truly believe this recipe is a winner because it perfectly captures the iconic caramel and chocolate biscuit combination that makes Twix bars so beloved, but in a wonderfully chewy and satisfying cookie form. The balance of textures, from the crisp cookie base to the gooey caramel and smooth chocolate topping, is simply divine. These cookies are fantastic on their own, but they also make a delightful addition to any dessert platter, cookie exchange, or just as a special treat to brighten your day.
Don’t be afraid to get creative with variations! You could try drizzling with different kinds of chocolate, like dark or white chocolate, or even adding a sprinkle of sea salt on top for an extra flavor dimension. Perhaps stir in some chopped nuts with the caramel, or even a hint of espresso powder in the cookie dough for a mocha twist. I really encourage you to give this Twix Cookies recipe a try; I’m confident you’ll be just as delighted with the results as I am.
Frequently Asked Questions about Twix Cookies:
Q: How should I store my Twix Cookies?
A: Once cooled, store your Twix Cookies in an airtight container at room temperature for up to 3-4 days. They might even last a bit longer, but they are best enjoyed fresh!
Q: Can I make the caramel layer from scratch?
A: Absolutely! While using pre-made caramel candies is convenient and yields great results, you can certainly make your own homemade caramel sauce. Just ensure it’s cooled enough to handle but still pliable when you spread it over the cookie base.
Q: My chocolate topping melted unevenly. How can I get a smoother finish?
A: For a smoother chocolate topping, ensure your cookie base is completely cool. Melt your chocolate gently in a double boiler or in the microwave in short intervals, stirring frequently. Once melted, pour it evenly and spread with an offset spatula or the back of a spoon. Letting the chocolate set completely before cutting is key for clean lines.
Twix Cookies
Decadent cookies with a chewy caramel center, coated in chocolate.
Ingredients
-
1 box white cake mix (15.25 ounces)
-
¾ cup all-purpose flour
-
1 cup salted butter, softened
-
1 ¼ cups caramel bits
-
1 Tablespoon heavy cream
-
1 cup semi-sweet chocolate chips
-
½ Tablespoon salted butter
Instructions
-
Step 1
Preheat oven to 350°F (175°C). Line baking sheets with parchment paper. -
Step 2
In a large bowl, combine the white cake mix and ¾ cup all-purpose flour. -
Step 3
Add 1 cup of softened salted butter to the dry ingredients and mix until well combined and a dough forms. -
Step 4
In a small microwave-safe bowl, combine 1 ¼ cups caramel bits and 1 Tablespoon heavy cream. Microwave in 30-second intervals, stirring in between, until smooth. Alternatively, melt on the stovetop over low heat. -
Step 5
Scoop rounded tablespoons of cookie dough and flatten slightly. Place a small dollop of the melted caramel mixture onto the center of each cookie dough circle. Carefully fold the dough around the caramel to enclose it, forming a ball. Place balls onto prepared baking sheets. -
Step 6
Bake for 10-12 minutes, or until edges are lightly golden. -
Step 7
While cookies are baking, melt 1 cup semi-sweet chocolate chips and ½ Tablespoon salted butter in a microwave-safe bowl in 30-second intervals, stirring in between, until smooth. -
Step 8
Once cookies are removed from the oven and slightly cooled, drizzle the melted chocolate mixture over the top of each cookie. -
Step 9
Allow chocolate to set before serving.
Important Information
Nutrition Facts (Per Serving)
It is important to consider this information as approximate and not to use it as definitive health advice.
Allergy Information
Please check ingredients for potential allergens and consult a health professional if in doubt.
Leave a Comment