

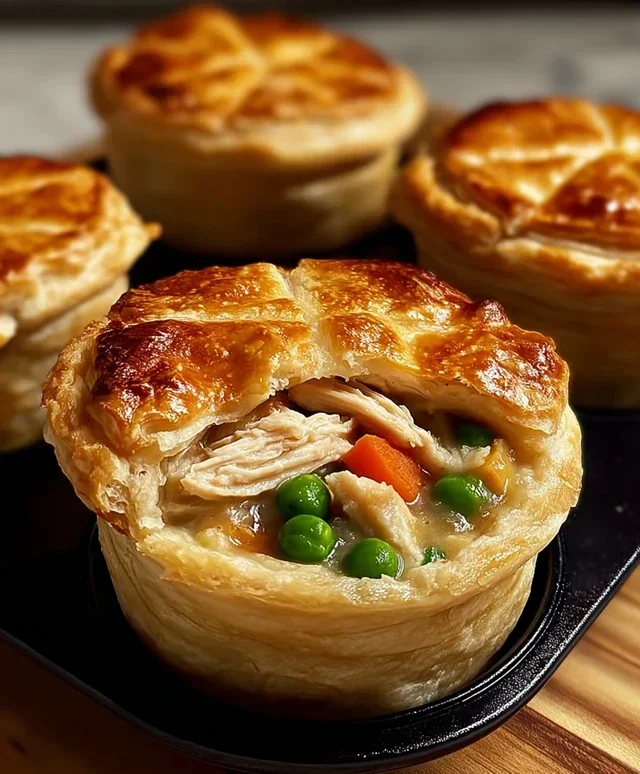
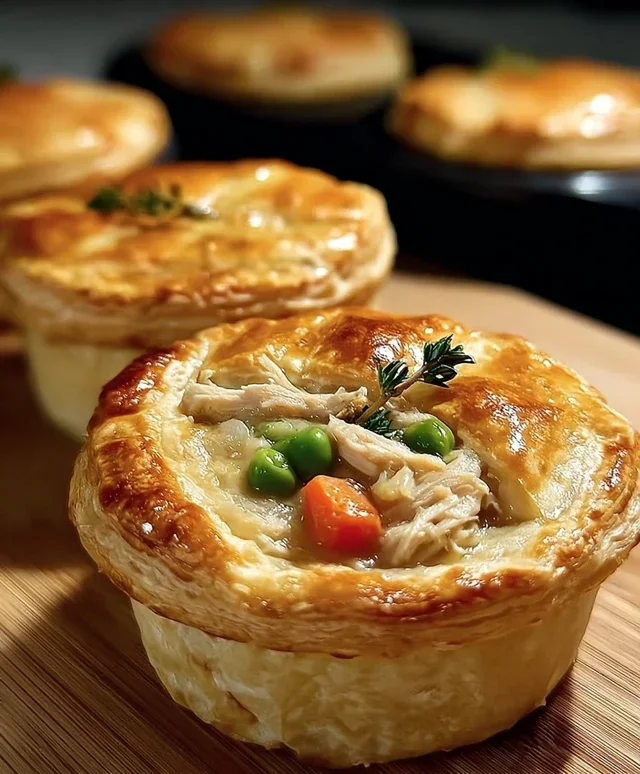
Mini Chicken Pot Pies are the ultimate comfort food, miniaturized for maximum delight! There’s something undeniably heartwarming about a flaky, golden crust giving way to a rich, creamy filling studded with tender chicken and garden-fresh vegetables. These aren’t just small pies; they’re individual parcels of pure joy, perfect for a cozy weeknight dinner, a delightful appetizer, or even a charming addition to a potluck. We all love the classic chicken pot pie for its nostalgic warmth, but these mini chicken pot pies take that familiar comfort and elevate it. The personal-sized portions mean no fighting over the best corner piece, and they bake up beautifully, creating a perfectly portioned savory treat that’s guaranteed to bring smiles. Get ready to fall in love with this classic, reinvented!

Mini Chicken Pot Pies
There’s something incredibly comforting about a classic chicken pot pie. The creamy, savory filling encased in a flaky crust is pure culinary bliss. But sometimes, a full-sized pot pie can feel a little… much. That’s where these adorable mini chicken pot pies come in! They’re perfect for individual servings, easier to manage, and honestly, just plain cute. They’re ideal for a weeknight dinner when you want something hearty and satisfying, or even for a casual gathering where individual portions are a plus. And the best part? They’re surprisingly simple to make, especially with a little help from your pantry staples. We’re going to take everyday ingredients and transform them into these delightful little flavor bombs. Let’s get started!
Ingredients:
Preparing the Filling
The heart of any good pot pie is its filling, and ours is wonderfully straightforward. We want a rich, flavorful mixture that’s perfectly seasoned and packed with those classic pot pie ingredients.
1. Cook the Chicken: Begin extract by cooking your diced chicken breast. You can do this in a skillet over medium-high heat with a little bit of oil or cooking spray until it’s cooked through and no longer pink. Alternatively, if you have leftover cooked chicken, you can dice that up and use it. Once cooked, set the chicken aside. This step ensures the chicken is tender and ready to be incorporated into the creamy filling. Make sure to dice it into small, bite-sized pieces so it distributes evenly throughout the pot pies.
2. Combine the Filling Ingredients: In a medium bowl, combine the cream of chicken soup, cooked diced chicken, frozen peas and carrots, garlic powder, onion powder, and salt. Stir everything together until it’s well combined and the chicken and vegetables are evenly coated in the creamy soup. The cream of chicken soup acts as our binder and provides a rich, savory base. The frozen peas and carrots are a classic pot pie addition, offering a touch of sweetness and color. The garlic and onion powders add depth of flavor without requiring extra chopping. Taste the filling at this stage and adjust seasoning if you feel it needs a little more salt or pepper.
Assembling the Mini Pot Pies
This is where the magic happens and these simple ingredients start to look like individual masterpieces. Using refrigerated biscuits makes this process incredibly fast and easy.
3. Prepare Your Muffin Tin: Preheat your oven to 375°F (190°C). Lightly grease a standard 12-cup muffin tin with cooking spray. This is crucial to prevent the biscuit dough from sticking and ensure you can easily remove your finished pot pies. If you don’t have cooking spray, a light brush of melted butter or vegetable oil will also work.
4. Create the Crust: Open your cans of refrigerated biscuits. You’ll want to work with them one at a time. For each biscuit, gently press and stretch it out a bit, then carefully press it into the bottom and up the sides of a muffin cup, creating a little shell. Try to get the dough to extend all the way to the top edge of the muffin cup. This will hold your delicious filling. You might need to gently coax the dough to fit; don’t worry if it’s not perfectly smooth. Repeat this with all 16 biscuits, so you have 16 individual crusts ready for filling. Make sure there are no holes or large gaps in the bottom of the biscuit shell, as this will cause your filling to leak out during baking.
5. Fill and Top: Spoon the chicken filling evenly into each of the biscuit-lined muffin cups. Don’t overfill them; leave a little bit of room at the top, as the filling will expand slightly as it heats up. Once all the cups are filled, take another biscuit from your cans. You can either flatten these biscuits and cut them into smaller rounds to act as lids, or if you’re feeling adventurous, you can get creative with decorative cutouts using cookie cutters. Place a biscuit lid on top of each filled cup, gently pressing the edges to seal it against the bottom crust. If you’re not using a full lid, you can also just place a smaller piece of biscuit dough on top. This step ensures that the filling is enclosed, creating that classic pot pie experience.
Baking and Serving
The final stretch is all about achieving that golden-brown, perfectly baked deliciousness.
6. Bake Until Golden: Place the prepared muffin tin into your preheated oven. Bake for 20-25 minutes, or until the biscuit crusts are golden brown and the filling is bubbly. You’ll want to keep an eye on them, as ovens can vary. If you notice the tops are browning too quickly before the filling is heated through, you can loosely tent the muffin tin with aluminum foil. Once they’re done, carefully remove the muffin tin from the oven. Let them cool in the tin for a few minutes – this is crucial! They will be very hot and the filling will be molten. After they’ve cooled slightly, you can use a small offset spatula or a butter knife to gently loosen the edges and lift the mini pot pies out of the muffin tin.
These mini chicken pot pies are best served warm. They make a complete meal on their own, or you can pair them with a simple side salad for a fresh contrast. Enjoy this comforting and adorable take on a classic!
Conclusion:
I hope you’re as excited about these mini chicken pot pies as I am! They truly are a delightful and charming way to enjoy a classic comfort food. The individual portions make them perfect for weeknight dinners, potlucks, or even as a fun appetizer. The creamy, savory chicken and vegetable filling encased in a flaky, golden crust is simply irresistible. We’ve created a recipe that’s surprisingly manageable, even for begin extractner bakers, and the result is a taste of pure homemade goodness. Don’t hesitate to experiment with different vegetables or herbs to make them your own!
For serving, these mini chicken pot pies are fantastic on their own, or you can pair them with a simple side salad for a complete meal. They also reheat beautifully, making them great for meal prepping. I encourage you to give this recipe a try – you won’t be disappointed!
Frequently Asked Questions:
Can I make the crust ahead of time?
Absolutely! You can prepare the pie crust dough up to 2 days in advance and store it tightly wrapped in the refrigerator. You can also freeze the dough for up to 3 months. Thaw it in the refrigerator overnight before you plan to use it.
What are some good variations for the filling?
The beauty of mini chicken pot pies is their versatility! You can swap out the vegetables for seasonal options like peas and carrots, corn, or even green beans. For a vegetarian version, use a plant-based chicken substitute or add extra heartier vegetables like mushrooms and potatoes. A sprinkle of fresh thyme or rosemary in the filling adds a wonderful aromatic touch.
How do I store leftover mini chicken pot pies?
Once cooled, store any leftover mini chicken pot pies in an airtight container in the refrigerator for up to 3 days. Reheat them in a 350°F (175°C) oven for about 10-15 minutes, or until heated through and the crust is crisp again. Microwaving is also an option, though the crust may soften.
Mini Chicken Pot Pies
Quick and easy individual chicken pot pies using refrigerated biscuits and canned soup.
Ingredients
-
2 cans refrigerated biscuits (8-count each)
-
0.5 lb boneless chicken breast, diced
-
1 cup frozen peas & carrots
-
1 can (10.5 oz) cream of chicken soup
-
0.5 tsp garlic powder
-
0.5 tsp onion powder
-
0.25 tsp salt
-
Cooking spray
Instructions
-
Step 1
Preheat oven to 375°F (190°C). Lightly grease an 8-cup jumbo muffin tin with cooking spray. -
Step 2
In a medium bowl, combine the diced chicken, frozen peas & carrots, cream of chicken soup, garlic powder, onion powder, and salt. Stir until well combined. -
Step 3
Open the cans of biscuits. Press each biscuit into the bottom and up the sides of each muffin cup, creating a crust. -
Step 4
Spoon the chicken mixture evenly into each biscuit-lined muffin cup. -
Step 5
Bake for 20-25 minutes, or until the biscuit crust is golden brown and the filling is bubbly. -
Step 6
Let the mini pot pies cool slightly in the muffin tin before carefully removing them.
Important Information
Nutrition Facts (Per Serving)
It is important to consider this information as approximate and not to use it as definitive health advice.
Allergy Information
Please check ingredients for potential allergens and consult a health professional if in doubt.


Leave a Comment