


Homemade Fruit Leather Recipe adventures are some of my absolute favorites in the kitchen, and for good reason! There’s something incredibly satisfying about transforming simple, fresh fruit into a chewy, intensely flavorful treat that’s both healthier and more delicious than anything you’ll find in a store. This homemade fruit leather is the perfect way to capture the vibrant essence of summer fruits, allowing you to enjoy their sweetness long after the season has passed. It’s the ultimate snack for kids and adults alike, a delightful burst of pure fruit flavor with a satisfyingly chewy texture. What truly makes this homemade fruit leather recipe so special is its simplicity and the endless possibilities for customization. You control the sweetness, the fruit combinations, and can even sneak in a boost of nutrients. Get ready to unleash your inner fruit alchemist!

Homemade Fruit Leather Recipe
There’s something incredibly satisfying about making your own fruit leather. It’s a wonderful way to preserve fresh fruit, especially when it’s in season and abundant. Plus, the taste of homemade fruit leather is leagues beyond anything you’ll find in a store – it’s pure, concentrated fruit flavor with just the right touch of sweetness. It’s also a fantastic healthy snack option for kids and adults alike, free from artificial colors and flavors. I love experimenting with different fruit combinations, but this basic recipe is a perfect starting point.
Ingredients:
Instructions:
Prepare Your Fruit
First things first, let’s get our fruit ready. You’ll need about 2 cups of chopped fruit. The beauty of fruit leather is its versatility! You can use almost any fruit you love. My personal favorites for this recipe include ripe strawberries, raspberries, blueberries, chopped peaches, or even thinly sliced apples. If you’re using apples, it’s a good idea to peel them first for a smoother texture. For berries, just give them a quick rinse. If you’re using larger fruits like peaches or mangoes, make sure to remove any pits or large seeds. Chop everything into relatively small, uniform pieces. This will help them cook down evenly. If your fruit is very watery, like watermelon or oranges (though I don’t recommend these for begin extractners as they can be trickier), you might need to cook them down a bit longer to achieve the right consistency.
Cook the Fruit
Once your fruit is chopped, it’s time to get it cooking. Transfer the chopped fruit to a medium saucepan. Add the 3 tablespoons of white sugar. The sugar acts as a preservative and also helps to enhance the natural sweetness of the fruit, but you can adjust this amount slightly depending on how sweet your fruit already is. You can also omit the sugar entirely if you prefer a less sweet result, but be aware that the fruit leather might not be as pliable or last as long without it. Now, it’s time for the lemon juice. Squeeze the juice from half a lemon directly into the saucepan. The lemon juice is crucial! It not only adds a bright, fresh flavor that complements the fruit, but it also acts as a natural pectin, helping the mixture to thicken and set properly. Stir everything together to combine. Place the saucepan over medium heat. Your goal here is to cook the fruit until it softens and breaks down, releasing its juices. Stir frequently to prevent sticking and burning. This process can take anywhere from 10 to 20 minutes, depending on the type of fruit you’re using. You’re looking for a consistency similar to applesauce, where the fruit is completely soft and mushy, and most of the liquid has evaporated or been incorporated into the fruit pulp.
Blend the Mixture
After the fruit has cooked down and is nice and soft, it’s time to create that smooth, spreadable texture for your fruit leather. Carefully transfer the cooked fruit mixture to a blender or a food processor. If you don’t have either of these appliances, you can use an immersion blender directly in the saucepan, making sure it’s safe to do so. Blend the mixture until it’s completely smooth and no chunks of fruit remain. You want a velvety consistency, like a very thick purée. If the mixture seems too thick and is struggling to blend, you can add a tablespoon or two of water or fruit juice at a time until it reaches the desired smoothness. It’s important to get it as smooth as possible at this stage because once it’s baked, any remaining lumps will remain. Taste the purée at this point and adjust sweetness if you feel it needs it, though I usually find the initial sugar amount to be perfect.
Spread and Bake
Now for the fun part! Preheat your oven to its lowest setting, usually around 170-200°F (77-93°C). This is a very low temperature, essentially dehydrating the fruit purée rather than baking it. Line a baking sheet with parchment paper or a silicone baking mat. Make sure the parchment paper or mat covers the entire surface of the baking sheet, extending up the sides slightly if possible, to create a contained area for the fruit leather. Pour the blended fruit purée onto the prepared baking sheet. Using an offset spatula or the back of a spoon, spread the purée evenly into a thin, uniform layer. Aim for a thickness of about 1/8 to 1/4 inch. The thinner you spread it, the quicker it will dehydrate and the chewier your fruit leather will be. Try to spread it as evenly as possible across the entire surface of the parchment paper or mat to ensure even drying. If you want multiple flavors, you can divide the purée and spread them in separate sections.
Dehydrate and Cool
Place the baking sheet in the preheated oven. Now, the waiting game begin extracts! You’ll need to let the fruit leather dehydrate for a considerable amount of time, usually 4 to 8 hours, sometimes even longer, depending on your oven’s temperature and the humidity in your kitchen. The goal is for the fruit leather to be no longer sticky to the touch. It should be firm and leathery, but still pliable. You can check on it periodically, starting after about 3-4 hours. If you notice any parts drying faster than others, you can rotate the baking sheet. Once it feels dry and no longer tacky, carefully remove the baking sheet from the oven. Let the fruit leather cool completely on the baking sheet. This cooling process is essential; it allows the leather to firm up further. Once it’s fully cooled, you can peel it off the parchment paper. If it seems to be sticking in places, gently lift an edge and peel it back.
Cut and Store
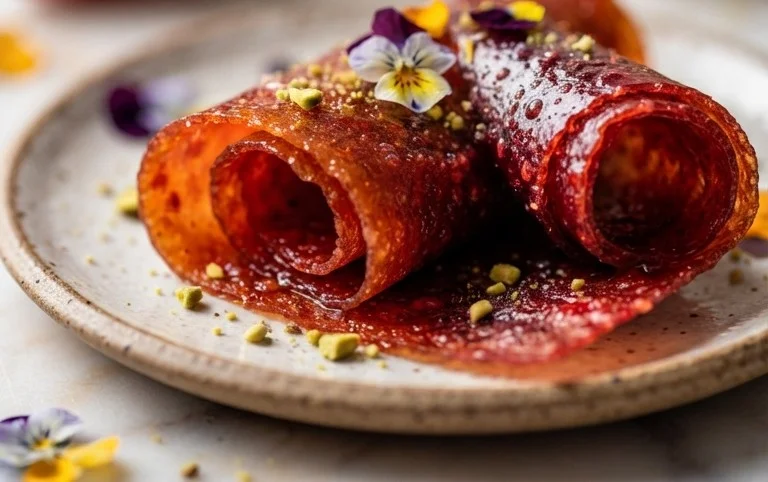
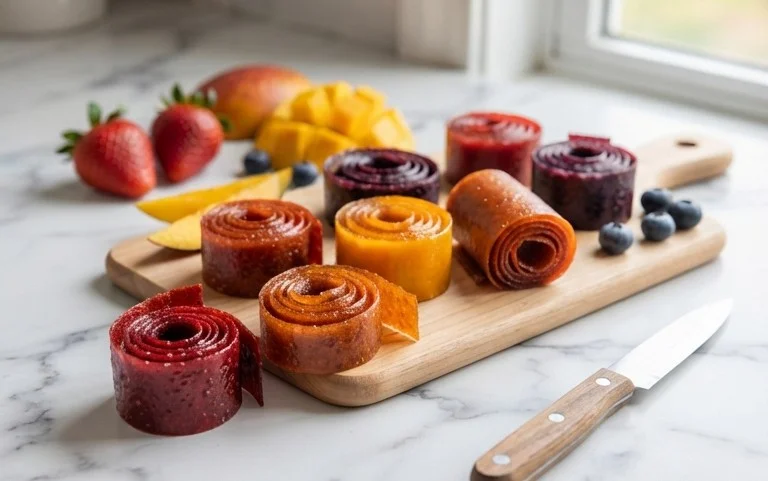
Once your fruit leather has cooled and is completely dry, it’s ready to be enjoyed! You can cut it into strips, squares, or any shape you desire using kitchen scissors or a sharp knife. Rolling up the strips is a classic way to present fruit leather, and it makes it easy for little hands to hold. To store your homemade fruit leather, wrap individual pieces tightly in plastic wrap or wax paper. You can also stack them in an airtight container. Properly stored, homemade fruit leather can last for several weeks at room temperature. If you live in a very humid environment, it’s best to store it in the refrigerator to prevent it from becoming sticky or moldy. This is a fantastic way to pack a healthy, homemade treat for lunches, snacks, or even on the go. Enjoy the delicious taste of pure fruit!
Conclusion:
Creating your own homemade fruit leather is a wonderfully rewarding experience, and as you’ve seen, it’s surprisingly simple to achieve! This recipe offers a fantastic way to preserve the vibrant flavors of fresh fruit, creating a healthy and delicious snack that everyone will love. It’s a guilt-free treat perfect for lunchboxes, after-school snacks, or even a sweet indulgence for yourself. The satisfaction of pulling perfectly pliable, intensely flavored fruit leather from your oven is truly something special.
Don’t be afraid to get creative with your serving suggestions! Slice it into fun shapes for kids, roll it up into pinwheels, or simply tear off a piece to enjoy its chewy goodness on its own. For variations, the possibilities are endless. Try combining different fruits for unique flavor profiles – think strawberry-banana, raspberry-apple, or mango-lime. You can also experiment with adding a touch of cinnamon, gin extractger, or even a hint of chili for a spicy kick. I wholeheartedly encourage you to gather your favorite fruits and give this homemade fruit leather recipe a try. You won’t be disappointed!
Frequently Asked Questions (FAQs):
Why is my fruit leather not drying completely?
Ensure your oven temperature is consistently low and that you are allowing enough drying time. Thicker fruit purees will naturally take longer to dry. Also, check that your oven door is slightly ajar to allow moisture to escape; some ovens have a “vent” setting that works well. If it’s humid where you are, it can also slow down the drying process.
Can I make fruit leather without an oven?
Yes! You can use a dehydrator if you have one, following the manufacturer’s instructions for fruit leathers. Another alternative is to use a very sunny, dry day and let it dry outdoors on screens or racks, though this method requires more attention and protection from insects.
How long does homemade fruit leather last?
When stored properly, airtight at room temperature, your homemade fruit leather can last for several weeks. For longer storage, wrap it tightly and keep it in the refrigerator, where it can last for a few months. Freezing is also an option for even longer preservation.
Homemade Fruit Leather
A simple and delicious way to preserve fresh fruit into a chewy, sweet treat. Perfect for snacks!
Ingredients
-
2 cups fruit, chopped
-
3 tbsp white sugar
-
1/2 whole lemon, just the juice
-
1/4 tsp cinnamon
-
1/4 tsp vanilla extract
-
Pinch of salt
Instructions
-
Step 1
Puree the chopped fruit in a blender or food processor until smooth. For very fibrous fruits, you may want to strain the puree. -
Step 2
In a saucepan, combine the fruit puree, white sugar, and lemon juice. Stir well to dissolve the sugar. -
Step 3
Cook over medium-low heat, stirring frequently, until the mixture thickens to a jam-like consistency, about 10-15 minutes. The sugar should be completely dissolved. -
Step 4
Stir in the cinnamon, vanilla extract, and a pinch of salt. Mix thoroughly. -
Step 5
Preheat your oven to its lowest temperature setting, ideally around 170°F (75°C). Line a baking sheet with parchment paper or a silicone baking mat. -
Step 6
Pour the fruit mixture onto the prepared baking sheet and spread it evenly into a thin layer (about 1/8 inch thick). Aim for a uniform thickness for even drying. -
Step 7
Bake in the preheated oven for 2-4 hours, or until the fruit leather is no longer sticky to the touch and can be easily peeled from the parchment paper. Drying time will vary depending on your oven and the thickness of the leather. -
Step 8
Let the fruit leather cool completely on the baking sheet before cutting it into strips or shapes. Store in an airtight container at room temperature.
Important Information
Nutrition Facts (Per Serving)
It is important to consider this information as approximate and not to use it as definitive health advice.
Allergy Information
Please check ingredients for potential allergens and consult a health professional if in doubt.

Leave a Comment