

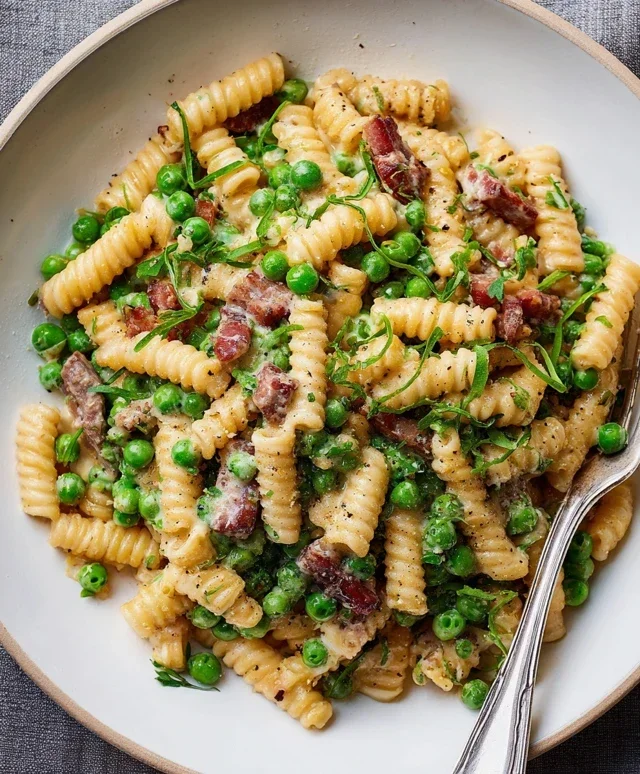
Creamy Pasta with Peas and Beef Beef Beef Beef Pancetta is an absolute dream for any pasta lover. If you’re looking for a dish that screams comfort, flavor, and a touch of indulgence, you’ve found it. We all have those meals that just hit the spot, the ones that make you feel warm and fuzzy from the inside out, and this creamy pasta dish is undoubtedly one of them. What makes this particularly special is the irresistible combination of tender, savory beef, the sweet pop of peas, and the wonderfully crispy, salty delight of beef pancetta. The creamy sauce binds everything together in a harmonious symphony of textures and tastes, making every bite an experience. This isn’t just dinner; it’s a culinary hug in a bowl.
Why You’ll Love This Dish
The Perfect Blend of Comfort and Sophistication
This recipe takes a classic creamy pasta base and elevates it with a trio of irresistible ingredients. The sweetness of fresh peas provides a delightful contrast to the rich, savory notes of the beef. And let’s talk about the beef pancetta – its crispy, salty goodness is truly the star, adding an incredible depth of flavor and a satisfying crunch that transforms a simple pasta dish into something truly memorable. It’s a dish that feels both familiar and exciting, perfect for a weeknight treat or a special occasion.

Creamy Pasta with Peas and Beef Beef Pancetta
This dish is a weeknight warrior, a true comfort food cbeef hampion that’s surprisingly quick to whip up. The salty, crispy crunch of beef beef pancetta, the sweet pop of peas, and the velvety embrace of a creamy sauce come together in perfect harmony. It’s sophisticated enough for guests but simple enough for a Tuesday. Let’s get cooking!
Ingredients:
Cooking Instructions
1. Get the Pasta Water Boiling
First things first, let’s get our pasta cooking. Fill a large pot with plenty of water, add a generous pinch of salt (think a tablespoon – it should taste like the sea!), and bring it to a rolling boil over high heat. Once it’s boiling, add your 220g of dried pasta. Stir it occasionally to prevent it from sticking together. We’re aiming for al dente, which means cooked through but still with a slight bite. Check the pasta package for the recommended cooking time and start testing a minute or two before it’s done.
2. Render the Beef Beef Pancetta
While the pasta is doing its thing, we’ll build the flavor base for our sauce. Place a large skillet over medium heat. Add the 1 tablespoon of olive oil. Once the oil is shimmering, add your 120g of beef beef pancetta cubes. We want to cook the beef pancetta slowly to render out its fat and achieve a beautiful crispness. Stir the beef pancetta occasionally, allowing it to brown and crisp up. This process usually takes about 8-10 minutes. Once it’s golden brown and crispy, use a slotted spoon to remove the beef pancetta from the skillet and set it aside on a plate lined with paper towels to drain any excess fat. Don’t discard all of the rendered fat in the pan – that’s liquid gold for our sauce! Leave about 1-2 tablespoons of the delicious rendered fat in the skillet.
3. Sauté the Aromatics and Peas
Now that the beef pancetta is resting, we’ll infuse the rendered fat with garlic. Reduce the heat slightly to medium-low. Add the 3 finely chopped garlic cloves to the skillet. Sauté for about 30-60 seconds, until fragrant but not browned. Burnt garlic can be bitter, so keep a close eye on it! Immediately after the garlic is fragrant, add the 120g of frozen peas to the skillet. Stir them into the garlic and rendered fat. Cook for just a minute or two, until the peas are bright green and heated through. They’ll cook quickly in the residual heat.
4. Create the Creamy Sauce
It’s time to make our sauce luxurious. Pour the 3/4 cup of cream into the skillet with the peas and garlic. Increase the heat to medium and bring the cream to a gentle simmer. Stir in the 50g of finely grated parmesan cheese. Continue stirring gently until the cheese is fully melted and the sauce begin extracts to thicken. This should happen relatively quickly. Once the sauce has reached your desired consistency, stir in the 1/2 teaspoon of freshly cracked black pepper and the 1 tablespoon of fresh lemon juice. The lemon juice adds a wonderful brightness that cuts through the richness of the cream and parmesan. Taste the sauce and add salt as needed, remembering that the beef pancetta and parmesan are already quite salty.
5. Combine and Serve
By now, your pasta should be perfectly cooked. Using a slotted spoon or a pasta spider, transfer the cooked pasta directly from the boiling water into the skillet with the creamy sauce. Don’t worry about draining it completely; a little bit of pasta water clingin extractg to the strands will help the sauce adhere even better. Add the reserved crispy beef beef pancetta back into the skillet. Toss everything together gently, ensuring every piece of pasta is coated in the luscious sauce. If you’re using the optional arugula, add it now and toss it in the heat of the pasta and sauce – it will wilt slightly and add a peppery fresh element.
Serve this glorious pasta immediately. Divide it among bowls, and then go wild with extra grated parmesan cheese. For an extra pop of freshness, grate some lemon zest over each serving. Enjoy this incredibly satisfying and flavorful dish!
Conclusion:
There you have it – a truly delightful and satisfying recipe for Creamy Pasta with Peas and Beef Beef Pancetta! This dish is an absolute winner because it strikes the perfect balance between rich, savory flavors from the beef beef pancetta and the creamy sauce, while the sweet pops of peas add a welcome freshness. It’s deceptively simple to make, making it ideal for a weeknight treat, yet elegant enough for entertaining guests. The comforting nature of this pasta makes it a fantastic go-to when you’re craving something truly special.
I highly recommend serving this Creamy Pasta with Peas and Beef Beef Pancetta with a simple side salad dressed with a light vinaigrette, or perhaps some crusty bread to sop up every last drop of that luscious sauce. For variations, feel free to swap out the beef beef pancetta for regular beef bacon or even some Italian sausage for a different flavor profile. If you’re looking for a vegetarian option, you could omit the beef pancetta entirely and perhaps add some sautéed mushrooms for an earthy depth. I truly hope you give this recipe a try – I’m confident you’ll fall in love with it!
Frequently Asked Questions:
Q: Can I make this dish ahead of time?
While it’s best enjoyed fresh, you can prepare some components in advance. You can cook the beef pancetta and cook the pasta separately. Reheat them gently and then combine with the sauce just before serving to maintain the best texture and creaminess.
Q: What kind of pasta works best?
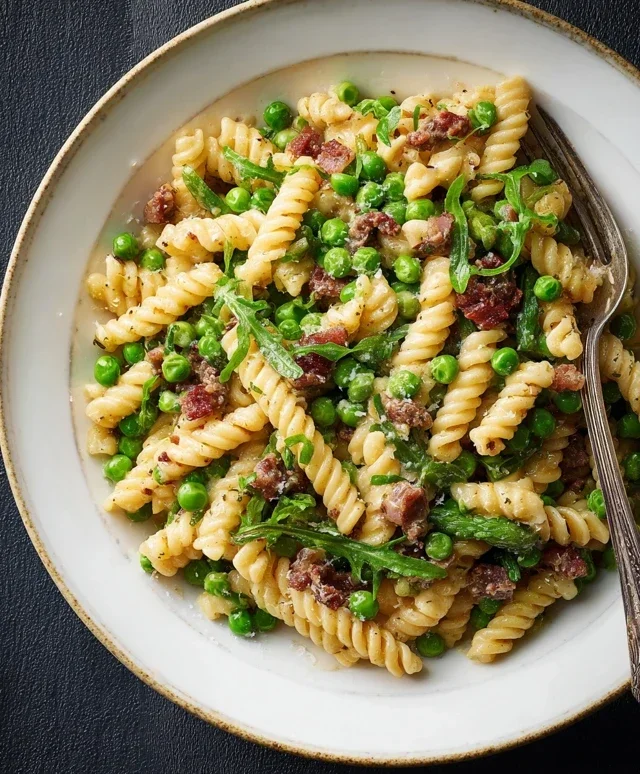
This recipe is wonderfully versatile! Short pasta shapes like penne, fusilli, or farfalle are excellent choices as they hold the creamy sauce beautifully. However, you could also use a long pasta like fettuccine or spaghetti if you prefer.
Creamy Pasta with Peas and Beef Pancetta
A quick and flavorful pasta dish featuring creamy sauce, sweet peas, and savory beef pancetta.
Ingredients
-
220 g dried pasta
-
1 tbsp olive oil
-
120 g beef pancetta (cut into small cubes)
-
3 cloves garlic (finely chopped)
-
120 g frozen peas
-
3/4 cup cream
-
50 g parmesan (finely grated)
-
1/2 tsp freshly cracked black pepper
-
1 tbsp fresh lemon juice
-
Salt to taste
-
Extra parmesan to serve
-
Optional: 1 cup packed arugula
Instructions
-
Step 1
Cook the pasta according to package directions. Reserve about 1/2 cup of pasta water before draining. -
Step 2
While the pasta cooks, heat olive oil in a large skillet over medium heat. Add the beef pancetta and cook until crispy, about 5-7 minutes. -
Step 3
Add the chopped garlic to the skillet and cook for 1 minute until fragrant, being careful not to burn it. -
Step 4
Stir in the frozen peas and cook for 2-3 minutes until bright green and heated through. -
Step 5
Pour in the cream and bring to a gentle simmer. Stir in the grated parmesan, black pepper, and lemon juice. Season with salt to taste. -
Step 6
Add the drained pasta to the skillet with the sauce. Toss to combine, adding a splash of reserved pasta water if needed to reach desired consistency. -
Step 7
Serve immediately, topped with extra parmesan, lemon zest, and optional arugula.
Important Information
Nutrition Facts (Per Serving)
It is important to consider this information as approximate and not to use it as definitive health advice.
Allergy Information
Please check ingredients for potential allergens and consult a health professional if in doubt.

Leave a Comment