

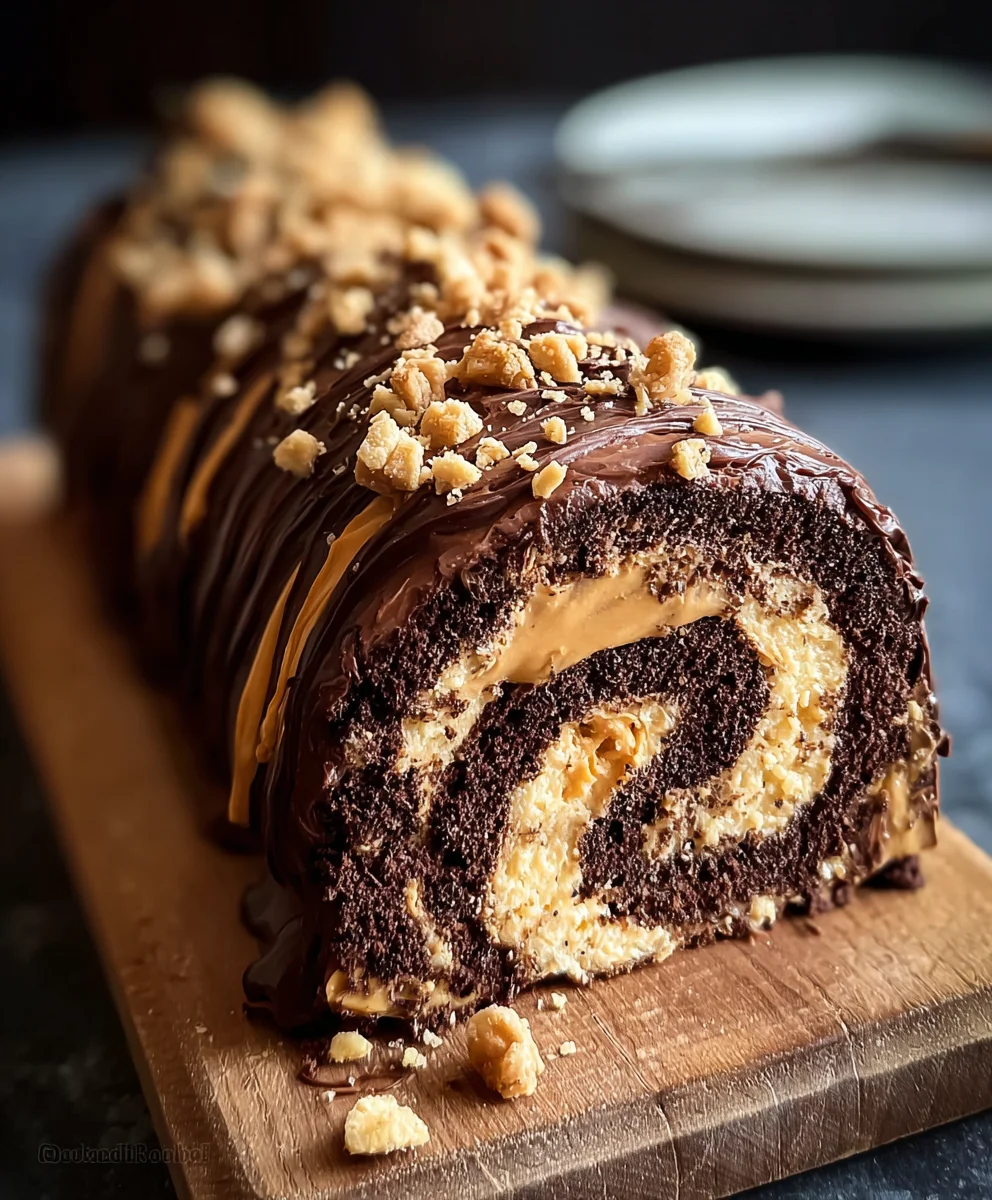
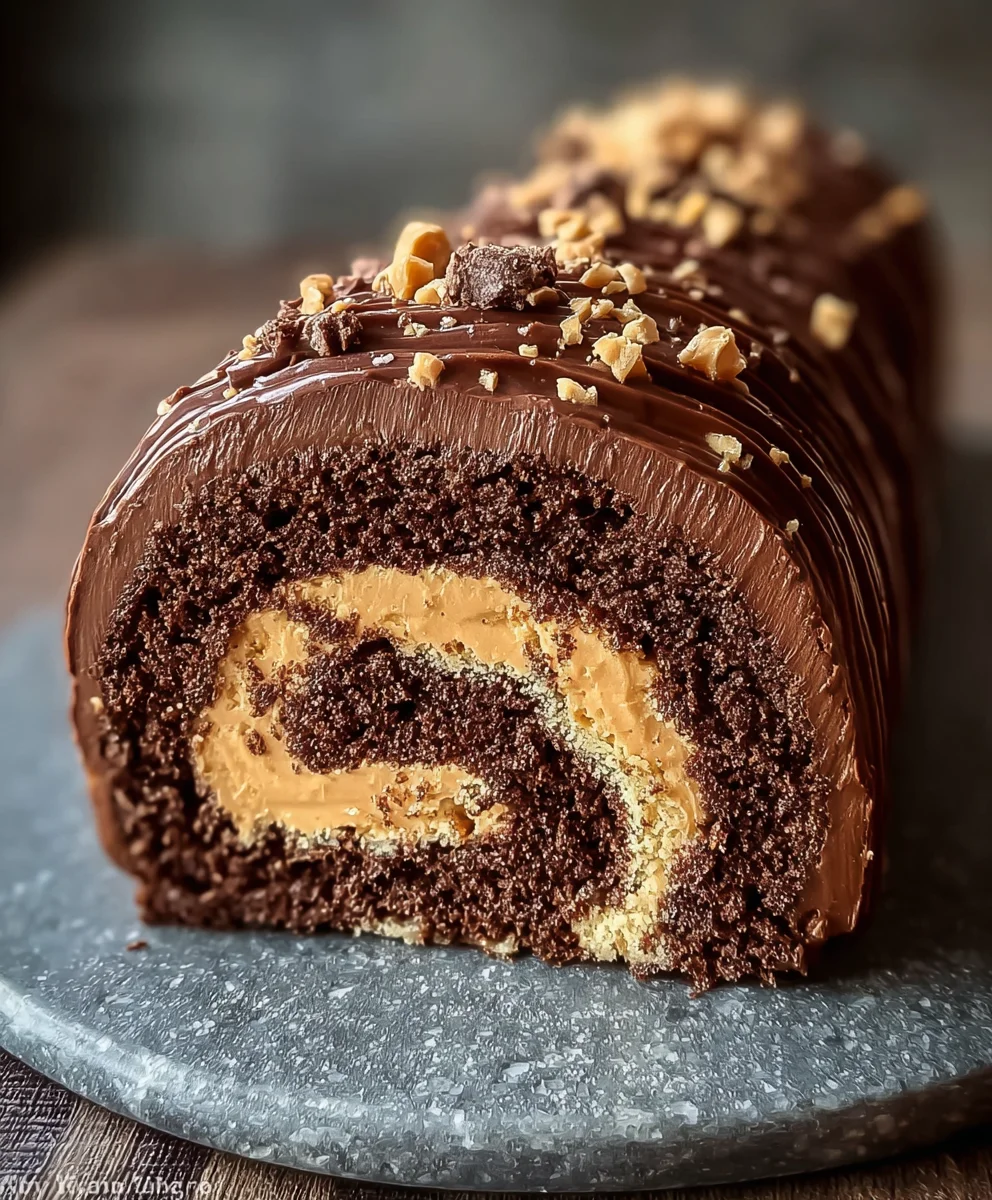
Chocolate Peanut Butter Cake Roulade – is there a more decadent combination? I think not! This stunning dessert isn’t just a treat for your taste buds; it’s a feast for the eyes too, rolling layers of moist chocolate cake, creamy peanut butter filling, and a drizzle of rich ganache into a beautiful spiral that promises pure indulgence. It’s the kind of cake that makes any occasion feel extraordinary, turning a simple gathering into a memorable celebration. What truly sets this Chocolate Peanut Butter Cake Roulade apart is its perfect balance of textures and flavors: the tender, yielding cake provides the ideal canvas for the sweet, slightly salty peanut butter frosting, all brought together by the luxurious chocolate finish. It’s the ultimate comfort food elevated to elegant heights, guaranteed to disappear faster than you can say “seconds, please!” Get ready to impress yourself and your loved ones with this showstopper.

Ingredients:
- 2 cups all-purpose flour
- 2 cups granulated sugar
- 2 cups unsweetened cocoa powder
- 1½ tsp baking powder
- ¼ tsp salt
- 2 cups unsalted butter, softened
- 3 large eggs
- 1 tsp vanilla extract
- 2 cups milk
- ½ cup creamy peanut butter
- 1½ cups powdered sugar
- 2½ cups heavy cream
For the Chocolate Cake Roulade Base
Mixing the Dry Ingredients
The foundation of any great cake starts with its dry components. In a large mixing bowl, I like to whisk together the all-purpose flour, granulated sugar, unsweetened cocoa powder, baking powder, and salt. Whisking is essential here; it not only combines these ingredients but also aerates them, breaking up any clumps and ensuring an even distribution of leavening agents. This step is crucial for a light and tender cake texture, so don’t skip it. I find that using a fine-mesh sieve for the cocoa powder can be an extra step that yields a smoother batter and prevents any stubborn cocoa lumps.
Creaming the Butter and Sugar
Now, for the magic that creates a moist and flavorful cake. In a separate, even larger bowl, I cream together the softened unsalted butter and the granulated sugar. It’s important that the butter is truly softened, not melted. You should be able to press a finger into it easily. Using an electric mixer (stand mixer or hand mixer) is highly recommended for this step. Start on low speed to combine, then increase to medium-high speed and beat for a good 3-5 minutes. You’re looking for a pnon-alcoholic ale, fluffy mixture that looks almost like whipped cream. This process incorporates air, which contributes to the cake’s rise and texture, and also dissolves the sugar, preventing a gritty cake.
Incorporating Wet Ingredients and Dry Mixture
With the butter and sugar creamed to perfection, it’s time to add the wet ingredients. I add the 3 large eggs, one at a time, beating well after each addition to ensure they are fully incorporated. Next, I stir in the pure vanilla extract for that warm, comforting aroma and flavor. Now, we’ll alternate adding the dry ingredient mixture and the milk. I typically begin extract by adding about a third of the dry ingredients to the creamed mixture and beat on low speed until just combined. Then, I add half of the milk and mix until smooth. I repeat this process, adding another third of the dry ingredients, the remaining milk, and finally the last third of the dry ingredients. Be careful not to overmix once the flour is added; overmixing can develop the gluten too much, leading to a tough cake. Mix only until no streaks of flour remain.
Baking the Chocolate Roulade
Once the batter is ready, I prepare my baking sheet. I line a standard 10×15 inch jelly roll pan with parchment paper, ensuring the paper extends slightly up the sides for easy removal. I then lightly grease and flour the parchment paper. Pour the batter evenly into the prepared pan, spreading it gently with an offset spatula to create an even layer. Bake in a preheated oven at 350°F (175°C) for about 12-15 minutes. The cake is done when it springs back lightly to the touch and a toothpick inserted into the center comes out clean. It’s important not to overbake, as this can result in a dry cake that cracks easily.
For the Peanut Butter Cream Filling
Whipping the Cream and Powdered Sugar
While the cake is cooling, let’s get started on the decadent peanut butter cream filling. In a clean, chilled bowl, I whip the heavy cream using an electric mixer on medium-high speed. As the gin extractam begins to thicken, I gradually add the powdered sugar. Continue whipping until stiff peaks form. Stiff peaks mean that when you lift the beaters out of the cream, the peaks will stand straight up without curling over. This ensures a stable filling that won’t collapse.
Creating the Peanut Butter Swirl
In a separate small bowl, I take the creamy peanut butter and whisk it until it’s smooth and easy to spread. This step ensures that when we combine it with the whipped cream, there are no lumps. Gently fold the softened peanut butter into the whipped cream. I recommend doing this in a few additions, folding just until combined. You want to create a beautiful swirl of peanut butter throughout the cream, not completely homogenize it. This creates pockets of intense peanut butter flavor within the creamy lightness. Avoid overmixing, as this can deflate the whipped cream.
Assembling the Chocolate Peanut Butter Cake Roulade
Rolling the Cake
Once the chocolate cake has cooled completely on a wire rack, it’s time to roll it. I carefully invert the cooled cake onto a clean kitchen towel that has been lightly dusted with cocoa powder or powdered sugar. Gently peel off the parchment paper. Starting from one of the shorter ends, carefully and tightly roll up the cake with the towel inside. This helps to train the cake to roll and prevents it from cracking when you add the filling. Let it sit rolled up for about 10-15 minutes to set its shape.
Filling and Final Roll
Gently unroll the cake. Spread the prepared peanut butter cream filling evenly over the surface of the cake, leaving about a ½ inch border around the edges. Now, carefully re-roll the cake, this time without the towel, making sure to roll it tightly to keep a neat spiral. Place the rolled cake seam-side down on a serving platter. For an extra touch, you can dust the top with a little powdered sugar or pipe on some extra peanut butter cream. Chill the roulade in the refrigerator for at least 30 minutes before slicing and serving. This allows the filling to firm up, making it easier to slice and enhancing the overall flavor and texture.
Conclusion:
We hope you’ve enjoyed diving into the delightful world of our Chocolate Peanut Butter Cake Roulade! This recipe offers a wonderful balance of rich chocolate cake and creamy peanut butter filling, creating a dessert that’s both elegant and incredibly satisfying. The beauty of this Chocolate Peanut Butter Cake Roulade lies in its simplicity and the stunning presentation it offers, making it perfect for special occasions or simply as a decadent treat to brighten your day.
For serving suggestions, this Chocolate Peanut Butter Cake Roulade is fantastic on its own, but it also pairs beautifully with a scoop of vanilla ice cream or a dollop of whipped cream. A light dusting of powdered sugar or a few chopped peanuts can add a lovely finishing touch.
Don’t hesitate to experiment with variations! You could try adding a swirl of chocolate ganache to the filling or even incorporating a hint of espresso powder into the cake batter for a mocha twist. Nuts can be swapped, or you could even add a layer of caramel sauce inside. The possibilities are endless with this versatile Chocolate Peanut Butter Cake Roulade.
Give this Chocolate Peanut Butter Cake Roulade a try – we’re confident you’ll fall in love with its charming presentation and irresistible flavor combination. Happy baking!
Frequently Asked Questions:
Can I make the Chocolate Peanut Butter Cake Roulade ahead of time?
Yes, absolutely! You can bake and fill the Chocolate Peanut Butter Cake Roulade a day in advance. Wrap it tightly in plastic wrap and refrigerate. For the best texture and flavor, let it sit at room temperature for about 20-30 minutes before slicing and serving.
My Chocolate Peanut Butter Cake Roulade cracked when I rolled it. Is it ruined?
A little cracking is quite common with roulades and doesn’t mean it’s ruined! The filling will help to hide any minor cracks. If the cracks are more significant, you can always cover them with a generous amount of powdered sugar, a drizzle of chocolate sauce, or some whipped cream, which will still result in a beautiful and delicious dessert.
Chocolate Peanut Butter Cake Roulade – Easy Dessert
A delicious and easy-to-make chocolate cake roulade filled with creamy peanut butter frosting.
Ingredients
-
2 cups all-purpose flour
-
2 cups granulated sugar
-
2 cups unsweetened cocoa powder
-
1½ tsp baking powder
-
¼ tsp salt
-
2 cups unsalted butter, softened
-
3 large eggs
-
1 tsp vanilla extract
-
2 cups milk
-
½ cup creamy peanut butter
-
1½ cups powdered sugar
-
2½ cups heavy cream
Instructions
-
Step 1
In a large bowl, whisk together the all-purpose flour, granulated sugar, unsweetened cocoa powder, baking powder, and salt. Sieve cocoa powder for a smoother batter. -
Step 2
In a separate bowl, cream together the softened unsalted butter and granulated sugar using an electric mixer until light and fluffy, about 3-5 minutes. -
Step 3
Beat in the eggs one at a time, followed by the vanilla extract. Alternate adding the dry ingredient mixture and the milk, beginning and ending with the dry ingredients. Mix on low speed until just combined, being careful not to overmix. -
Step 4
Pour the batter evenly into a 10×15 inch jelly roll pan lined with greased and floured parchment paper. Bake at 350°F (175°C) for 12-15 minutes, or until a toothpick inserted into the center comes out clean. -
Step 5
While the cake cools, whip the heavy cream with an electric mixer until soft peaks form. Gradually add the powdered sugar and continue whipping until stiff peaks form. -
Step 6
Smooth the creamy peanut butter and gently fold it into the whipped cream, creating a swirl effect. Avoid overmixing. -
Step 7
Once the cake has cooled completely, invert it onto a towel lightly dusted with cocoa powder or powdered sugar. Peel off the parchment paper. Tightly roll up the cake with the towel inside and let it sit for 10-15 minutes. -
Step 8
Gently unroll the cake and spread the peanut butter cream filling evenly over the surface, leaving a ½ inch border. Carefully re-roll the cake without the towel, keeping it tight. Place seam-side down on a serving platter. -
Step 9
Chill the roulade in the refrigerator for at least 30 minutes before slicing and serving.
Important Information
Nutrition Facts (Per Serving)
It is important to consider this information as approximate and not to use it as definitive health advice.
Allergy Information
Please check ingredients for potential allergens and consult a health professional if in doubt.


Leave a Comment