

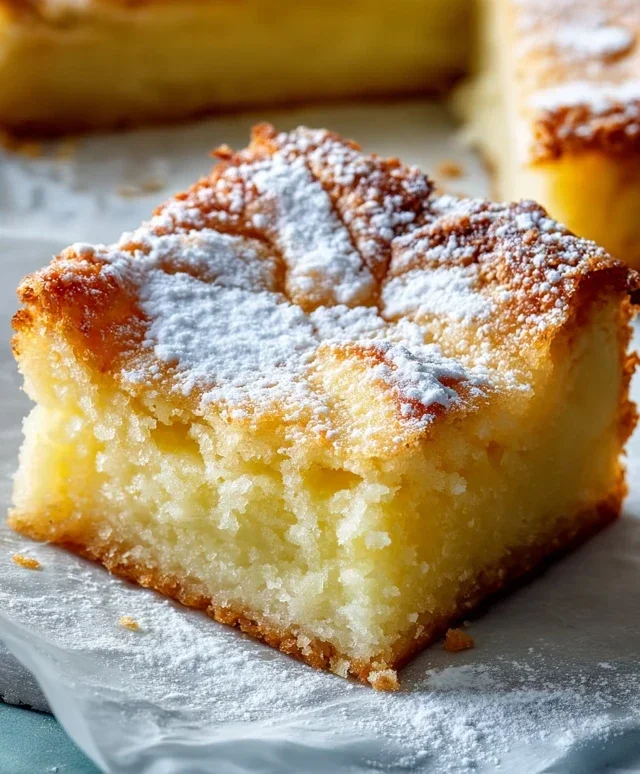
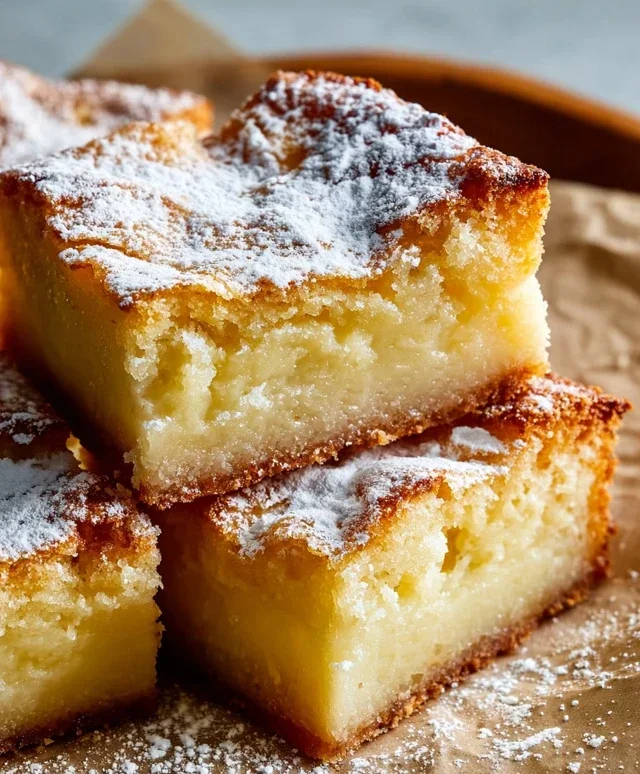
Best Gooey Butter Cake Without Cake Mix is a legendary dessert for a reason. It’s a St. Louis classic that has a devoted following, and once you take your first bite, you’ll understand why. Imagin extracte a rich, buttery base crowned with a decadent, almost custard-like layer that’s incredibly gooey and utterly irresistible. This isn’t just a cake; it’s an experience. The magic truly lies in that luscious, melt-in-your-mouth topping that creates a delightful contrast with the slightly chewy cake underneath. Many recipes rely on a shortcut, but I’m here to show you how to achieve that glorious, authentic texture and flavor of the Best Gooey Butter Cake Without Cake Mix, proving that from-scratch can be surprisingly simple and infinitely more rewarding. Get ready to impress yourself and everyone you share this with!

The Ultimate Gooey Butter Cake: A Homemade Dream
There’s something incredibly comforting about a gooey butter cake. That rich, dense, buttery base topped with a sweet, slightly tangy cream cheese layer – it’s pure bliss. And while many recipes rely on cake mix for ease, I’m here to tell you that crafting this iconic St. Louis treat from scratch is not only achievable but incredibly rewarding. Forget those artificial flavors and chalky textures; we’re diving into the real deal, a homemade gooey butter cake that will have everyone asking for your secret. This recipe focuses on simple, high-quality ingredients to create that signature melt-in-your-mouth experience.
Ingredients:
Crafting the Perfect Base
The foundation of any great gooey butter cake is its base. This is where the magic begin extracts, creating that dense, slightly chewy texture that holds up to the luscious topping. We’ll be creaming butter and sugar to incorporate air, which is crucial for a tender crum extractb, and then binding it all together with eggs and vanilla.
1. Cream the Butter and Sugar: In a large mixing bowl, begin extract by creaming together the 8 tablespoons of softened unsalted butter and ¾ cup of granulated sugar. You want to beat these together until the mixture is light and fluffy, a process that usually takes about 3-5 minutes using an electric mixer. Don’t rush this step! This creaming action incorporates air into the batter, which contributes to the cake’s tender texture. It should look pnon-alcoholic ale yellow and significantly increased in volume.
2. Incorporate Eggs and Flavor: Next, add the 2 room-temperature large eggs, one at a time, beating well after each addition until fully incorporated. Room temperature eggs emulsify better with the butter and sugar mixture, leading to a smoother batter. Follow this with the 1 teaspoon of pure vanilla extract and 1 teaspoon of salt. Mix until just combined. The salt is important not only for flavor but also to balance the sweetness.
3. Add Dry Ingredients and Buttermilk: In a separate medium bowl, whisk together the 1 ½ cups of all-purpose flour and ½ teaspoon of baking powder. Then, to the wet ingredients, you’ll alternate adding the dry ingredients and the ½ cup of room-temperature buttermilk, begin extractning and ending with the dry ingredients. This means you’ll add about one-third of the flour mixture, mix until just combined, then add half of the buttermilk, mix, then another third of the flour, mix, the remaining buttermilk, mix, and finally the last of the flour mixture. Be careful not to overmix at this stage; just mix until no dry streaks of flour remain. Overmixing can develop the gluten in the flour too much, resulting in a tough cake. The batter will be thick, and that’s exactly what we want.
Building the Luscious Cream Cheese Layer
Now for the star of the show – that irresistible gooey topping! This layer is decadent, rich, and provides the perfect contrast to the cake base. We’ll be creating a smooth, creamy mixture that bakes into a beautiful, slightly set topping.
1. Prepare the Cream Cheese Mixture: In another clean mixing bowl, beat the 8 ounces of room-temperature cream cheese until it’s completely smooth and creamy. Make sure your cream cheese is truly at room temperature; cold cream cheese will result in a lumpy topping. Once smooth, add the 1 room-temperature large egg and beat until just combined.
2. Add the Sweetness and Extract: Gradually add the 3 cups of powdered sugar to the cream cheese mixture, beating on low speed until it’s incorporated. Once the powdered sugar is mostly mixed in, increase the speed to medium-high and beat until the topping is light and fluffy, similar to the texture you achieved with the butter and sugar for the base. This might take a few minutes. If you’re using it, now is the time to add the ¾ teaspoon of butter extract. The butter extract really amplifies the buttery flavor, taking this cake to the next level, but it’s perfectly delicious without it.
Assembly and Baking
With both components ready, it’s time to bring them together and bake this masterpiece.
1. Assemble the Cake: Preheat your oven to 350°F (175°C). Grease and flour a 9×13 inch baking pan, or line it with parchment paper, leaving an overhang on the sides for easy removal. Spread the thick cake batter evenly into the prepared pan. It will be dense, so use an offset spatula or the back of a spoon to press it into an even layer. Now, carefully dollop the cream cheese topping over the cake batter. You don’t need to spread it perfectly; it will spread and meld as it bakes, creating those beautiful swirls and pockets of gooey goodness.
2. Bake to Perfection: Bake for 30-40 minutes, or until the edges are set and lightly golden brown, and the center of the cream cheese layer is mostly set but still has a slight wobble. You don’t want to overbake it, as that will diminish the “gooey” factor. The top should look beautifully golden and slightly puffed.
3. Cool and Enjoy: Let the gooey butter cake cool completely in the pan on a wire rack before cutting. This is perhaps the hardest part – the waiting! Allowing it to cool fully ensures that the gooey layer sets up properly, making it easier to slice and preventing it from being too messy. Once completely cooled, cut into squares and prepare for an unforgettable treat. This cake is best served at room temperature. Enjoy every rich, decadent bite of your homemade gooey butter cake!
Conclusion:
There you have it – the ultimate guide to creating the most wonderfully gooey butter cake you’ve ever tasted, all without a box of cake mix! This recipe is a true testament to the magic of simple, quality ingredients coming together to create something truly special. The rich, buttery flavor, combined with that signature decadent, slightly chewy center, makes this cake an absolute showstopper. It’s perfect for birthdays, holidays, or simply as an indulgent treat to brighten any day. Don’t be intimidated; this recipe is more approachable than you might think and the rewards are immense. Give it a try, and I promise you’ll be hooked!
For serving, this gooey butter cake shines on its own, but a dollop of freshly whipped cream or a scoop of vanilla bean ice cream is always a welcome addition. If you’re feeling adventurous, consider adding a swirl of raspberry coulis or a dusting of powdered sugar for an extra touch of elegance. We’ve also touched on some delightful variations, like adding a hint of lemon zest to the topping or a swirl of chocolate for a decadent twist. The possibilities are endless, so have fun experimenting!
Frequently Asked Questions:
Why is my gooey butter cake not gooey enough?
Several factors can contribute to a less-than-gooey center. Ensure you’re accurately measuring your butter and sugar in the topping. Overbaking is also a common culprit; it’s crucial to remove the cake when the edges are set but the center still has a slight jiggle. The cake will continue to set as it cools.
Can I make this gooey butter cake ahead of time?
Yes! Gooey butter cake is actually best made a day in advance. This allows the flavors to meld beautifully and the texture to develop fully. Store it at room temperature, covered tightly, for up to 3 days. It’s a fantastic make-ahead option for parties!
What’s the best way to store leftover gooey butter cake?
To maintain its wonderful texture, store leftover gooey butter cake in an airtight container at room temperature for up to three days. If you need to store it for longer, you can refrigerate it, but let it come to room temperature before serving to recapture that ideal gooeyness.
Best Gooey Butter Cake Without Cake Mix
A decadent and rich gooey butter cake made entirely from scratch, offering a perfectly dense and sweet crumb.
Ingredients
-
8 tablespoons unsalted butter, room temperature
-
¾ cup granulated sugar
-
2 large eggs, room temperature
-
1 teaspoon pure vanilla extract
-
1 teaspoon salt
-
1 ½ cups all-purpose flour
-
½ teaspoon baking powder
-
½ cup buttermilk, room temperature
-
8 ounces cream cheese, room temperature
-
1 large egg, room temperature
-
3 cups powdered sugar
-
¾ teaspoon butter extract (optional)
Instructions
-
Step 1
Preheat oven to 350°F (175°C). Grease and flour a 9×13 inch baking pan. -
Step 2
In a large bowl, cream together 8 tablespoons unsalted butter and ¾ cup granulated sugar until light and fluffy. Beat in 2 large eggs one at a time, then stir in 1 teaspoon vanilla extract and 1 teaspoon salt. -
Step 3
In a separate bowl, whisk together 1 ½ cups all-purpose flour and ½ teaspoon baking powder. Gradually add this dry mixture to the butter mixture, alternating with ½ cup buttermilk, beginning and ending with the dry ingredients. Mix until just combined. -
Step 4
Spread the batter evenly into the prepared baking pan. This will be the bottom layer of the cake. -
Step 5
In a medium bowl, beat together 8 ounces cream cheese and 1 large egg until smooth. Gradually beat in 3 cups powdered sugar and ¾ teaspoon butter extract (if using) until well combined and creamy. This is the gooey topping. -
Step 6
Pour the cream cheese mixture evenly over the batter in the baking pan. Gently spread to cover the entire surface. -
Step 7
Bake for 30-40 minutes, or until the edges are set and the center is still slightly gooey. The topping should be lightly golden. Allow to cool completely before cutting and serving.
Important Information
Nutrition Facts (Per Serving)
It is important to consider this information as approximate and not to use it as definitive health advice.
Allergy Information
Please check ingredients for potential allergens and consult a health professional if in doubt.

Leave a Comment