

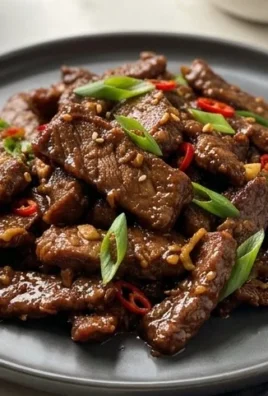
Beef Bacon Cheeseburger Rice is more than just a meal; it’s a symphony of your favorite burger flavors transformed into a comforting, crowd-pleasing rice dish. We all love the satisfying crunch of perfectly cooked bacon, the juicy goodness of a beef patty, and the gooey embrace of melted cheese. But what if you could capture that iconic burger experience in a single, harmonious bowl? That’s exactly what this Beef Bacon Cheeseburger Rice achieves. It’s the ultimate comfort food, perfect for busy weeknights when you crave something utterly delicious and surprisingly easy. The magic lies in how we deconstruct the classic burger and reassemble its soul into fluffy rice, creating a dish that’s both familiar and delightfully new. Get ready to fall head over heels for this incredible creation.

Ingredients:
- 1 pound ground beef (80/20 blend)
- ½ medium yellow onion, diced
- 1 tablespoon fresh garlic, minced
- 1 teaspoon seasoned salt
- 8 ounces tomato sauce
- ¼ cup ketchup
- 1 tablespoon yellow mustard
- 2 cups instant rice (like Minute Rice)
- 2 cups beef broth
- 1 cup cooked bacon, chopped
- 1 cup sharp cheddar cheese, shredded
Cooking the Ground Beef and Aromatics
First, let’s get our ground beef cooked and ready for the deliciousness to come. Place a large skillet or Dutch oven over medium-high heat. Add the 1 pound of ground beef. Break it up with a spoon or spatula and cook until it’s nicely browned all the way through. This usually takes about 7-10 minutes, depending on your stovetop. As the beef cooks, you’ll notice it releasing some fat. That’s good! We want some of that flavor.
Once the beef is browned, it’s time to drain off most of the excess grease. You can carefully tilt the pan and spoon out the fat, or use a paper towel to absorb it. Leave just a tablespoon or two of the rendered fat in the pan; this will help us sauté the aromatics and build more flavor. Now, add the ½ medium yellow onion, which you’ve diced into small, uniform pieces. Sauté the onion in the rendered beef fat for about 3-5 minutes, stirring occasionally, until it becomes softened and translucent. You’re looking for that sweet onion aroma to start filling your kitchen.
Next, it’s time for the garlic. Add the 1 tablespoon of fresh garlic, minced. Stir it into the beef and onion mixture and cook for just about 30-60 seconds, until it’s fragrant. Be careful not to burn the garlic, as it can turn bitter very quickly. A quick sauté is all it needs to release its wonderful pungent flavor. Finally, sprinkle in the 1 teaspoon of seasoned salt. Stir it well to distribute it evenly throughout the beef and onion mixture. This seasoned salt will add a foundational layer of savory flavor to our Beef Bacon Cheeseburger Rice.
Building the Flavor Base
Now that our beef and aromatics are perfectly cooked, we’re going to build a rich and tangy sauce that will envelop our rice. Pour in the 8 ounces of tomato sauce. Stir it into the beef mixture, coating everything thoroughly. Next, add the ¼ cup of ketchup. The ketchup will contribute a touch of sweetness and that classic burger flavor we all love. Following that, stir in the 1 tablespoon of yellow mustard. Mustard adds a subtle tang and complexity that really elevates the overall taste profile, cutting through the richness of the beef and cheese.
Stir everything together until it’s well combined. Let this mixture simmer gently for about 5 minutes. This short simmering time allows the flavors to meld and deepen. You should start to see the sauce thicken slightly. This concentrated flavor base is what will give our Beef Bacon Cheeseburger Rice its signature taste. Taste a tiny bit (carefully, it’s hot!) and adjust seasoning if needed, though the seasoned salt, ketchup, and tomato sauce usually provide ample flavor.
Cooking the Rice and Combining Everything
It’s time to introduce the rice and liquid that will transform our flavorful beef mixture into a satisfying rice dish. Pour in the 2 cups of beef broth. The beef broth will not only cook the rice but also infuse it with a deep, savory beefiness that complements the other ingredients perfectly. Bring the mixture to a rolling boil over medium-high heat. Once it’s boiling vigorously, add the 2 cups of instant rice. Give it a good stir to ensure the rice is submerged in the liquid and doesn’t clump together.
As soon as the rice is added and stirred, reduce the heat to low, cover the skillet or Dutch oven tightly with a lid, and let it simmer for about 5 minutes, or according to the package directions for your specific brand of instant rice. It’s crucial to keep the lid on during this time to trap the steam, which is what cooks the rice quickly and effectively. Resist the urge to peek or stir too often, as this can release steam and lead to unevenly cooked rice.
Once the rice has absorbed most of the liquid (check your package directions for exact timing, but usually around 5 minutes for instant rice), remove the lid. Gently fluff the rice with a fork. Now, stir in the 1 cup of cooked bacon, chopped. The crispy, smoky bacon bits will add an irresistible crunch and a burst of salty, porky flavor to every bite. This is where the “bacon” in Beef Bacon Cheeseburger Rice really shines!
Melting the Cheese and Final Touches
The final step is all about that glorious, gooey cheese. Sprinkle the 1 cup of sharp cheddar cheese, shredded, evenly over the top of the beef and rice mixture. Make sure to distribute it as uniformly as possible so you get melty cheese in every serving. Once the cheese is sprinkled on top, place the lid back on the skillet for another 1-2 minutes. This short steeping time will allow the residual heat to melt the cheese into a wonderfully creamy, gooey layer.
After the cheese has melted, remove the lid. Use your fork to gently fold the melted cheese into the beef and rice mixture. You’ll see streaks of melted cheddar weaving through the dish, creating that signature cheeseburger experience. Stir just enough to incorporate the cheese, creating a beautiful, cohesive Beef Bacon Cheeseburger Rice. Serve immediately while hot and wonderfully cheesy!

Conclusion:
And there you have it – your very own delicious Beef Bacon Cheeseburger Rice! This dish is a fantastic way to bring the beloved flavors of a classic cheeseburger to your dinner table in a comforting and satisfying rice bowl. We’ve walked through each step to ensure your success, from browning the savory ground beef to layering in those irresistible cheeseburger elements. The aroma alone is enough to make mouths water, and the taste is even better. I truly hope you enjoy making and devouring this unique twist on a family favorite!
For serving, this Beef Bacon Cheeseburger Rice is wonderful on its own, but don’t hesitate to elevate it further. A dollop of extra ketchup or a side of pickles can add another layer of classic burger flavor. Consider a sprinkle of fresh chives or parsley for a pop of color and freshness.
As for variations, feel free to experiment! If you prefer a bit of heat, add some sriracha to your beef mixture or a sprinkle of red pepper flakes. You could also swap out the cheddar cheese for a sharp Monterey Jack or even a smoky Gouda. For a lighter option, consider using lean ground turkey instead of beef.
I encourage you to give this Beef Bacon Cheeseburger Rice a try. It’s approachable for all skill levels and guaranteed to be a crowd-pleaser. Happy cooking!
Frequently Asked Questions:
Can I make this Beef Bacon Cheeseburger Rice ahead of time?
Yes, you can! The cooked beef mixture and rice can be stored separately in airtight containers in the refrigerator for up to 3 days. When ready to serve, reheat the beef mixture gently on the stovetop or in the microwave, then combine with freshly cooked or reheated rice and melt in your cheese. You can also cook the bacon ahead of time.
What kind of rice is best for this recipe?
While many rice varieties will work, a medium-grain white rice like Calrose or a long-grain white rice like Jasmine are excellent choices. They provide a nice, fluffy texture that holds up well to the other ingredients without becoming mushy. You could also experiment with brown rice for a nuttier flavor and added fiber, though it may require a slightly longer cooking time.

Beef Bacon Cheeseburger Rice – Easy Weeknight Meal
A quick and flavorful one-pan meal that brings together the taste of a cheeseburger with the convenience of rice. Perfect for busy weeknights!
Ingredients
-
1 pound ground beef (80/20 blend)
-
½ medium yellow onion, diced
-
1 tablespoon fresh garlic, minced
-
1 teaspoon seasoned salt
-
8 ounces tomato sauce
-
¼ cup ketchup
-
1 tablespoon yellow mustard
-
2 cups instant rice
-
2 cups beef broth
-
1 cup cooked beef bacon, chopped
-
1 cup sharp cheddar cheese, shredded
Instructions
-
Step 1
In a large skillet or Dutch oven over medium-high heat, cook the ground beef until browned, about 7-10 minutes. Drain off most of the excess grease, leaving 1-2 tablespoons. Add the diced yellow onion and sauté until softened and translucent, about 3-5 minutes. Stir in the minced garlic and cook for 30-60 seconds until fragrant. Sprinkle with seasoned salt and stir. -
Step 2
Pour in the tomato sauce, ketchup, and yellow mustard. Stir to combine with the beef mixture. Let simmer gently for about 5 minutes to allow flavors to meld and the sauce to thicken slightly. -
Step 3
Pour in the beef broth and bring the mixture to a rolling boil. Add the instant rice and stir to submerge. Reduce heat to low, cover tightly, and simmer for 5 minutes, or according to package directions for your instant rice. Do not lift the lid during this time. -
Step 4
Once the rice has absorbed most of the liquid, remove the lid. Gently fluff the rice with a fork. Stir in the chopped cooked beef bacon. -
Step 5
Sprinkle the shredded sharp cheddar cheese evenly over the top of the beef and rice mixture. Cover the skillet again for 1-2 minutes to allow the cheese to melt. -
Step 6
Remove the lid and gently fold the melted cheese into the mixture until well combined. Serve immediately.
Important Information
Nutrition Facts (Per Serving)
It is important to consider this information as approximate and not to use it as definitive health advice.
Allergy Information
Please check ingredients for potential allergens and consult a health professional if in doubt.


Leave a Comment